

The new challenge is up over at Heart 2 Heart Challenges is up! This one is all about the embellishments! This could be taken so very many different ways! At first, I was going to do a shaker card, and then, as the card was coming together, it ended up being totally different! I love how it turned out, don’t you?
For this card, I started with the window thin cuts. Everything except the shutters have four layers of White Daisy Cardstock, the top and bottom have a layer of Charcoal Cardstock, and the shutters have a layer of Pewter Cardstock. I have a piece of acetate between two layers of the window, so that I could have some “glass” in my window frame!
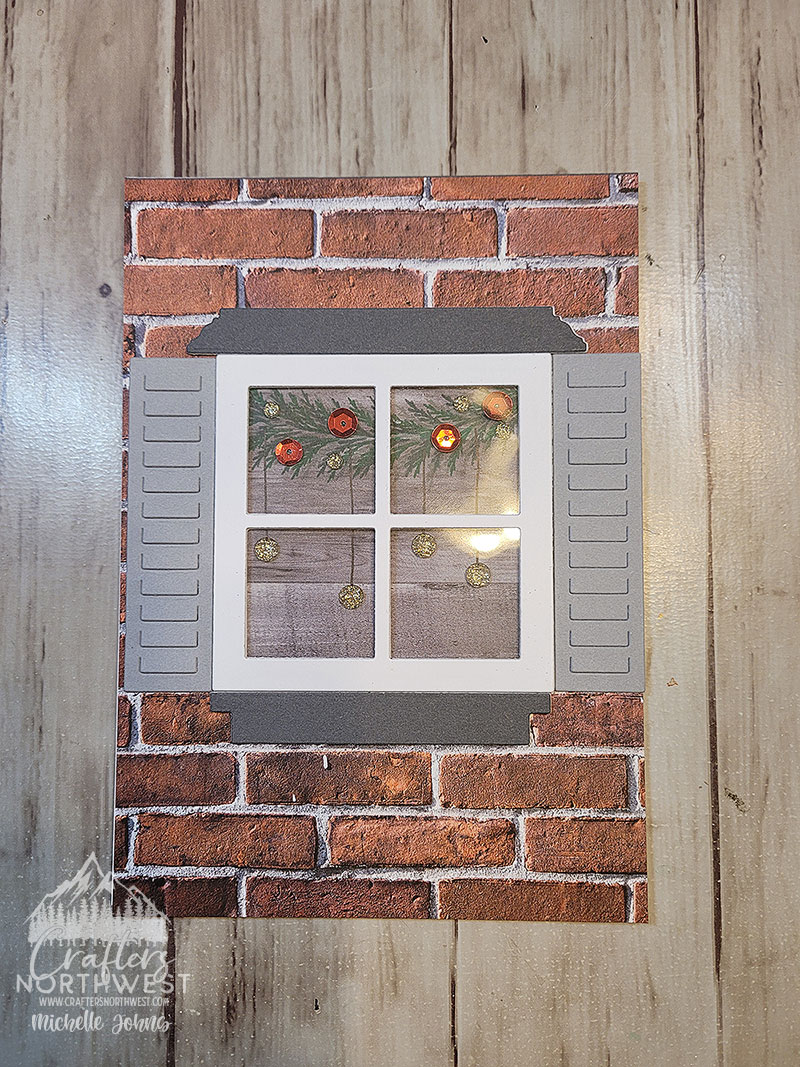
I ended up stamping on a piece of the Wood Texture Paper (from the Wood Grain Paper Packet, and I love how much depth it gives it! I used two of the little sprigs from the Serenity Cardmaking Stamp & Thin Cuts. and put them on two 1″ x 1″ blocks. I used Sage, Clover, and Evergreen inks for the foliage.
I added red sequins from the Holiday Loose Sequins (that are still available online!) with the , then some of the tiny gold glitter gems on the garland. I decided it still needed a bit more, so I added a few lines with my black .05 journaling pen, then I added the larger gold gems to the end of those lines.
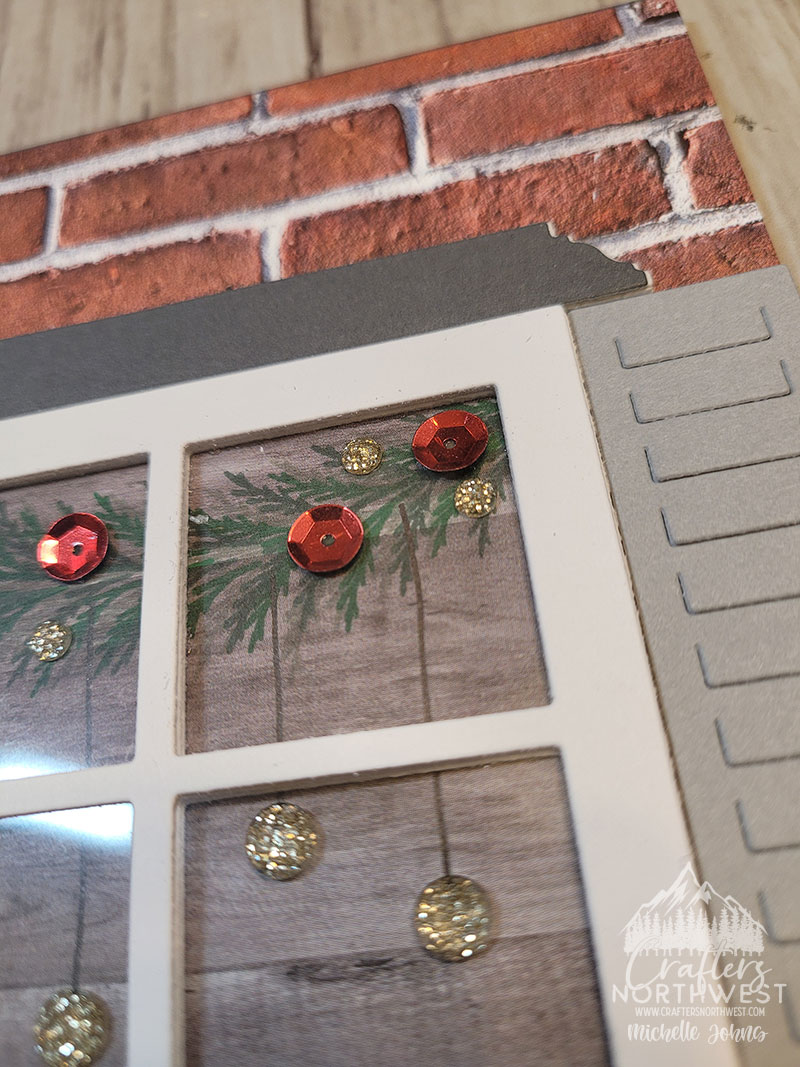
Of course, the outside of the house needed to have something on it, we couldn’t have it be just plain white! So, I grabbed a sheet of the brick texture paper from the textures paper pack. These bricks work perfectly!
I used Liquid Glass to adhere everything except the sequins, and for those I used Tombow Multi Bond Glue.
The card is a 5×7 card that I made from White Daisy Cardstock. Though not shown, the inside reads “For You With Love”, from the For All Occasions stamp set. I used a 2″ x 2″ block for that, and combined the two sentiments onto one block.
I would love to know what you think about this card! For every share of this blog post, and comment on this post, and comment on the Facebook post with this card, you will be entered into a drawing for me to send this card to you, for you to be able to use to send to someone! (or keep for yourself!) I will draw a winner on December 11th! And, if you have made it this far, if you put a penguin emoji in your comment (here or on facebook) you will receive 2 entries!
Thanks for stopping by! I hope that between myself and the other ladies, you have been inspired to join us over at Heart 2 Heart Challenges! You have until the end of the month to participate! I hope to see you over there!
~Michelle
Welcome to the September Technique Blog Hop! This month is all about a window of some sort! I know there will be LOTS of great ideas on this hop, so make sure to visit everyone! (and make sure to leave some love along the way! EVERYONE loves to hear how much their creation resonates with others!) Today, you may have come from Lauren’s blog, or you may have started here. Either way, it will be a big circle, so you will eventually end up back here!
Today I did a fun peek a boo card, with a new technique that I hadn’t tried yet, and it was fun! Let’s take a look at the front, first, shall we?
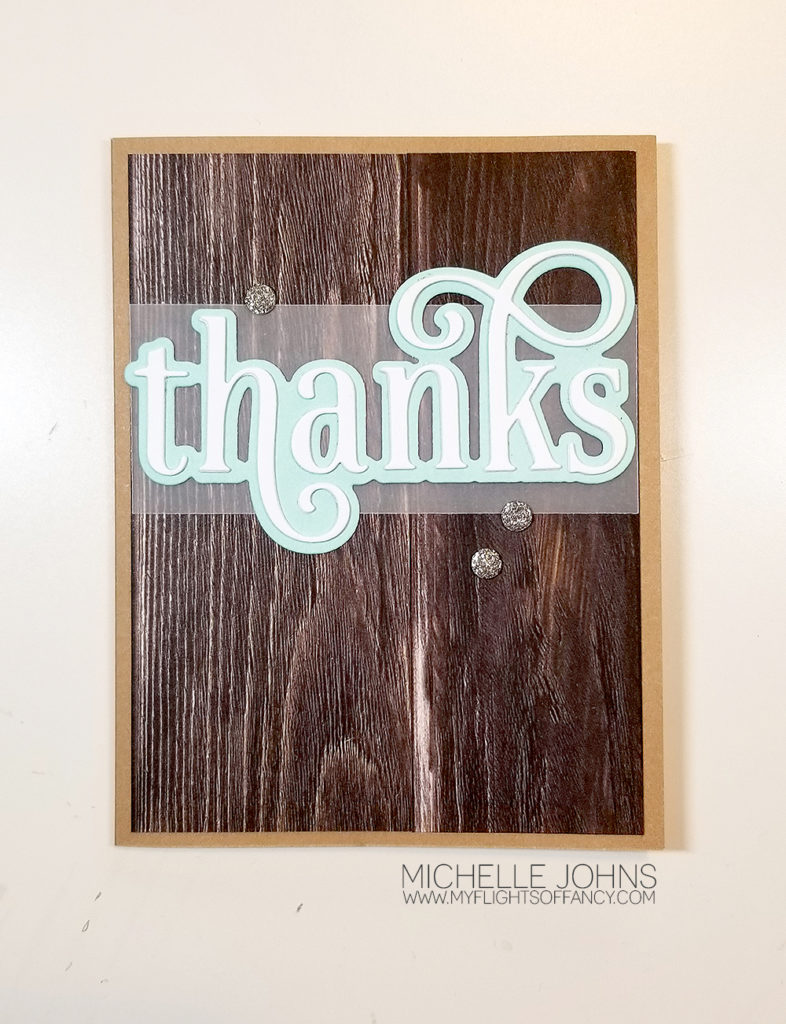
I am IN LOVE with the wood paper packet! This is just one of the papers from the packet! It is actually a plank looking piece, so, I did some fussy cutting to be able to have it look like a solid piece (though, maybe not quite so much in person!)
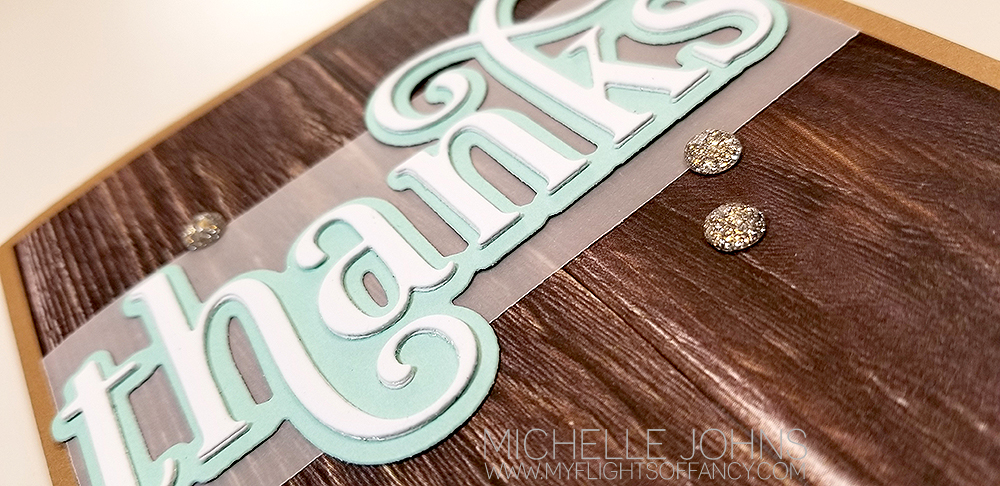
That Thanks die cut is fabulous, isn’t it? That is new too! I cut three layers from White Daisy Cardstock, and the shadow layer from Mint Cardstock. Then layered them with the liquid glass, that I LOVE so much! I attached them on top of a piece of vellum with some micro glue dots. I finished fancy-ing up the card with some gold glitter gems.
Now, let’s take a look at the inside, shall we?
Oh my goodness! Isn’t that fantastic?!?! SOOOOOOOO much fun!
![]()
I used the From the Funny Farm stamp set for the adorable little birdie! I stamped it in the intense black ink and then colored with the Ice Blue Blend Tri tip marker. I used the circle thin cut from the card spinner die set for the little cut out for the bird.
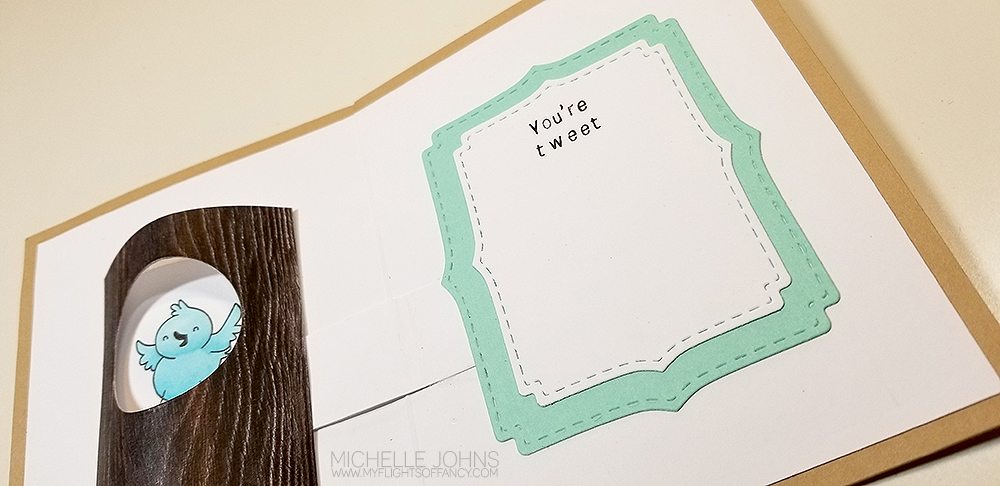
The sentiment side uses the Stitched Fancy Brackets dies, in both White Daisy and Mint Cardstocks. I stamped the sentiment with the Teeny Tiny Type alpha set.
I hope you leave a bit of love for me! Then, off to another Michelle’s blog! 😉
Thanks so much for stopping by!!
In case you get lost along the way, here are all of the blogs this hop!
Melissa
Cat
Maz
Lauren
Michelle J. You Are Here!
Michelle L.
Brandi
Katy
Alyson
Miss. Carrie’s Creations
Welcome to another H2H challenge! This week’s challenge is all about “Wood”! I know we have some great examples for you this week!
Today, I have some Timber paper that has moved to the Online Only portion of our websites, but I do love the wood paper on it so much! (I was going to use a new product, but it hasn’t arrived yet!)
These cards come from my Cards for Guys class (with NO stamping!)! They are SUPER fun! I loved putting them together! In this class you have two cards per basic design, however each card is just a bit different. And, did you see, NO STAMPING! Incredible, right??
Now, after you see these cards, you will have to let me know which is YOUR favorite!

As you can see, these cards have the same basic set up, however are very different in looks! I used one brad and a bit of silver embellishing thread for the left one, and some extra foam tape and a wood arrow from the Wooden Arrows Assortment.
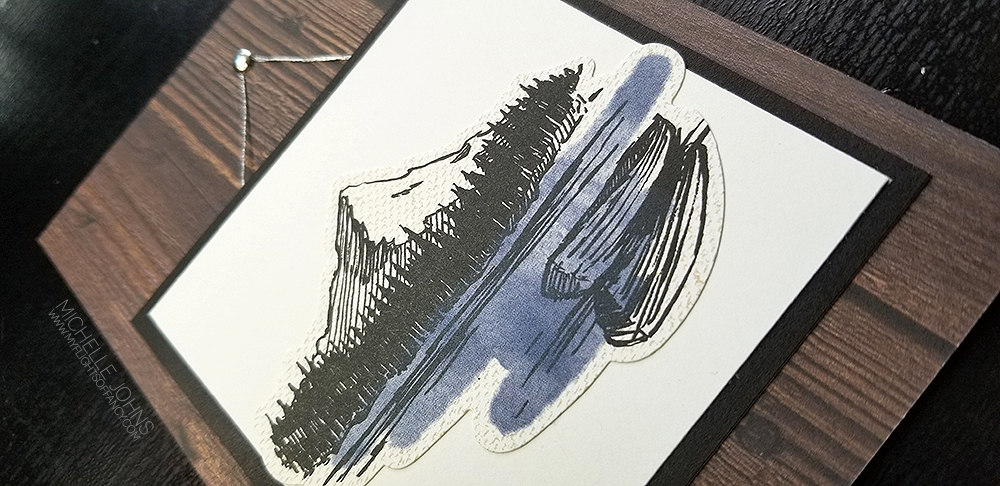
I did cut the mountain sticker a bit, so that it would fit in the ‘photo frame’, but I don’t think it’s terribly noticeable, do you?
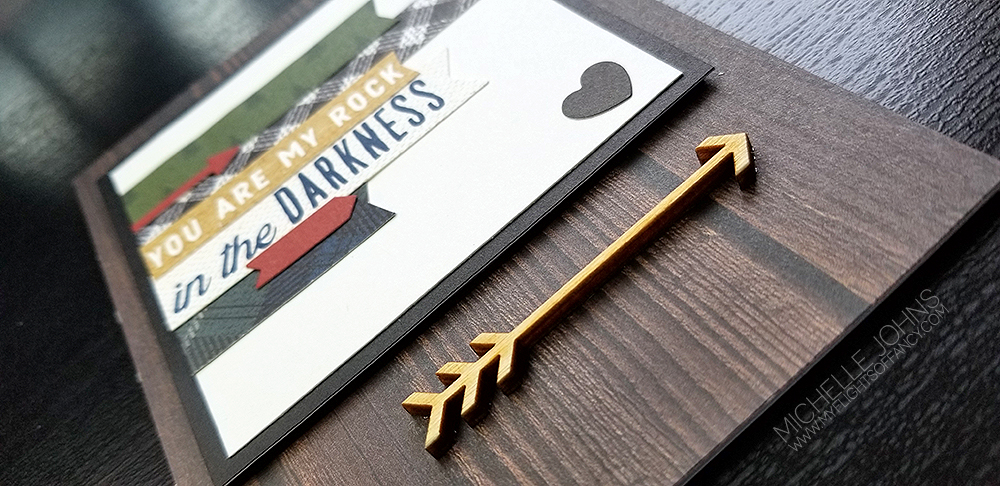
Look at that wood paper! It totally looks like it has dimension, itself! (it doesn’t, but it looks like it does!)
So, tell me, which “Wood you rather?” 😉
I would love it if you left me a comment! Then, play along with the challenge! You have the whole month to do so!
More info on the class coming shortly, so make sure to watch for it!
Welcome to May and National Scrapbook Month! Every May, it is National Scrapbooking Month. So many companies and people and groups do all sorts of celebrations! Close to my Heart has a special for May, however that is not what I am showing you today! Today I am using the Sweet Girl Workshop Your Way to show you this super fun layout page.
I host a crafting retreat every year, and this year we happened to be at the beach on National Scrapbooking Day! It’s fantastic! I have always loved the beach, and totally wanted to incorporate the beach into my page. While I could have added sand to the page with my liquid glass, I didn’t . . . this time!
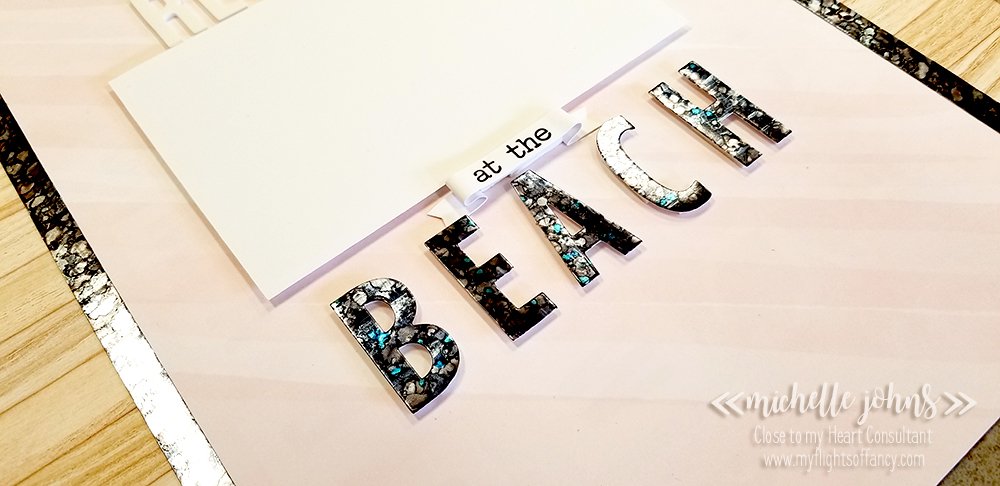
Most of the time, I plan plan plan before I cut anything. This time, I saw a layout on Pinterest, and fell in love! I just HAD to create it with the papers that I had! SO this fun, one page layout was created! I cut 3/4 x 1 1/2 inch strips from the center of the wood grain paper in the Sweet girl, then inked the edges with Almond ink and a sponge dauber. The SUPER fun part was the silver pieces! These look JUST like the inside of a seashell that you can find here on the Pacific Coast.
To do it, I started with the technique that I shared earlier this summer. (you can see that one here) So, you start with silver foil paper, then cover the whole thing with Black Shin Han Alcohol marker. Then you take an alcohol prep pad, and lightly go over it, removing some of the ink. It will look very grungy at this point. Then, you go back over it and dot the whole thing with the black marker, then the Warm Grey 7 marker, and then the Warm Grey 4 marker. Just dotting all over the place! (I used the chisel end for all of the dotting process) Then I went over with the Turquoise Blue marker, dotting here and there again, but sparingly this time. (I made sure to scribble off all of the color that it picked up, before I put it away again.
I let it dry for a bit, and then cut out the letters for BEACH out with the Block Letters Alphabet Thin Cuts, and paired it with the White Alphabet Foam Stickers and a banner that was stamped with the Modern Typewriter Alphabet stamp set. I know you can’t tell so much in the first picture, but I am hoping you can see how much shine comes through in the second picture. It turned out SO GREAT!!
I am going to put the group photo on this page for our retreat, and start an album for just those pages (which I have a few to get caught up on!). I am so please with this whole thing!
Thanks so much for stopping by! I do hope you liked my page! I would love it if you left a comment for me below, letting me know what you think! After that, head on over to the Heart 2 Heart Challenge blog, and play along with their challenge! The scrapbooking challenge is up until the end of the month, so you will have a lot of time to join us on this one!
Welcome to another week, and another challenge at H2H! (Heart 2 Heart Challenges) This week, we are focusing on Sweet Treats. Now, this could mean so very many things, but I think you will agree with me, in that it ‘should’ be candies or cookies or maybe even cupcakes or brownies! (or maybe even kek, as a friend and I joke!)
So, this week, I have a fun little box, using the September SOTM, of course, because that thing is my favorite SOTM, like EVAH!!
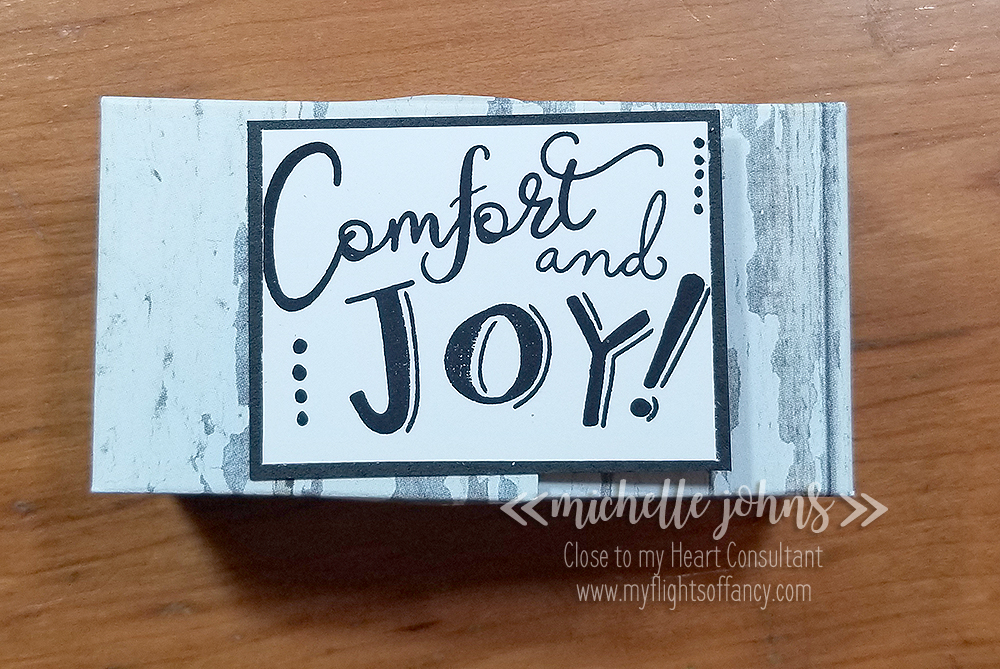
Now, from the top, it doesn’t look like much, I know. But from the side, it’s super cute! I didn’t get a photo of it open, but I can assure you, that it includes candy!! And while this little box is little, it can sure hold a LOT of candy!!
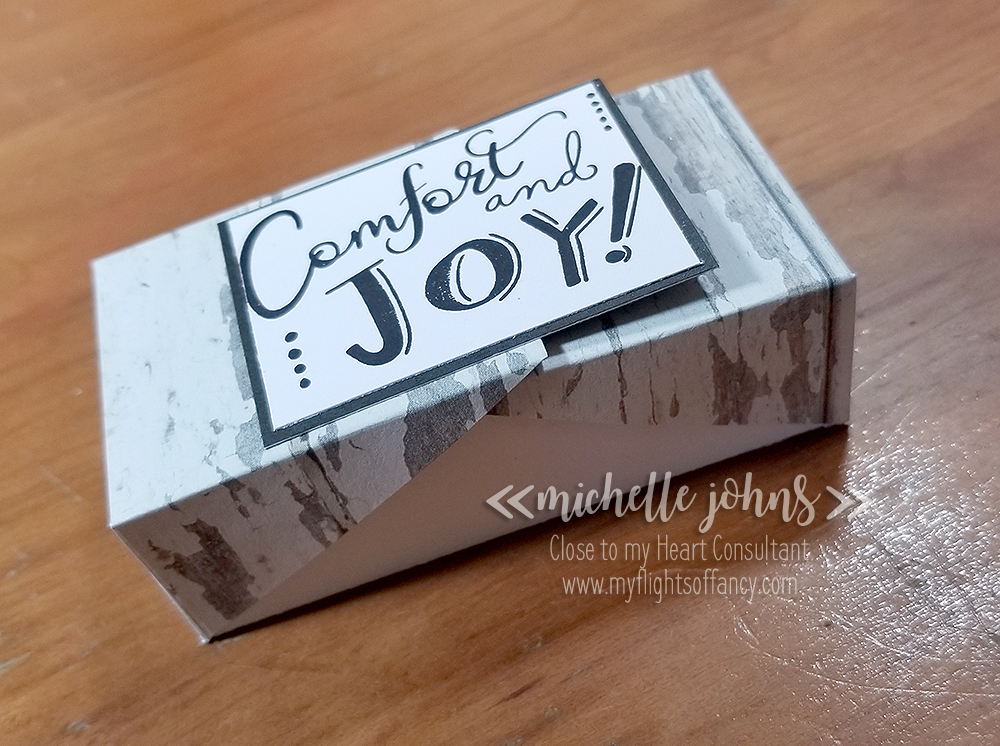
If you didn’t know, I do a facebook live every Sunday morning (well, morning for me, anyway!). During my last FB live, I made this adorable box! So, go on over to my fb page and take a look at the video! You can even watch a few of my past videos too! If you like what you see, I would love for you to like my page too!
Let me know what you think of my little box! Did you go and watch the how to video? I’d love to see your little box, too!
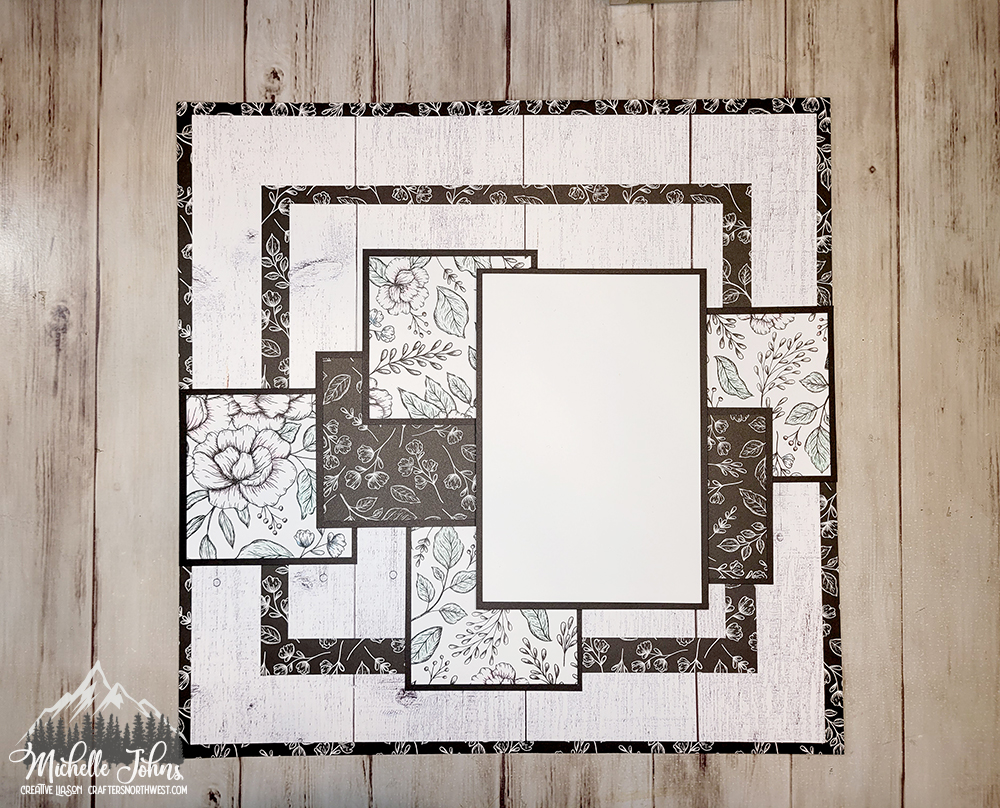
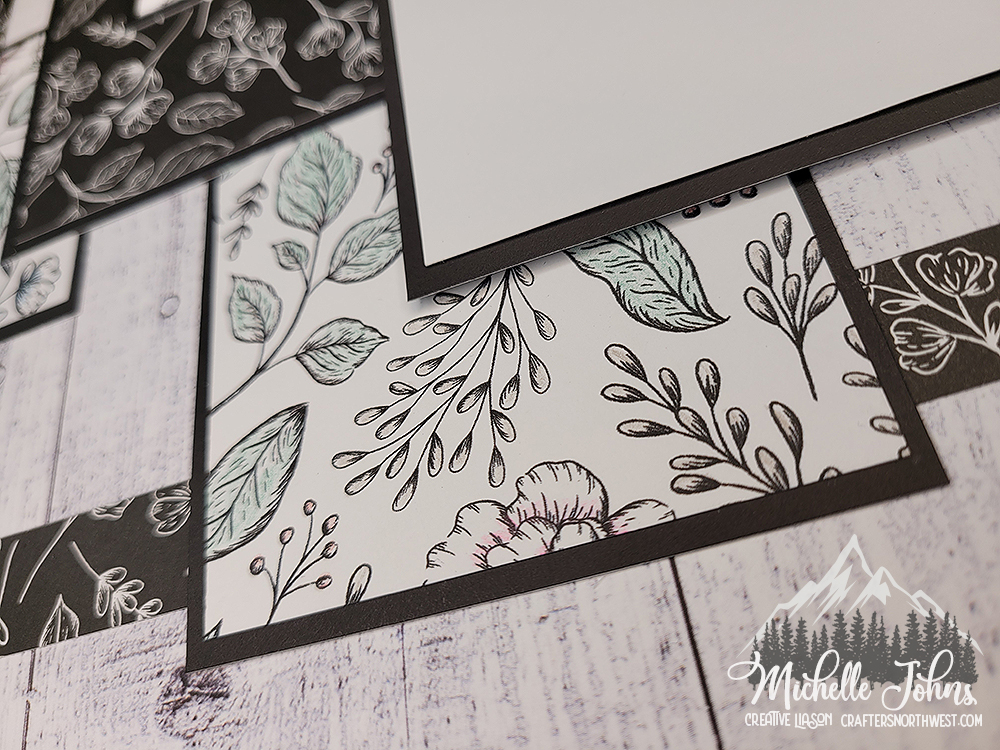
Supplies Used:
White Daisy Cardstock
Seasonals Mix In Paper Pack
Black Cardstock
September Stamp of the Month
Archival Black Ink
3×3 Acryllic Block
Fiskars Trimmer
Liquid Glass
Non Stick Micro tip Scissors
Bone Folder
Embossing Stylus
Martha Stewart Scoring Board
Subscribe to my monthly newsletter & daily blog updates in the sidebar.
Join My Craft with Heart Club.
Earn FREE products by joining my Princess Club.
Check out the clearance rack and save up to 70%.
The $75 New Consultant Kit is the best deal of ALL! Discounts & benefits here.
Find me on Facebook Page where I share videos and specials
Join my Facebook Group. Prizes and fun interaction!
Follow me on Pinterest.
Subscribe to my YouTube channel with video tutorials.