Tag Archives: Treat

Gifts from the Heart with H2H

Have you been watching the Crafting with Santa series?  It happens every Wednesday on my FB page.  Santa joins me and we craft a little something, that is a surprise to him until right then!

This last week we made these adorable little treat holders!  I even shared the design space file for it!  Makes it even easier!


The red and pink ones were the samples, and we made the green ones in the video!  I love how well they turned out!  Head over and watch the video and join in on the crafting with Santa!

Cutting it Close!

Welcome to 2020 and the challenges that H2H are doing! I missed last week’s challenge, but I’m back in the saddle with this one! This week’s challenge is all about cutting things close! You can fussy cut, cricut cut, or like me, use some die cuts!

This was the fun candy treat that my crop ladies got at the last crop. They were super simple to put together, some random stamping, and coloring!

I just cut my paper to be the same width as my cello bag, and created a bottom and backing for it. Then used some B&T to make the top pretty too!

I die cut and stamped my images. Then I used our water colors to paint each of the flowers. Then some of the flowers were colored again with a shimmer brush. Then, I stamped each of the die cuts again, so that the outlines were nice and brisk!

Isn’t it so pretty?? I love how it turned out!

Here are the things that I used:
White Daisy Cardstock
Spruced Up Cardmaking Workshop stamp & Die
Mix In Paper Packet
Watercolors
Water brush
Archival Black Ink
Canary Ink
Eggplant Ink
Charcoal Ink

Thanks for stopping by! Now, head over to the H2H challenge blog and see what some of the other ladies have got to show you, and maybe even consider playing along!

Pages & Projects: 1 Year Thanks Bags

Hey everyone! My friend Danielle and I are doing a number of things this month, to help challenge each other to be better, and one of the things that we are doing is a series of videos on Thursdays that will be Pages & Projects. We will alternate each week what we do, so you should make sure to come and check out the videos each week! You can find her project here.

That being said, this week I am starting off with a thank you project for some of the doctors and nurses we had when Audrey was in the hospital last year. This weekend is her One Year anniversary of getting to come home! So, we will be delivering some of these fun little bags on Sunday!


{Can’t see the video in email? Click here to watch!}

I hope you enjoy the video, even my oops, and my fix for it! I left that all in for you, so you can see that EVERYONE does the oops, and generally it is fixable with a bit of thinking!

I would love to know what papers you would use, and who you would give a little bag like this to!

Project sizes:
White Daisy:
4 x 12 scored at 5 1/2 & 11
4 x 10 scored at 5 1/2 & 7
5 1/4 x 4 1/4 scored at 1 3/4 on all sides

B&T Pieces
3 3/4 x 5 1/4 (qty 3)
3 3/4 x 2 3/4

Charcoal Cardstock
2 x 5 1/4

Shaker Thin Cuts:
Largest circle in White Daisy
Stictched Frame in Charcoal

Products used:
Into the Wild paper packet
White Daisy Cardstock
Charcoal Cardstock
Charcoal Ink
Simply Said Stamp Set
Shaker Window Thin Cuts
White Ribbon
Micro Tip Scissors
3-D Foam Tape
Liquid Glass

Sweet Treats

Welcome to another week, and another challenge at H2H! (Heart 2 Heart Challenges) This week, we are focusing on Sweet Treats. Now, this could mean so very many things, but I think you will agree with me, in that it ‘should’ be candies or cookies or maybe even cupcakes or brownies! (or maybe even kek, as a friend and I joke!)

So, this week, I have a fun little box, using the September SOTM, of course, because that thing is my favorite SOTM, like EVAH!!

Now, from the top, it doesn’t look like much, I know. But from the side, it’s super cute! I didn’t get a photo of it open, but I can assure you, that it includes candy!! And while this little box is little, it can sure hold a LOT of candy!!

If you didn’t know, I do a facebook live every Sunday morning (well, morning for me, anyway!). During my last FB live, I made this adorable box! So, go on over to my fb page and take a look at the video! You can even watch a few of my past videos too! If you like what you see, I would love for you to like my page too!

Let me know what you think of my little box! Did you go and watch the how to video? I’d love to see your little box, too!

Supplies Used:
White Daisy Cardstock
Seasonals Mix In Paper Pack
Black Cardstock
September Stamp of the Month
Archival Black Ink
3×3 Acryllic Block
Fiskars Trimmer
Liquid Glass
Non Stick Micro tip Scissors
Bone Folder
Embossing Stylus
Martha Stewart Scoring Board

Did you enjoy what I had to share today? If so, please . . .

Subscribe to my monthly newsletter & daily blog updates in the sidebar.
Join My Craft with Heart Club.
Earn FREE products by joining my Princess Club.
Check out the clearance rack and save up to 70%.
The $75 New Consultant Kit is the best deal of ALL! Discounts & benefits here.
Find me on Facebook Page where I share videos and specials
Join my Facebook Group. Prizes and fun interaction!
Follow me on Pinterest.
Subscribe to my YouTube channel with video tutorials.

August SOTM – For the Love of Crafting

Welcome to the August Stamp of the month Blog hop! This month we have almost 30 consultants sharing ideas with you about how to use this fantastic stamp set! It is suuuuper fun! Today you should have arrived here from Debi’s blog, but if not, that’s ok, it’s a big circle, and you will get back around to her!

Take a look at all the fun stamps in this set!

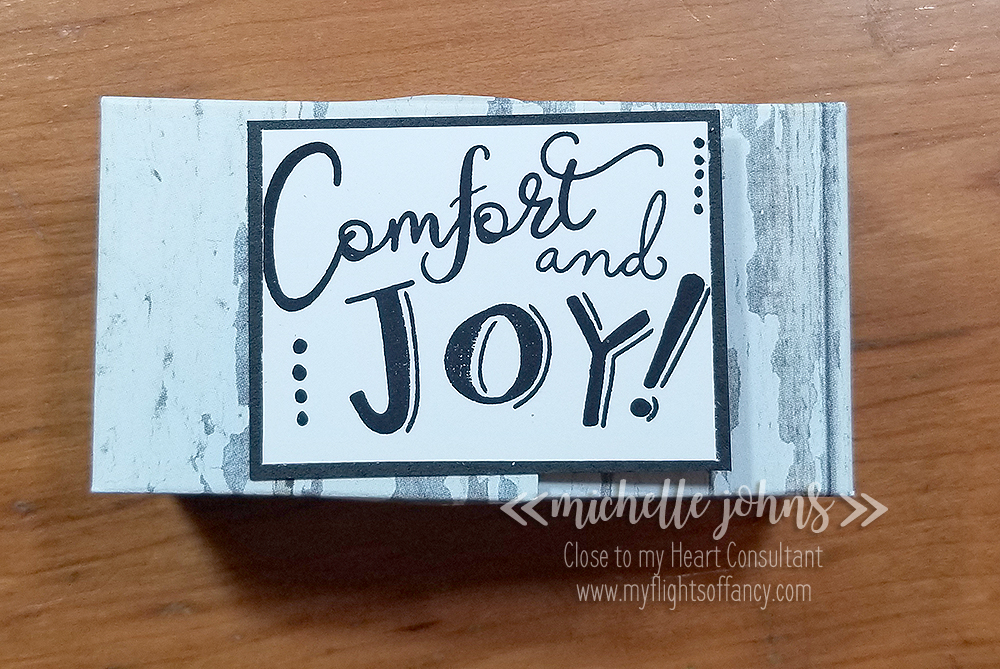
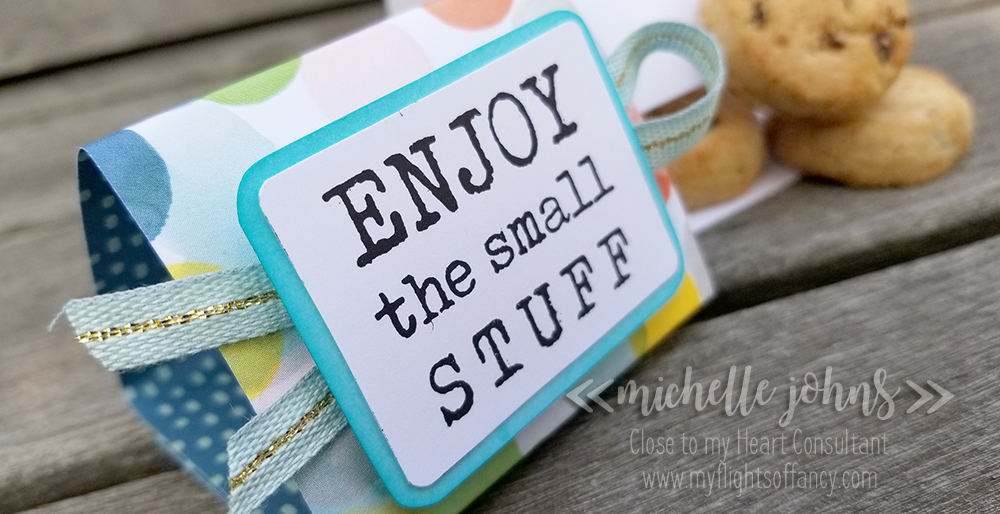
While I was trying to decide what to make for this fun blog hop, I looked over and saw the package of mini chips ahoy cookies, and I thought that would be perfect match with the “Enjoy the small stuff” stamp in the set.

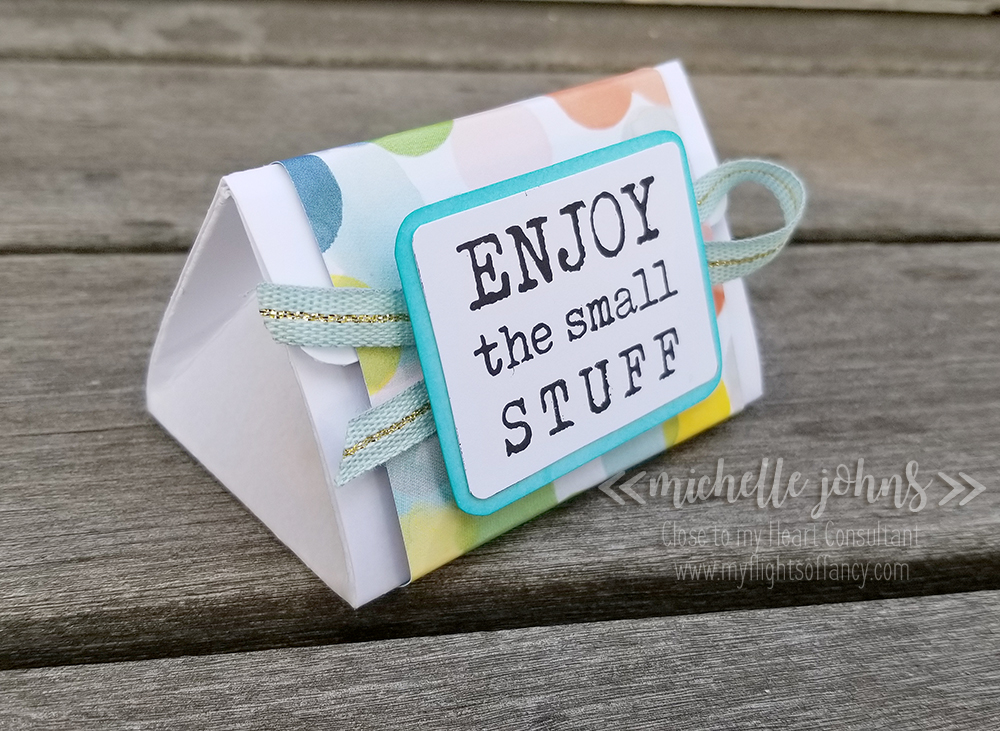
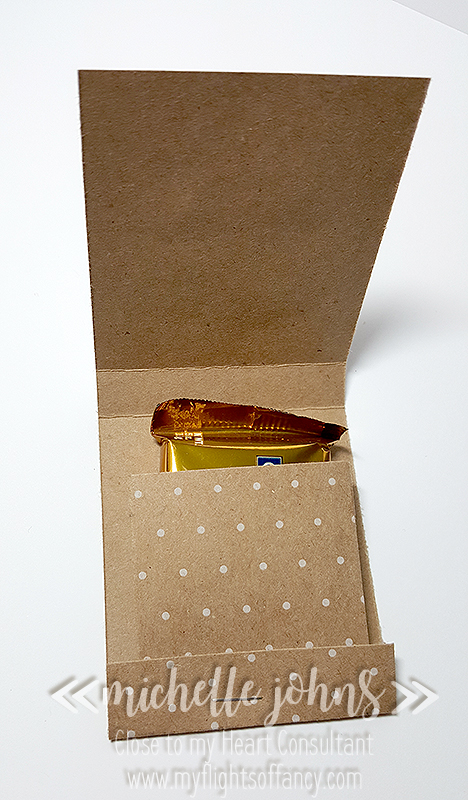
If you don’t know already, I am enamored by Sam of Pootles Papercraft. She has TONS of videos on how to make fantastic little boxes for all sorts of things. So, that was the first place that I went to to try to find a little box for these cookies! I found one, and decided to make it a bit smaller (you know, to go with the whole “small stuff” theme!)

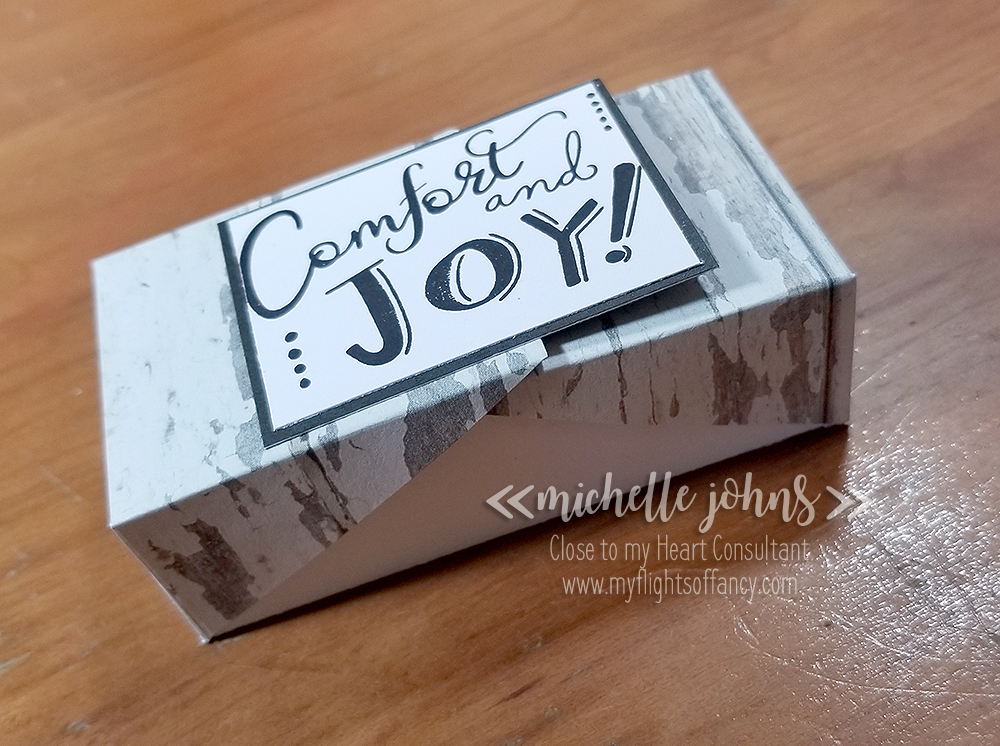
So, it’s this cute little triangle box, with a Central Park paper wrapper. One side tucks in, and the other folds over.

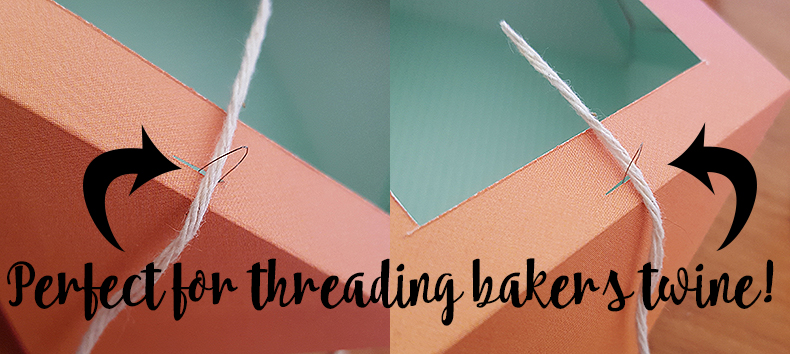
I don’t have access to all of my tools and stamps, as I am staying at the hospital with my youngest. That means I work with what I have. Sam uses a small punch to put a finger hold in the part of the box that tucks in. I don’t have that with me, so I decided to add a little bit of ribbon with the mini stapler, to be able to pull the box open.

Since I do have a super small stash of things with me, I do only have the black archival ink with me, but wanted a bit of color around the sentiment. So, I ‘cheated’! I stamped the image once in the archival black, then stamped again with 2nd generation on my white daisy cardstock. I cut out both images with my micro tip scissors. The first generation I cut just inside the solid black line, and on the 2nd generation I cut on the outside of the black line. Then I flipped the larger piece over and colored with the Turquoise Blue Shinhan marker. I popped the two pieces up on some foam tape, and then used a bit of the same ribbon behind to help the colors pop some more!

I hope you like my little treat box! They would be perfect for party treats, teacher appreciation, co-worker gifts, gifts for nurses, and so many other things!

I hope you leave a comment and let me know what you think of it! Then, hop on over to Tracey’s blog to see what fun stuff she has for you!

Thanks again for stopping by! Make sure to stop by tomorrow to see more fun goodies with this stamp set!

Tuesday Treats: Gem Box

Hey everyone! It’s time for some more treats!!

This is a super fun box that I saw a tutorial for, using the Envelope Punch board. Well, I have many, many tools, but that isn’t one of them. Well, I KNOW that I can make that without the punch board, so I did!

I used one of the sheets from a past paper pack, some embellishments from the Sugar Rush Compliments, a bit of white shimmer trim, some of the heart washi, and some twine that I had laying around. (We have had some severe weather (for us) so I’m trying to drive as little as possible) I had a few hearts from the Raspberry cardstock left from another product, so I added those too, and finished off with some Sugar Rush Dots.

As you can see, this fits 4 Lindor truffles, these are pink (fit the box colors!) and are milk and white chocolate.

This fun little box isn’t going to just sit here, this is going to go to Robyn! I had to cancel my last crop because of weather, and challenged the ladies that were going to come to do something crafty, and share a picture of what they created. For doing so, they would get an extra little something at the next crop. Well, Robyn was the only one that shared her projects, so she gets this fantastic little box!

Now, one of the tools that I suggest that you have in your crafter’s tool kit . . . a needle threader!! While, yes you can use it for sewing . . . you can also use it to get your bakers twine or thin ribbons into small holes!

So, the next time you are at the store, grab a package! They are usually less than $2!

I hope you like my little box!

I’ll be back tomorrow with a scrapbook page! Hopefully you will join me!

~Michelle

Sweet! Yum! Treat Bag!

Welcome back to Bags & Tags Tuesday! Today I have this sweet little bag of chocolate for you! It would be paired perfectly with a coffee, mocha, hot cocoa, or even tea!

As you can see, this sweet little bag will hold 3 Ghirardelli chocolates perfectly!

I used Pixie Cardstock for the bag and the straps. The little dot is the middle of the donut hole from yesterday’s card! (there are 2 more on the back side, since I mis-cut one of the donuts yesterday!) The dots and cup are from the Sugar Rush paper packet, as well as the “hello” sentiment (it’s from the same zip strip as yesterday’s card).

I used two of the three washi tapes that come in the Sugar Rush Washi Pack. They add just a bit to the whole bag, making it not too bland!

I hope you enjoyed this little bag! I’ll include the dimensions and such below!

Until tomorrow!!

~ Michelle

Bag dimensions and info:

3 x 4 15/16
scored at 2″ from each 3″ side. (so the long part across the top)

(2) 2 1/2 x 1 7/8
scored at 1/2″ on 3 sides (2 long and one short)
slightly miter the squares on the 2 corners

(2) 1/4 x 10 (handles)

Use your bone folder to crease the score lines.
Attach handles 1/2″ in from the sides, lining them up just along the score line.
Decorate the front of your bag before you put it together, as it will be easier to do at this point.
Attach center piece of the bag sides first (do both sides).
Then attach the sides to the front of the bag, and repeat on the back.

Chocolate holder, take 1!

So, Tuesdays are going to be Tags, Bags, and Treat Holders! Yesterday I told you I was going to have something for you to be able to gift to friends . . . we all like little gifts! Especially when they are made pretty first!

So, I used another paper from the Rustic Home Fundamentals paper pack. This pack is so fun!

Here you can see it is a matchbook style treat holder. Inside is just one little Ghirardelli square, perfect for a little “I’m thinking about you” treat.

This is such a fun little treat holder!! You could easily make up many of them for valentines or treats for birthdays, or even just because!!

Remember those hearts that I told you I colored yesterday? Well, they came in perfectly today for the front of this little treat holder! They are all cut from White Daisy cardstock, and then colored with the ShinHan Touch Twin markers.

I hope you liked the little holder today! Who would YOU give one to? Join me tomorrow for another fun crafting bit!

Until then, have a fabulously crafty day!

~ Michelle