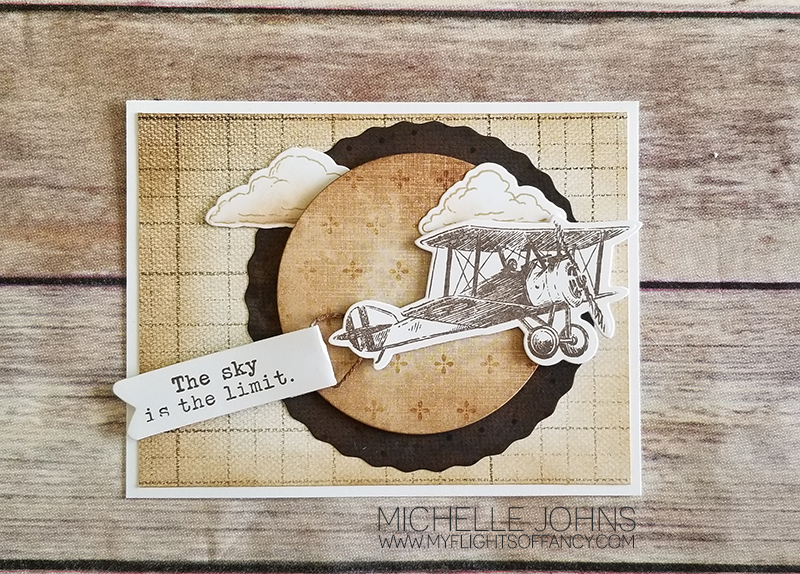
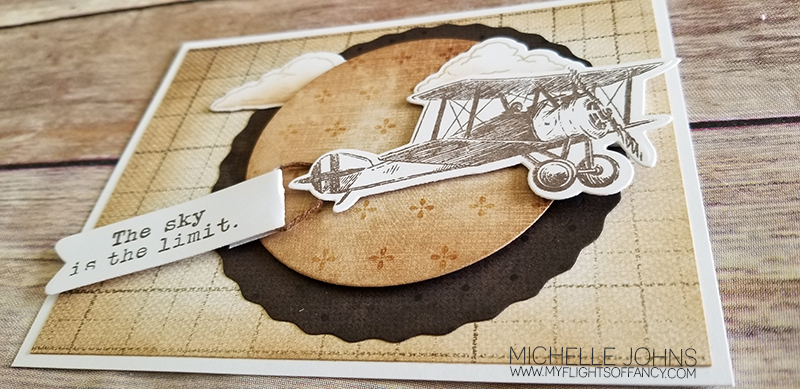
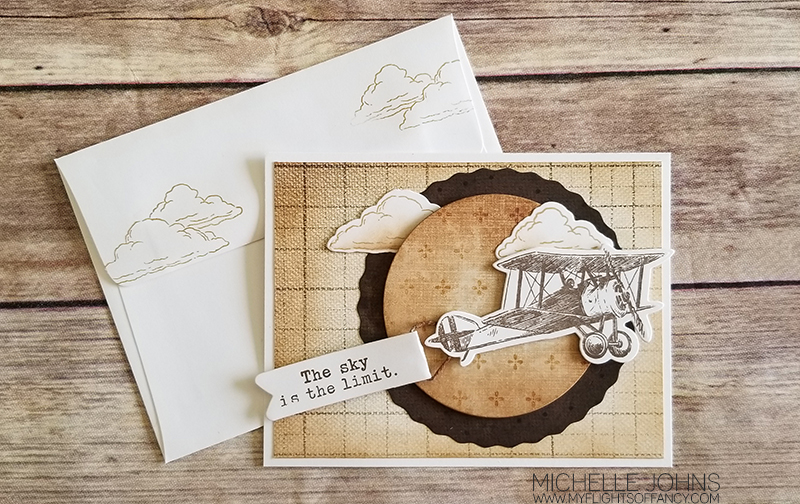
Now, let me say that I was inspired by this card I found on Pinterest. It doesn’t fit the ‘vibe’ of this challenge, but I knew that I could use the plane from the Dreams take Flight set, and make it mine. And I don’t know about you, but I think I totally rocked this one!
The plane and banner are stamped in Espresso ink, I stamped and inked the clouds with toffee ink. Now, if only we still had the waxy flax still, that would have been perfect! Alas, we do not. So, I grabbed my mink twine and my Earth brown blend marker, and colored a tiny piece of the twine, and attached it with some mini glue dots!
The circle and banner are popped up with foam tape. The plane is then popped up with some thin foam tape. The clouds being tucked in various places in various depths on the card I think give it an added extra pop!
Now, of course I couldn’t leave the envelope blank! So, I stamped the large cloud on a bit of post it note and cut it out, then stamped the clouds with a slight overlap on the flap of the envelope.
I’ve already said that I really like how this card turned out, and I hope that you do as well! You should totally come over and join in on the challenges! We have a new one each week, and they last until the end of the month, so you have plenty of time to get your entry in!
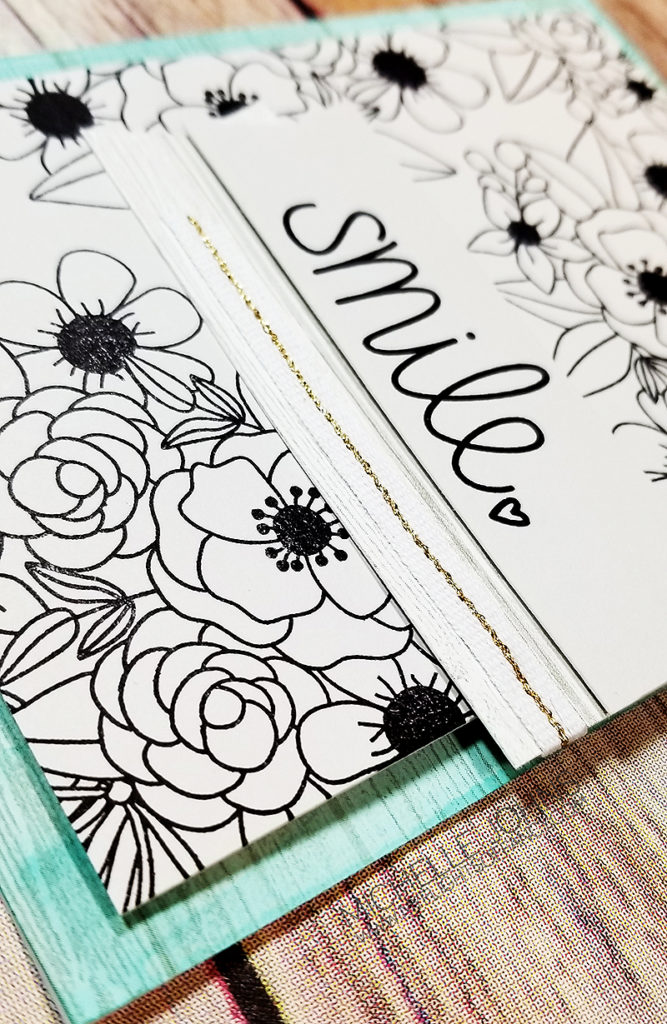
It’s time for another card from both Danielle and I! Today’s theme is the February SOTM. This stamp set has a bouquet of flowers, some script and some typewriter type sentiments on it. This set is perfect for cards for some ladies in your life! (add an alphabet stamp set, and it would be perfect for ANYONE in your life!)
I found a beautiful card that I wanted to create with this set. The Spruced Up paper pack has a fantastic paper that is a wood grain paper, so I grabbed my lagoon reinker and the medium flat waterbrush along with the All Purpose Mat, and colored the wood grain paper! It turned out great!! Exactly as I wanted it!
I used some of the mink cardstock from the coordinating cardstock pack for the front of the card. I stamped the bouquet with archival black ink three separate times (well, 5, counting the two little bits in the corners). I did some stamp surgery to be able to stamp the “smile” sentiment without the top part. I used a little bit of the wood grain that was the original color as one of the banners. Add a bit of the white and gold ribbon, and this card is finished!
I am in LOVE with how it turned out! I would love to know what you think! After you leave a comment, head over to see what beauty Danielle has for you!
Danielle and I are back with another fun project! Today’s project is a card, but not just any card! Today we are using this card as our inspiration. We wanted to be inspired by the design, the water coloring, and the vellum!
Originally I was going to do a BUNCH of different cards to show off different water color techniques, but I left most of the products for those other techniques at home! ACK! So, I went with the “easy” option! Also called faux watercoloring! To do this, you use your ink pad, a slick surface (I used the All Purpose mat), a brush (I used the medium flat waterbrush, and some water.
Now, the papers on the left side of my cards are both retired. I used a zip strip from Craft On, on the pink card, and the cardboard piece of B&T from Hawthorne on the brown card. My ink colors today were raspberry and toffee.
Ideally you would do this on watercolor paper, however, I also didn’t have any of that with me! (Yes, I forgot a whole bag of items when I left for my crop!) So, I just used some white daisy cardstock. While it did warp some, it didn’t warp too much!) I used the Shaker window and confetti thin cuts to die cut my circle from vellum paper. Then I used two different (retired) embossing folders to emboss the circles. I created two (actually four, but I only used two) versions of “thanks” and cut them with my cricut machine. I used a bit of gold embellishing thread and gold glitter paper on the pink card, to help it pop some more. I added a few black dots from the Black & White dots. and decided I needed a bit more black. So, I grabbed the black watercolor pencil, scribbled a bit on a scrap of paper, added a bit of water with the small round water brush, and smacked it on my scissors to get some splashes of color on the rest of the card front.
I think they look pretty fantastic, even if they don’t look like the one that inspired us! I would love to see the cards you make! So, make some, snap a photo, and share with Danielle and I!
Thanks so much for stopping by! Make sure to hop over to Danielle’s blog to see her card too!
Today I have a fun spinner card, complete with video! Danielle and I are both doing a “Spinner” card, however, they are both so totally different! Make sure to go over and check out her card, and watch her video showing how she did it!
Today’s card is somewhat simple, decoration wise, but that spinner makes up for it! (I think!)
I used a number of dies in this card, but that made it super simple to put together!
{The video is above, if you don’t see it, please click through to the blog post to see the video!}
Sizes:
B&T papers: 4 x 5 1/4 (qty 2)
Julep Cardstock: 3 1/4 x 3 1/4 (Cut the frame and then the largest stitched circle from the inside negative piece from the frame)
White Daisy Cardstock: 3 x 3 ~ Largest Stitched Circle
Hopefully you like the card and the tutorial is easy to follow! I would love to see any cards that are inspired by this card and tutorial! Remember to hop on over to Danielle’s blog to see her card!
Have you seen the new stuff? Oh My Goodness!! All the holiday stuff you could want! (ok, well, I guess that depends on the holiday that you celebrate, but so much fun stuff!!) We will have 22 ladies participating in this fun hop, you may have started at Alyson’s blog, or you may have started here, either way, you will have plenty to go see! If you get lost along the way, Melinda has the whole list over on her blog.
I stamped the truck image by sponging the stamp with Candy Apple Red and Evergreen inks onto one of the tags from the Holiday Cheer special. Then I added the sequins and the foam and acetate from the window foam and acetate. I used the Shaker window thin cuts to cut the gold glitter paper that also comes in the Holiday Cheer special.
I used a pattern for the card from the old Wishes how to book. This card measures 3 1/2 x 8 inches. I used a bit of the white and gold ribbon to hang the ornament from. I just taped the ribbon to the back, to make it easily removable from the card once the recipient gets it.
Thanks so much for stopping by! I hope you will leave me a comment to let me know what you think! After to take a few moments to do that, hop on over to Krista’s blog!
Welcome to the Technique Blog Hop! This month, we are going back to the basics! You will see many different things (and maybe a few versions of the same thing) I know you will see some things that you forgot about, and maybe even a few things that are new to you! I can’t wait to see everyone else’s things, I know you will too! So, you should have gotten here from Krista’s blog, but if not, it’s a circle, and you will get back around to her!
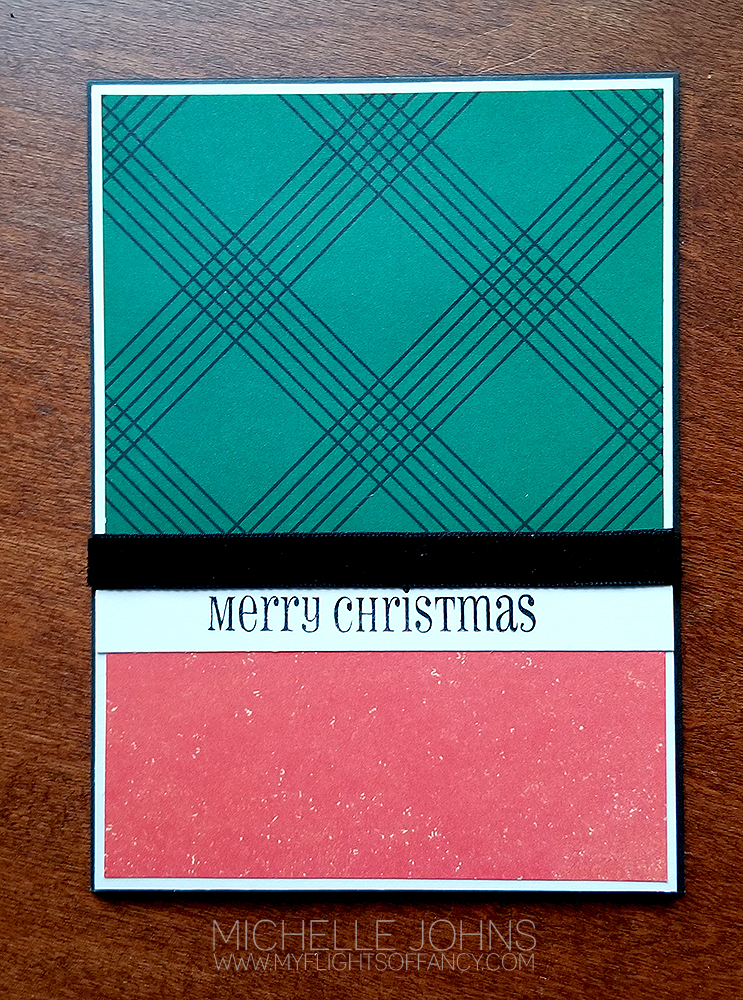
Today I went back to the basics, and let my paper do the talking for me! (at least mostly!) I grabbed two pieces from the newly available Cedar & Pine paper packet, a piece of linen cardstock and a piece of black cardstock! Keeping the design basic was key to all of this!
Let me share the sizes with you!
Black: 4 x 11 Linen: 3 7/8 x 5 3/8 (x2) & 3 3/8 x 1/2
Evergreen B&T: 3 3/4 x 3
Red B&T: 3 3/4 x 3
Super simple! I could easily get 3 cards from these sheets of cardstock!
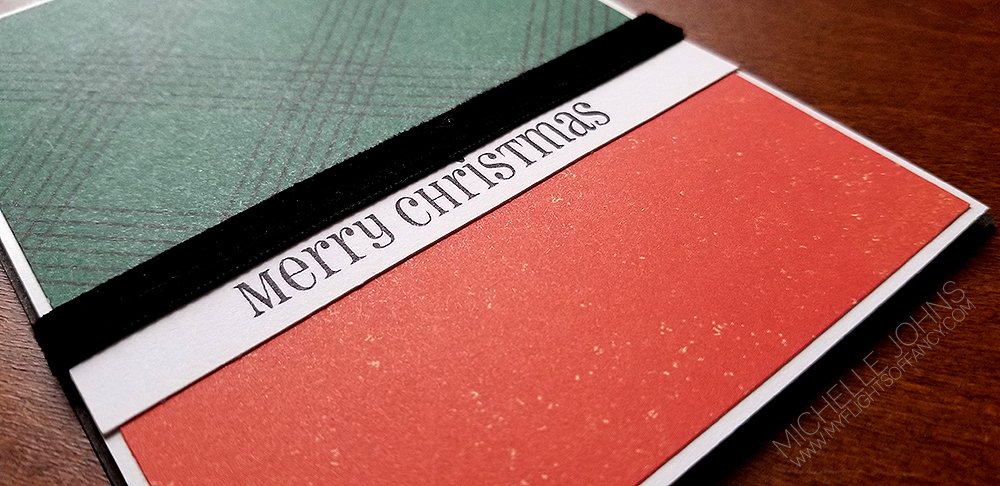
I used the Say it in Style stamp set for the sentiment. I could totally make this card be for ANY occasion! There are so many great sentiments on this set! You will definitely want to have it in your stash!
I added a bit of the black velvet ribbon to finish it off and give it a nice polished look! You could easily use a piece of black cardstock to get a similar effect, if you don’t have that ribbon yet!
Oh, and just to give you an idea of how ‘back to basics’ this card was . . . . I had TOTALLY forgotten that I was supposed to do this hop! When I signed up I was going to do a different technique, however, when I remembered, I had just over an hour and a half to design, make, photograph, edit, and type up this whole post. Plus wait for my food that I had just ordered and then get home! Just so you know, I did it, and I have a few minutes to spare, even! (so long as everything doesn’t crash when I hit publish! hahahahahhaa!!)
Thanks so much for stopping by! I hope you enjoyed my card with a back to basics card design! Now, leave a bit of love below, and then hop on over to Melissa’s blog to see what she has for you!
This week’s challenge is to use Pink, Grey, Black, and White. You have until the end of the month to play along, so I hope that you do!
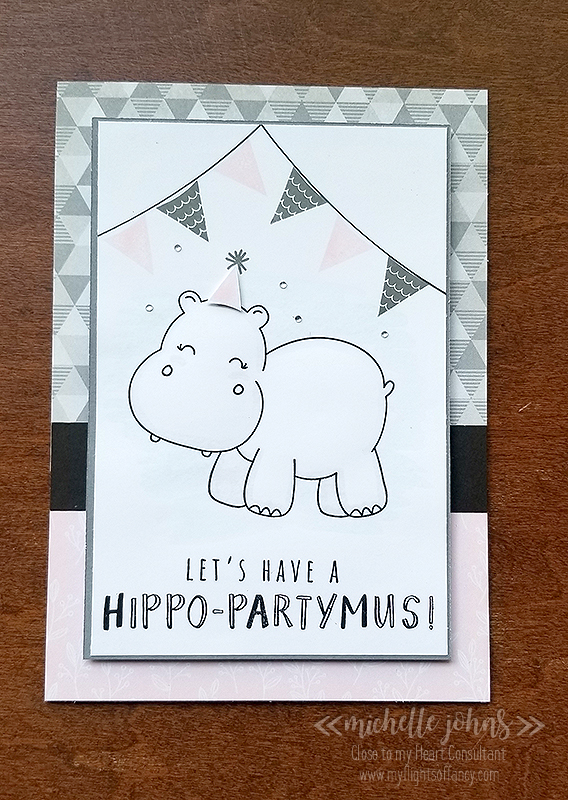
I knew that I wanted to use the Hippo that is one of the hostess rewards available until the end of the month. It is such an adorable set! I know you will want one too! Just ask me how to get it!
I decided that I was going to CASE the card that is in the Seasonal Expressions book for this stamp, I figure why not make my life a little easier, right? That card is a 5×7 card. I estimated the white piece to be a 4×6 piece of white daisy, and I just built my card on that basis.
The grey comes from the Into the Wild paper packet, the pink comes from the Mix In paper packet, and the rest is plain cardstock. (black, charcoal, and white daisy). I stamped the hippo, sentiment, and the banner strings in intense black ink, since I knew I would be coloring it. Then I stamped the banners in ballerina and charcoal inks. I stamped the party hat in ballerina on a scrap piece of white daisy, and stamped the poof for the top in charcoal.
I used the medium round waterbrush to pick up a little bit of the charcoal ink from the lid of the ink pad, to outline the hippo with. I also added some rounded cheeks with the ballerina ink, the same way. Then I grabbed a bit of the sapphire ink (just a tad little bit, mind you!) and put a very slight wash of blue behind lil miss hippo. I did use my heat gun to dry the cardstock, so I could continue with my card! I used liquid glass to adhere the hippo panel to the charcoal cardstock mat.
Before I glued everything to the front, I had to decide how to put the card together. Now, if you know me, you know I like to be frugal with my paper, when I can be! Well, today’s card is no different! Would you believe me if I told you that you can get TWO cards that are 5×7 from one single sheet of cardstock? Well, you can, if you do it the same way that I did!
If you use the windmill pattern, you can get four 5×7 pieces out of one 12 x 12 piece of cardstock. Then, if you create a score line of 1/2 inch along the top (like I did), or the long side, you can then create two 5×7 cards from one sheet of cardstock!
So, I put the 1/2 inch score line along the top of the inside of the card, using liquid glass to adhere them together, so I would know they wouldn’t fall apart. Once I had the card base put together, I could put the rest of it together! I glued on the papers to the front. I then added the hippo and mat piece with lots of foam tape! I don’t want it to buckle when I sent it off!
On the inside, I made my panel a bit smaller, to be 3 1/2 x 5, with a charcoal mat around it. Before I glued it together I added lil miss hippo’s head and the happy birthday sentiment.
To finish off the whole thing, I added a few bitty sparkles to lil miss hippo’s party decor! Then I decided I wanted to add a smidge more color, and used the ballerina ink and the small round waterbrush, with no water in it, to add some color to the letters in Hippo – partymus!
Isn’t this card just adorable? I love how fun it is! And, by the time you see this, I will have given it to my daughter, who loves hippos! Do you know someone that loves hippos? You only have a little bit of time left before this stamp goes away, don’t miss out!!
Thanks so much for stopping by! I would love it if you left a comment for me! I do read every one of them!
All products used are CTMH, unless otherwise noted:
Today is an easy project, and could be used with any color combination that you might have or want to use! I used Sapphire cardstock and ink today, however, use what works best for whomever you are giving your card to!
{If you cannot see/watch this video, click here to watch it.}
You could even make up a whole set of these with different sentiments on there!
I hope that you liked today’s card!
The items needed for today’s card are listed below.
Welcome to another Man Card Monday! I’ve decided to ramp up this series again, as I had many people tell me that they love it! We lady crafters seem to have a hard time making cards that aren’t too froofy to give to the guys in our lives!
So, today I have a card for you that I hope you will like! I was inspired by this card on Pinterest. So I decided to recreate it with the stamps and papers that I have!
Make sure to watch the video to put it together. The sizes for each of the pieces are at the bottom of this post.
{Can’t see the video in your email, click here to watch it!}
Welcome to August! It’s a new month, and a new week, and a new challenge! Today over at H2H, the new challenge is all about coloring! There are so many ways that you can color your images or your paper, or even your embellishments, it’s crazy! Today I am keeping the coloring fairly simple! (With everything else I used on this card, it’s probably a good thing!)
Now, I have been getting a bit more adventurous lately, in mixing and matching my stamps and thin cuts. But, today’s card is a bit crazy! If you had to purchase the full package items brand new, pulling nothing from your stash to make this card, it would cost $445! (though, I did not include blocks or the paper trimmer in this number!) WOW! Crazy, right??
Now, of course, I did not use whole packets of anything on this card, and most of those things are things that will be used MANY MANY MANY times! There is a list at the bottom of the post, so you can see everything listed out (including the blocks and trimmer), so you can add things to your stash, if you wanted! 😉
So, let’s get started, shall we?
So, the challenge, as I said above, is coloring. I knew I wanted to use the paper pal sets. I decided to color one to look like my youngest daughter. She is very tomboy, so she has a blue t-shirt (her favorite color) and green shorts. This is the combo that you will see her in the most frequently! She almost always has a hat on, something that she started doing last summer. Recently she and her friend died their hair to be a rainbow, with purple at the front to red at the back. So, you can see a bit of purple, blue, and green peeking out from under the bill of her hat. As a quick side note, the hair in the set is a traditional ‘guy’ hairstyle. I just turned it so that the side would be peeking from under the brim, as opposed to over the left ear on the paper pal. (her hair is short on the sides and long-ish on the top) If she has sunglasses available, she is almost always wearing them! So, now I have her little person all colored, it’s time to figure out how the card is going to go together!
So, I reached to the Make it from your Heart, volume 2 for a card design. I picked pattern 25. I have a bunch of scraps from all of the paper packs, so I was looking through those to see what pieces would work well with the colors that I had already colored. So, I have scraps from the Craft On, True Love, and Into the Wild paper packets. I used a pattern from the Mix In packet for the front of the card, so that it had a bit more interest.
I didn’t want to have a super weird cut off for my paper pal, so I used the smallest stitched rectangle to create a frame. She is partially inside and partially outside of this frame, and I think it gives it a fun somewhat 3-D look.
So, now I need a sentiment. (this seems to be my theme, recently . . . create the card and then figure out what the sentiment is going to be! LOL) Seeing as she is such a tomboy, I didn’t want to use the super frilly/scripty fonts that are in the Flower Market cartridge (even though I DO love them so!). I decided to do a bit of stamp surgery, and cut the frame from one of the stamps in the You Are Here sets, use the “Girl” from Sweet Girl Scrapbooking set, and the “love you” from the Flower Market set.
Of course, I couldn’t leave the inside or the envelope out of the fun! So, I used the same paper scraps to mimic the front onto the inside, and two of the main papers from the front onto the flap of the envelope.
I am really happy with how this card turned out! (even if it is, technically, really expensive!) It shows that you don’t have to stick to just one set. I know that if you are a crafter, you have a stash, even if it isn’t very large, you can be creative with how you use it! So, use your stash creatively, let your creativity go, and make something that makes your heart happy!
Thanks so much for stopping by! I hope you like my little card! What color would your paper pal be wearing?
All supplies used are CTMH, unless otherwise noted: