I was teaching a class the other day, and didn’t have the paper pack that the class was designed for, so I had to improvise!
So, what did I do? I shopped my stash, of course! The class used a bright happy paper packet, so I wanted to keep with that theory, and have bright happy colors!
I think I ended up with papers from 5 different paper packs! The class turned out great, and the ladies loved it!
Today I am going to share just the cards from the class, so, remember to put your Make it from Your Heart books to use, and use up those scraps!
I would love to see how you are using YOUR scraps! I do hope you will share with me!
Close to my heart has a few different inks, and they are great for a few different applications. Let’s talk about them for a minute, shall we?
First there is the Exclusive Inks which are Dye based inks. This is the group of inks that had the most colors. These inks will sink into the paper that you are stamping on.
Next are the pigment inks. These inks are thicker in consistency and are more opaque. When stamped on top of another image, they will blend less. These inks stay on top of the paper, and also take longer to dry.
Then there are specialty inks. Those are Archival Black, Intense Black, StazOn, and Versamark. They are do different things, and may look similar on your finished project, however, it’s all about using the right tool for the job.
Archival black is the blackest black ink that Close to my Heart has. I personally love this ink! It really is a true black color. This ink is archival safe and acid free. Once dry it is waterproof, lightfast, and fade-proof.
Intense black is also archival safe and acid free. Like Archival Black, it is waterproof once dry. This ink is fast drying and non-smearing.
StazOn is not an acid free ink, so you may not want to use it in your scrapbooks, however it is great for a good number of things, especially non-porous surfaces.
Versamark ink is an archival safe watermarking ink. This means it is a thicker, clear ink. It, like the pigment ink, will stay wet (or sticky) for a bit.
So, you are thinking “Ok, Michelle, so what ones do I use on what projects?”, right? Well, let me give you a few examples!
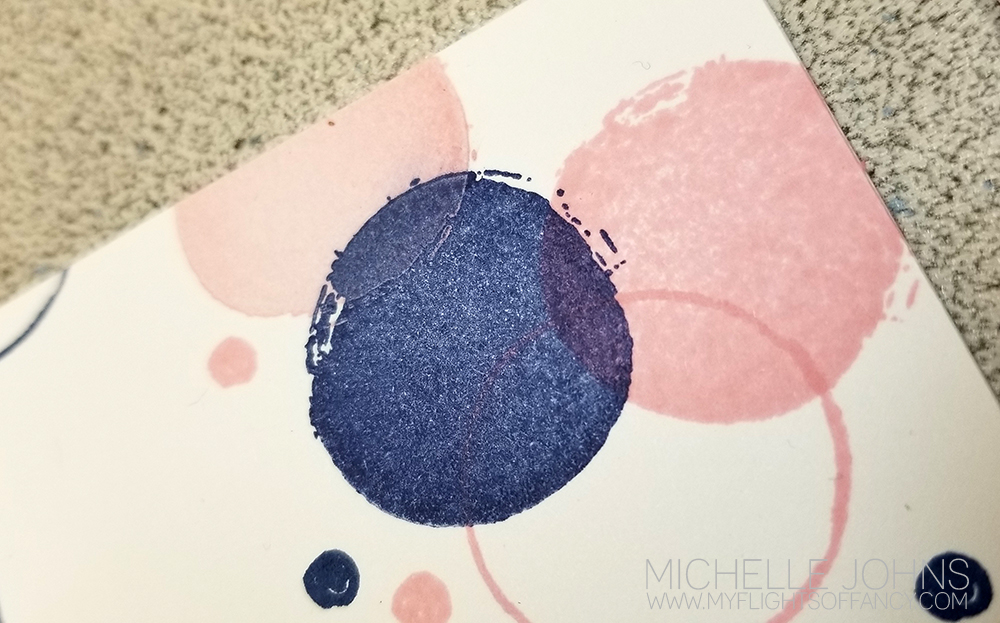
These first two cards I used the dye ink and pigment inks in both pixie and sapphire. You can see slight differences in the inks on the paper.
In this close up, on the right, you can see that the pixie and sapphire dye inks blend together where they overlap. On the left side of this little cluster, you can see the pixie pigment ink on top of the sapphire ink. It isn’t super obvious because pixie is such a light color, and sapphire such a dark color, however you can see the difference.
On this next example, I am using three types of ink. I used the Versamark ink to hold the white embossing powder for the lace doily. I used ballerina dye ink to sponge some color over top of it, and then I used the sapphire pigment ink for the sentiment, and used clear embossing powder over top of it. (this helped it dry so I could continue with my project, and tied the look into the doily that is under it) Since the versamark and the pigment inks stay wet/sticky for a bit, they hold embossing powder fantastically!
I used the dye ink to sponge, as the pigment ink would have stuck to the embossing powder, and I would have ended up with a look that I wasn’t really going for!
Now, for this post, I did not use Archival Black, Intense Black, or StazOn inks. The majority of my cards use Archival Black ink. This is one of my most recent uses. I will use Intense Black Ink if I am going to be using my alcohol markers, as the solvent in the markers will not pick up the Intense black ink. You can see the Intense Black ink and coloring on this project. I know I have used StazOn ink, however apparently it didn’t make my blog! Ack!
I hope this helps you to know which ink to use for which project! Still have questions? Let me know! I will gladly answer them for you!
Welcome back to another Man Card Monday! Today we are going with a mono chromatic card, that works perfect with any wood grain paper you might have stashed away! (I know I have a small stash of it!)
This card is super fun and easy to make!
Here are a couple of close up photos for you, because I know you want them!
The first card, without inking:
The one made in the video, with inking:
Which do you like better? Let me know in the comments below!
This week’s challenge is to use Pink, Grey, Black, and White. You have until the end of the month to play along, so I hope that you do!
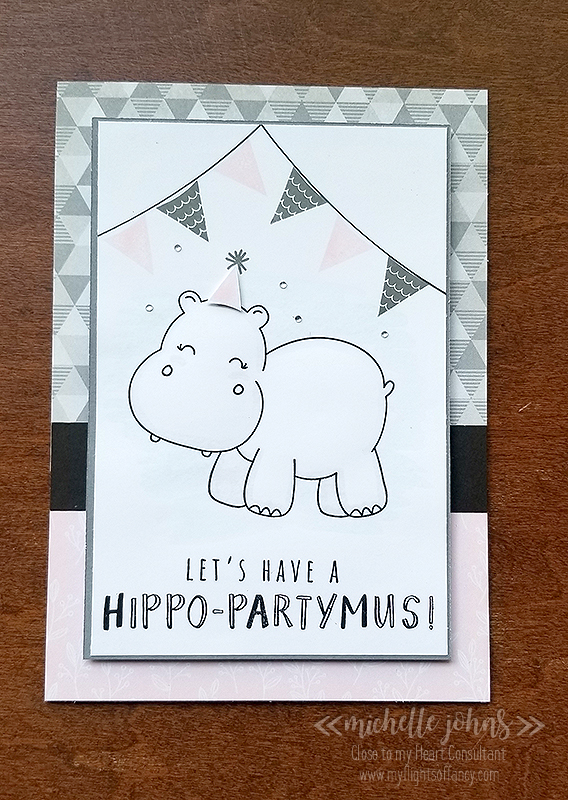
I knew that I wanted to use the Hippo that is one of the hostess rewards available until the end of the month. It is such an adorable set! I know you will want one too! Just ask me how to get it!
I decided that I was going to CASE the card that is in the Seasonal Expressions book for this stamp, I figure why not make my life a little easier, right? That card is a 5×7 card. I estimated the white piece to be a 4×6 piece of white daisy, and I just built my card on that basis.
The grey comes from the Into the Wild paper packet, the pink comes from the Mix In paper packet, and the rest is plain cardstock. (black, charcoal, and white daisy). I stamped the hippo, sentiment, and the banner strings in intense black ink, since I knew I would be coloring it. Then I stamped the banners in ballerina and charcoal inks. I stamped the party hat in ballerina on a scrap piece of white daisy, and stamped the poof for the top in charcoal.
I used the medium round waterbrush to pick up a little bit of the charcoal ink from the lid of the ink pad, to outline the hippo with. I also added some rounded cheeks with the ballerina ink, the same way. Then I grabbed a bit of the sapphire ink (just a tad little bit, mind you!) and put a very slight wash of blue behind lil miss hippo. I did use my heat gun to dry the cardstock, so I could continue with my card! I used liquid glass to adhere the hippo panel to the charcoal cardstock mat.
Before I glued everything to the front, I had to decide how to put the card together. Now, if you know me, you know I like to be frugal with my paper, when I can be! Well, today’s card is no different! Would you believe me if I told you that you can get TWO cards that are 5×7 from one single sheet of cardstock? Well, you can, if you do it the same way that I did!
If you use the windmill pattern, you can get four 5×7 pieces out of one 12 x 12 piece of cardstock. Then, if you create a score line of 1/2 inch along the top (like I did), or the long side, you can then create two 5×7 cards from one sheet of cardstock!
So, I put the 1/2 inch score line along the top of the inside of the card, using liquid glass to adhere them together, so I would know they wouldn’t fall apart. Once I had the card base put together, I could put the rest of it together! I glued on the papers to the front. I then added the hippo and mat piece with lots of foam tape! I don’t want it to buckle when I sent it off!
On the inside, I made my panel a bit smaller, to be 3 1/2 x 5, with a charcoal mat around it. Before I glued it together I added lil miss hippo’s head and the happy birthday sentiment.
To finish off the whole thing, I added a few bitty sparkles to lil miss hippo’s party decor! Then I decided I wanted to add a smidge more color, and used the ballerina ink and the small round waterbrush, with no water in it, to add some color to the letters in Hippo – partymus!
Isn’t this card just adorable? I love how fun it is! And, by the time you see this, I will have given it to my daughter, who loves hippos! Do you know someone that loves hippos? You only have a little bit of time left before this stamp goes away, don’t miss out!!
Thanks so much for stopping by! I would love it if you left a comment for me! I do read every one of them!
All products used are CTMH, unless otherwise noted:
I know that if you are seeing this, you likely have a stash of paper that you either didn’t use because you completed the first project, and didn’t get back to it, you love it and don’t want to use it, or any number of reasons.
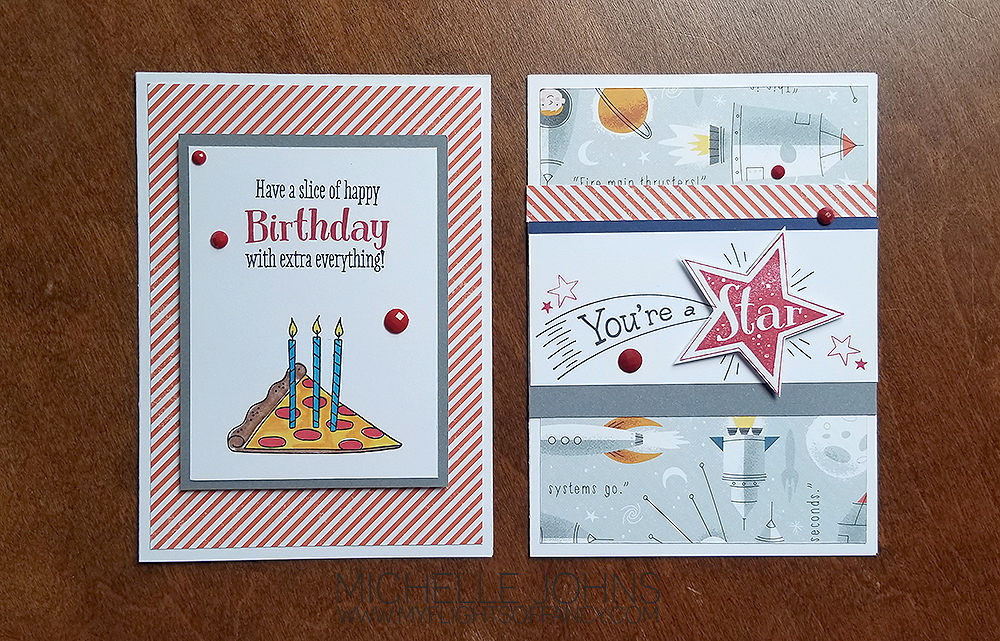
Today I have just a bit of the “A Slice of Happy” cardmaking workshop your way. As you can see, I don’t have much of this kit left! I cannibalized it for other projects! Until this project, I had never inked up the stamp set that came with it! I love the set, and I don’t know why I didn’t use it . . . too many projects, not enough time, I think!
So, I started with the directions, and had to adjust, since I didn’t have as much paper as it called for! Just one sheet of 12×12 B&T, 1 sheet of whisper cardstock, and a partial piece of sapphire cardstock.
I wanted some of both cards, and wanted more that just 2 of each, so . . . math time it was! I figured out that I could get 4 cards of each design with what paper I had! Woohoo!!
So, here’s what I did:
From my 12×12, I cut 3 pieces that were 3 3/4 x 12.
Then, I cut 2 of those pieces into 5 1/4 x 3 3/4 pieces, which gives you four pieces.
From the remaining 3 3/4 x 12 piece, I cut 4 pieces that were 1 1/4 x 3 3/4, and four pieces that were 1 1/2 x 3 3/4.
You should have a couple of scraps that are 1 x 3 3/4. Cut each of these to 1/2 x 3 3/4.
You are all done cutting the B&T piece! Yaay!
Now, for the Whisper, I cut a 4 x 12 strip and cut that down to 3 x 4, which gives you four pieces.
Then I cut another 4 x 12 piece, and cut that down to four pieces that were 1 1/2 x 4.
Now the sapphire. For that one, all I did was cut four pieces that were 3/8 x 4.
Oh, the white daisy might be important too, yes? Four pieces that are 2 3/4 x 3 3/4 and four pieces that are 4 x 1 3/4. Plus a scrap that is about 4 x 4, to stamp the stars on.
Then, it’s just as easy as just layering all of the pieces together to make the cards!
These cards came together very quickly! The longest part was the coloring of the pizza!
So, shop your stash! Complete a project that you have just set aside for ‘another time’, crunch some numbers and do something like I did, or mix it up and do both!
I bet you can find something that needs to be done! Show me when you complete it! I would love to see!
Thanks for stopping by!
Oh, and yes, I have a few more tiny scraps, but that makes me happier than a 12 x 12 sheet that is doing nothing!
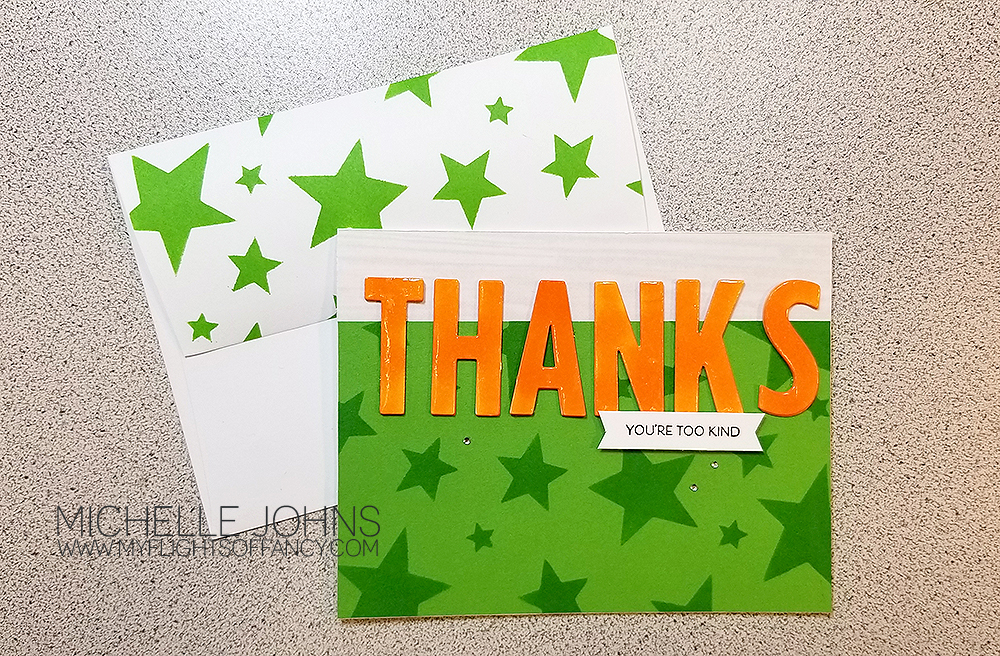
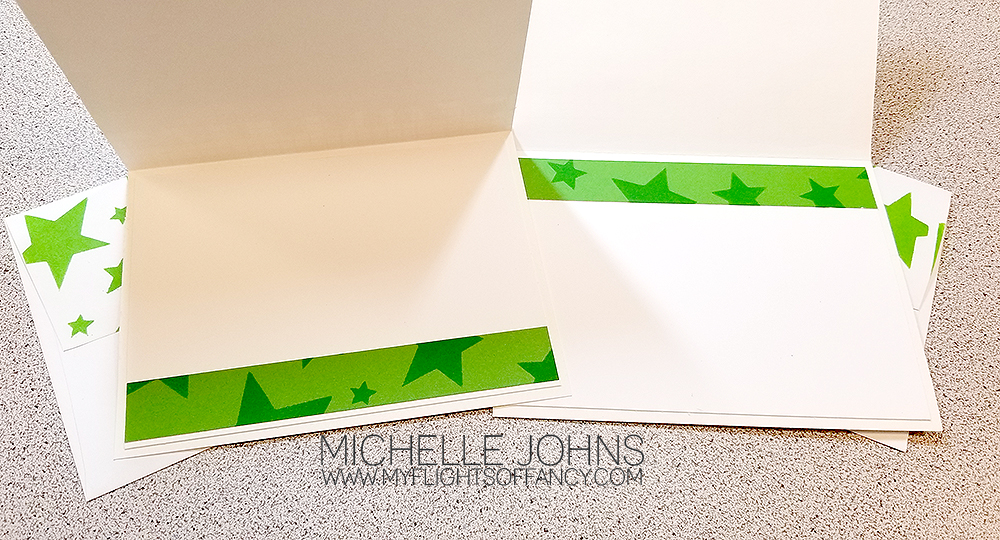
Do you know that I do a Facebook live every Sunday evening? It is at 5pm pacific time, and I do all sorts of crafty things! I have always had great intentions of putting the photos and dimensions up on my blog after the video, and, well, life seems to always get in the way! So, now I am going to turn over a new leaf, and get them up on the blog on the Tuesday following! So, welcome to the first Tuesday repost of the Sunday live! LOL!!
Sunday we were playing with stencils and different things that you can do with them! I have a few examples to show you, and we made a card with one as well! If you want to play along, here is the star stencil that I used. It is on the Artbooking cartridge, so you will need to have that cartridge to cut this stencil. It is slightly different than that image, as I wanted to add a few more stars. So, at the end of the post are the steps that I did to get this stencil, in case you want to try it with one of yours!
We used a variety of mediums in the video, including dye ink, pigment ink, texture paste, & embossing powder. Different things will give you different looks, so you should try them all out!
This card was so fun to put together! And super easy, as well! Maybe a smidge time consuming, but not too bad, overall! I hope that you make one too! Please show me what you make, I love knowing that my tutorials are helpful to you!
Paper size info:
Willow: 6 x 4 {Trimmed after stenciling to 5 1/2 x 3 1/4 & 5 1/4 x 3/4}
Into the Wild, Wood Grain B&T: 5 1/2 x 1 1/4
White Daisy: 2 x 3/8 & 5 1/2 x 4 & scraps for “thanks” letters
Step by step how to make your own stencil:
1. Open Image: #M3D15D Stars overlay from Artbooking cartridge and make it be 6×6
2. Add Shape>Square to your mat
3. Click and drag square to be slightly larger than your star overlay
4. Select both images and slice
5. Select the grey image that looks like your stencil, and delete.
6. Move the grey stars & outline to the side of your overlay
7. Add Shape>Circle & duplicate it
8. Shrink one circle to fit over just one star in the grey overlay
9. Select that circle and the grey overlay and slice
10. Step 9 will give you 2 grey stars separate from everything.
11. Delete the circle with a start cut from it.
12. Repeat steps 8 & 9 & 11 with the 2nd circle.
13. Select all 4 grey stars, and like with the grey square, click and drag, but make smaller instead of larger
14. Place the individual stars on the original overlay (mine is a lagoon color) in the solid portions of the overlay
15. Select ONE grey star and the overlay, and slice. (you can ONLY slice 2 layers at one time)
16. Delete (or move) both the grey and the lagoon stars. (move if you might want to cut more stars from the overlay)
17. Repeat steps 15 & 16 for the other 3 stars.
18. You are now ready to cut your stencil!
If you don’t want to do all of those steps (looks harder in writing than it really actually is!!), here is the link to my stencil that I am using in the video!
I really do love seeing the creations that you guys and gals come up with! Leave me a comment and let me know what you think, and show me what YOU come up with!
Welcome to another Man Card Monday! I’ve decided to ramp up this series again, as I had many people tell me that they love it! We lady crafters seem to have a hard time making cards that aren’t too froofy to give to the guys in our lives!
So, today I have a card for you that I hope you will like! I was inspired by this card on Pinterest. So I decided to recreate it with the stamps and papers that I have!
Make sure to watch the video to put it together. The sizes for each of the pieces are at the bottom of this post.
{Can’t see the video in your email, click here to watch it!}
Welcome to August! It’s a new month, and a new week, and a new challenge! Today over at H2H, the new challenge is all about coloring! There are so many ways that you can color your images or your paper, or even your embellishments, it’s crazy! Today I am keeping the coloring fairly simple! (With everything else I used on this card, it’s probably a good thing!)
Now, I have been getting a bit more adventurous lately, in mixing and matching my stamps and thin cuts. But, today’s card is a bit crazy! If you had to purchase the full package items brand new, pulling nothing from your stash to make this card, it would cost $445! (though, I did not include blocks or the paper trimmer in this number!) WOW! Crazy, right??
Now, of course, I did not use whole packets of anything on this card, and most of those things are things that will be used MANY MANY MANY times! There is a list at the bottom of the post, so you can see everything listed out (including the blocks and trimmer), so you can add things to your stash, if you wanted! 😉
So, let’s get started, shall we?
So, the challenge, as I said above, is coloring. I knew I wanted to use the paper pal sets. I decided to color one to look like my youngest daughter. She is very tomboy, so she has a blue t-shirt (her favorite color) and green shorts. This is the combo that you will see her in the most frequently! She almost always has a hat on, something that she started doing last summer. Recently she and her friend died their hair to be a rainbow, with purple at the front to red at the back. So, you can see a bit of purple, blue, and green peeking out from under the bill of her hat. As a quick side note, the hair in the set is a traditional ‘guy’ hairstyle. I just turned it so that the side would be peeking from under the brim, as opposed to over the left ear on the paper pal. (her hair is short on the sides and long-ish on the top) If she has sunglasses available, she is almost always wearing them! So, now I have her little person all colored, it’s time to figure out how the card is going to go together!
So, I reached to the Make it from your Heart, volume 2 for a card design. I picked pattern 25. I have a bunch of scraps from all of the paper packs, so I was looking through those to see what pieces would work well with the colors that I had already colored. So, I have scraps from the Craft On, True Love, and Into the Wild paper packets. I used a pattern from the Mix In packet for the front of the card, so that it had a bit more interest.
I didn’t want to have a super weird cut off for my paper pal, so I used the smallest stitched rectangle to create a frame. She is partially inside and partially outside of this frame, and I think it gives it a fun somewhat 3-D look.
So, now I need a sentiment. (this seems to be my theme, recently . . . create the card and then figure out what the sentiment is going to be! LOL) Seeing as she is such a tomboy, I didn’t want to use the super frilly/scripty fonts that are in the Flower Market cartridge (even though I DO love them so!). I decided to do a bit of stamp surgery, and cut the frame from one of the stamps in the You Are Here sets, use the “Girl” from Sweet Girl Scrapbooking set, and the “love you” from the Flower Market set.
Of course, I couldn’t leave the inside or the envelope out of the fun! So, I used the same paper scraps to mimic the front onto the inside, and two of the main papers from the front onto the flap of the envelope.
I am really happy with how this card turned out! (even if it is, technically, really expensive!) It shows that you don’t have to stick to just one set. I know that if you are a crafter, you have a stash, even if it isn’t very large, you can be creative with how you use it! So, use your stash creatively, let your creativity go, and make something that makes your heart happy!
Thanks so much for stopping by! I hope you like my little card! What color would your paper pal be wearing?
All supplies used are CTMH, unless otherwise noted:
Welcome back, folks! This week we are talking about borders. As always, it is up for interpretation. This week, I went with the Decorative Borders Thin Cuts! Now, like you have seen me do in the past, I went for the Make it from your Heart books to get me started. Today, I was perusing Volume 1, and I gained inspiration from both patterns 25 and 30. More the artwork of those patterns than of the patterns themselves. (This is one of the things that I love about all of the books, there is artwork to show you that it can be done similarly, but differently at the same time!)
So, I started with pattern 30, and in that artwork, there is a scalloped border that is done, probably with the old corner punch, and there are a few layers of it. So, my brain said, if they can do a few, I can do a whole card front of them, right? Right! So, I ended up cutting about 24 strips! I used 20 on the front of the card, and 2 on the inside, and have a few left over that I can use for another project!
So, I have my card front, what do I do now? So, back to the book I go, and I pause at pattern 25. It has this fun rectangle on the front, and I knew that I could use the Stitched Rectangles thin cuts for this! I thought about just leaving the rectangle empty, but didn’t much like it that way. So, I decided that I would use a scrap of vellum on it, and that would be perfect! I would be able to see through it and still see that border background. I had a scrap of the Mix In paper packet on my desk, and thought that it would be perfect to add a bit of color to the card, but still soft enough to not take over the card. So, then I decided to add a bit of color to the frame that I had cut from the rectangle die, so I grabbed my pink watercolor pencil, and colored it in, and then went over it with the medium waterbrush. I did another scrap of the frame for the inside as well.
Then I needed to decide what to do for the front sentiment and focal point of the card. I had stamped and die cut the flowers from the Escape to Paradise stamp and thin cuts, so I grabbed those, and thought they would be perfect! So, I grabbed the watercolor pencils again, and colored away! Now, I had not stamped these on watercolor paper, so I tried to be very gentle with the amount of water that I used on the flowers and the frames too!
Now, I have everything but the sentiment! What in the world am I going to do? While I like the sentiments in the set, they just didn’t seem to fit with the direction that this card was going! So, I looked through what I had, and fell back to my trusty favorite set, the sentiments from the cricut Flower Market cartridge bundle! I LOVE these things! This sentiment worked perfectly with these flowers! And gives the card so many more possibilities! (I actually already know who I am giving it to, but won’t say just yet, as I want it to be a surprise!)
I attached the vellum to the frame with micro glue dots. I used them also on the flower in the back. Then I used some thin foam tape behind the frame, behind the sentiment strip, and for the top flower. Then, the card needed a bit of bling, so I added some silver glitter gems to it. Now that I am looking at it, I could have added a ‘nest’ of the silver embellishing thread behind the flowers, and that would have added yet another nice little touch.
I hope that you like my little card! Let me know what you think, should I have added the silver thread in a nest?
Thanks so much for stopping by! I hope you play along with the challenges over at Heart 2 Heart, they are super fun! You always have until the end of the month to complete your challenge, with a new challenge every week!
All products used are CTMH unless otherwise noted:
Welcome back! This week are are focusing on the wild! This can mean so many different things, and I went with the Pacific Northwest version of it! Where I am here in Washington, we have the mountains an hour-ish away and the ocean about two hours away. We really do have the best of it, right here! I love to go to both places, for different reasons. The mountains are so quiet and peaceful, and I don’t get there nearly enough!
At first I didn’t know what I was going to do for this challenge. I have this problem where I tend to come up with too many ideas, and then keep looking for another idea, because, what if that new idea is better? Well, this time was similar, except I hadn’t actually come up with any full ideas yet. I was trying to go with supplies, instead of the end result. I was chatting with my friend Danielle (about something else entirely) and the image for this card popped into my head! I could NOT wait to try it!
So, I grabbed a piece of scrap paper and the Into the Wild Scrapbooking stamp bundle, and some post it notes, and tried it. And it WORKED!! Then I did it with actual cardstock, and more post its, and this is what I came up with!
I stamped the mountains in pewter ink, and used the post it notes to mask the mountains, so I could add the peaks in the back. Then I used the largest tree and stamped it in New England Ivy ink randomly across the lower third of the card. Next was the medium tree with Fern Ink, grouped around the large tree. Then I used the smallest tree and stamped it in second generation New England Ivy Ink. I copied this onto the back flap of the envelope as well.
The sentiment comes from the You Are Here cricut bundle. There is a cricut cut for it, however, I just hand trimmed it, as I didn’t have my cricut handy when I was making this card.
Now, the sky is done with the medium flat waterbrush. This was a two part technique. I squished the sapphire ink pad, to put some ink on the lid of the ink pad. I also stamped 6 sets of mountains in the sapphire ink and trimmed them out. I then stuck the post it notes down to cover all of the mountains. I watered down the ink in the lid of the ink pad, and did a quick wash starting from the post its and going up to the edge of the paper. This pulls the ink from the post it and also from the ink pad. I made this a quick process, as the post it notes are not water proof, and I didn’t want the water seeping through and ruining the mountains. You can see that some did seep, but not a ton, and it’s ok!
The front and inside are matted with the light side of the New England Ivy cardstock. As you can see, I also stamped one of each sized tree on the inside of the card.
I LOVE how this card turned out! I hope you do as well! Leave me a note and let me know what you think! Then, go and make one for yourself, and share your creation with me!
All products used are CTMH unless otherwise noted: