If you are following my blog, you probably know that I LOVE my CTMH stamp sets! I think I have shared the story before, but just in case I haven’t, let me share now.
10 years ago, I was a party of a monthly group that would get together to make a set of projects (usually cards) and place an order of product. I was getting my crafty time in with other ladies, and I was having a blast! I ordered a stamp set that I LOVED the concept of!
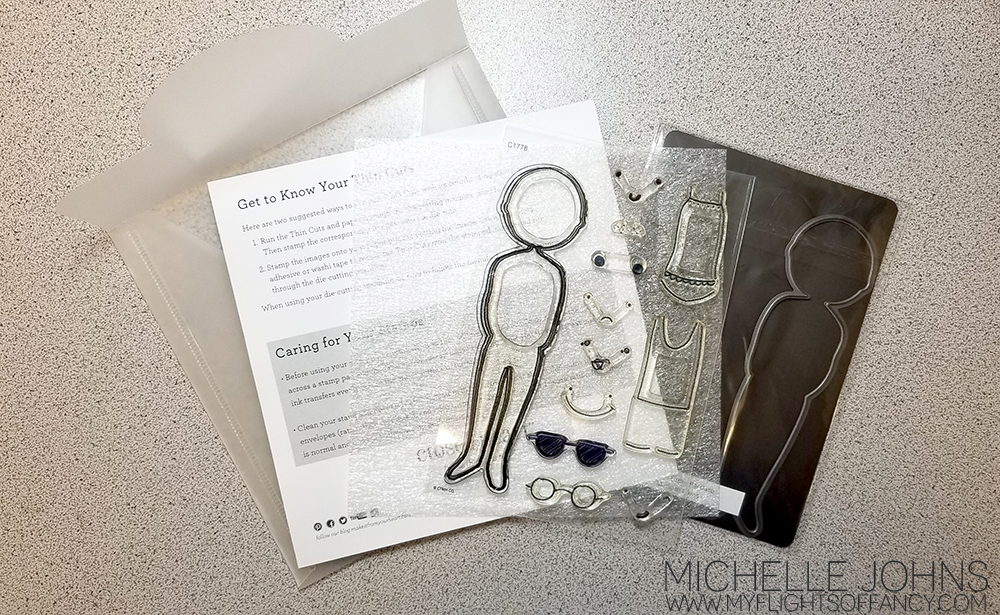
It was a “people” set. There were guys and gals and kids and baby heads, and bodies and each arm individually, and legs, and feet, and other items too. There were a LOT of stamps in that set!
I had hundreds of ideas on things to make with it! However, each of those pieces was on a square wood block. So, just in case you didn’t already know, most people can’t see through wood! (amazing, right?!?!) So, while I loved the set, I just could NOT get anything to line up, for the life of me! (And it looks really strange to have the head and neck floating above the neckline of the body below it!)
That being said, I was still excited, and was getting ready to sign up to be a representative of that company. I mentioned it to a friend that lived (and still does) across the US from me), and she asked “Have you heard of CTMH?” I responded with “I don’t even know what CTMH stands for, so, no? Probably not!”
Well, as you can probably guess, it stands for Close To My Heart, and I LOVE it!! She told me that the stamps were clear and the blocks were clear, and you could see through them. I was in love without ever having used them! My problem had been solved! They, of course, didn’t have that stamp set that I loved so much, but they had so many other things that I loved!
I signed up and was Tickled Pink! (that was the campaign that was happening then!)
So, let me show you some about these stamps!
1. They are clear. Every stamp set is clear. You can see through them to get your stamping aligned just how you want it!
2. You don’t have to store wood! This isn’t a big thing to everyone, however I have 4 kids and pets, so storage space is at a premium! If I don’t have extra stuff to store, then that means I can keep it in a smaller space (or, you know, get more things to fill the space that the wood would have taken up, right?) CTMH stamps use acrylic blocks to stamp with. Once you have a few, you are good to go!
3. They don’t take up much space! Each stamp set comes as a 6×6 sheet with a foam piece and care instructions, inside a plastic storage envelope. They are about 1/4 thick, and if the set has matching dies, they fit right inside the same envelope.
4. Stamping Surface Every stamp set includes a foam sheet to help you get a nice, crisp image. The old red rubber stamps have foam between the rubber and the wood to help give cushion to the stamping for a nice image. Removing the foam means that the stamp can continue to be clear and see through, so you know exactly where you are stamping.
5. Flexability One of the best things about these stamps is the ability to change them! You can take a straight line and use it straight, and then put a little (or a big) curve into it, and continue using it! So very many options!
This is just a small list of things that are awesome about the Close to my Heart stamps, I would love to know what else YOU love about them!
I figured I would share the card that came of the images above, because I thought it was pretty cute!
And, because I know you can’t see the shirt very well, I decided I needed to add a bit more to it, so, using masking, I created this MOM Hugs shirt! {I actually clapped when it worked PERFECTLY!}
I would love to send this fun MOM Hugs card out to someone! Share this post on social media, and leave a comment here stating that you did so. On Friday 8/16 I will draw a name from those comments and send this card out to you!
Thanks so much for stopping by! I hope I brighten your day just a bit!
Hey everyone! My friend Danielle and I are doing a number of things this month, to help challenge each other to be better, and one of the things that we are doing is a series of videos on Thursdays that will be Pages & Projects. We will alternate each week what we do, so you should make sure to come and check out the videos each week! You can find her project here.
That being said, this week I am starting off with a thank you project for some of the doctors and nurses we had when Audrey was in the hospital last year. This weekend is her One Year anniversary of getting to come home! So, we will be delivering some of these fun little bags on Sunday!
I hope you enjoy the video, even my oops, and my fix for it! I left that all in for you, so you can see that EVERYONE does the oops, and generally it is fixable with a bit of thinking!
I would love to know what papers you would use, and who you would give a little bag like this to!
Project sizes: White Daisy:
4 x 12 scored at 5 1/2 & 11
4 x 10 scored at 5 1/2 & 7
5 1/4 x 4 1/4 scored at 1 3/4 on all sides
B&T Pieces
3 3/4 x 5 1/4 (qty 3)
3 3/4 x 2 3/4
Charcoal Cardstock
2 x 5 1/4
Shaker Thin Cuts:
Largest circle in White Daisy
Stictched Frame in Charcoal
Have you ever seen a class or event listing that says “bring your basic tool kit”? And think to yourself, but what does that mean?? I know I have! So, I thought I would share with you what MY definition of a ‘basic tool kit’ is.
So, it kind of looks like a lot of stuff, but that’s just because it’s all laid out pretty, just for you guys! I know I like to see things, and not just a list sometimes. So, let’s go over what we see in the photo, shall we?
First, a paper trimmer and refill blades. Now, there are ALL sorts of paper trimmers out there. This is the one that I am currently using. I really do like it! Fiskars is a really great brand, that stand behind their product! Can you paper craft without a paper trimmer? Of course you can, this just makes the job so very much easier!
Right next to the paper trimmer, you see a number of different adhesives. Glue dots (two sizes, regular and micro are what I use the most often!), Liquid Glass (with the fine tip applicator, a tape runner, and foam tape. These are all great for different reasons, and I use them all often! At the end of that column, you will see an anti static pouch. Yes, that is kind of the opposite of ‘sticky’, and let me tell you why it’s here! When you are using the compliment stickers, you may want to pop one up. If you don’t make it not sticky, when you put it into your page protector, and then into your book (assuming a scrapbook layout in this example), when there is pressure, the parts that don’t have foam tape on them specifically, may stick to your project, giving it an odd dimension. If you use the anti static pouch on the back side of the sticker first, then it will pop up quite nicely, and you won’t have to worry about it sticking where you don’t want it to!
Next up we have blocks. I have a small variety of sizes shown. The top/left three of those shown are in the block starter kit. This kit is a fantastic place to start! You have most of your bases covered with those three blocks. I have added an additional two blocks, as they are perfect for sentiments and tiny stamps. All of the block sizes shown here are: 3×3, 2×2, 2×3 1/2, 1×3 1/2, 1×1.
Continuing on, we have scissors, of course! I show two pairs here, however, you don’t need to have two. Both of these are micro-tip scissors, which make them great for fussy cutting out images from the B&T paper or stamped images. The grey pair (in this photo) are non stick as well. Which means that I can cut the foam tape with these, and not have to worry about them getting sticky! My blue pair (they are sold in grey now) are 10 years old, and I have never had to have them sharpened or replaced! While I don’t craft every day, I can say that I average at least one day per week during that whole time, and probably even more frequently than that! These are nice, quality scissors!
Directly below the scissors we have some washi tape and post it notes. I tell my ladies to have their “Ugly Washi” in their kits, as we use it on the back sides of projects for various reasons! It doesn’t have to be ugly, but if you buy a pack, and have one roll that you KNOW you will never use on a project, this is the perfect use for it! We will use it to tape ribbons on the back sides of layouts and cards, tape small pieces together to make them easier to glue on as a whole, and a few other reasons too! It just comes in handy! The post it notes are used for masking our projects and making notes as well. Maybe you want to use a specific photo on a layout, or you can’t remember what size photos you want to put onto the layout. Post it notes are perfect for this!
Moving to the last ‘group’ of items. Most of these will be pretty self explanatory, but I do still want to list them for you. We have an embossing tool, a piercing tool, a pencil, journaling pen, ruler, and a bone folder. I think most of those are pretty clear, right? The embossing tool for scoring card bases, and even making fun designs on things, the piercing tool is great for piercing (go figure!) and also picking up the already sticky embellishments to put them onto your projects. The pencil, pen, and ruler speak for themselves, I do believe! And the bone folder is great for burnishing the card bases, and smoothing out the liquid glass, to give a great finish to your project!
The last two items in this photo are a Rub & Remove eraser and a needle threader (ok, well, two of those . . . that’s how they come!) The eraser is great for getting stray adhesive off of your projects or your tools. And the needle threader? Well, that comes in super handy for the twine that you are trying to get through holes of paper or buttons! This super inexpensive little tool has come in SO handy, you will for SURE want to add it to your basic tool kit!
The other thing that I will usually bring, but didn’t get into the photo, is my VersaMat. This is a self healing, gridded cutting mat on one side, and a soft stamping surface on the other side.
Now, hopefully I didn’t get TOO wordy for you today! At least I had a picture as well, right?? Do you have something in your basic tool kit that I don’t have in mine? Do I have something that you hadn’t thought to have in yours? I would love to hear about those items! Do share!! (I know my friend Eileen has dental floss in hers, to get her paper up after she has glued it down, if she placed it wrong, or forgot a layer that should have gone down first)
Want more inspo? Check out my friend, Danielle’s blog post! She has a few different things than I do!
Thanks so much for stopping by! Let me know what you think of my list!
Do you know that I do a Facebook live every Sunday evening? It is at 5pm pacific time, and I do all sorts of crafty things! I have always had great intentions of putting the photos and dimensions up on my blog after the video, and, well, life seems to always get in the way! So, now I am going to turn over a new leaf, and get them up on the blog on the Tuesday following! So, welcome to the first Tuesday repost of the Sunday live! LOL!!
Sunday we were playing with stencils and different things that you can do with them! I have a few examples to show you, and we made a card with one as well! If you want to play along, here is the star stencil that I used. It is on the Artbooking cartridge, so you will need to have that cartridge to cut this stencil. It is slightly different than that image, as I wanted to add a few more stars. So, at the end of the post are the steps that I did to get this stencil, in case you want to try it with one of yours!
We used a variety of mediums in the video, including dye ink, pigment ink, texture paste, & embossing powder. Different things will give you different looks, so you should try them all out!
This card was so fun to put together! And super easy, as well! Maybe a smidge time consuming, but not too bad, overall! I hope that you make one too! Please show me what you make, I love knowing that my tutorials are helpful to you!
Paper size info:
Willow: 6 x 4 {Trimmed after stenciling to 5 1/2 x 3 1/4 & 5 1/4 x 3/4}
Into the Wild, Wood Grain B&T: 5 1/2 x 1 1/4
White Daisy: 2 x 3/8 & 5 1/2 x 4 & scraps for “thanks” letters
Step by step how to make your own stencil:
1. Open Image: #M3D15D Stars overlay from Artbooking cartridge and make it be 6×6
2. Add Shape>Square to your mat
3. Click and drag square to be slightly larger than your star overlay
4. Select both images and slice
5. Select the grey image that looks like your stencil, and delete.
6. Move the grey stars & outline to the side of your overlay
7. Add Shape>Circle & duplicate it
8. Shrink one circle to fit over just one star in the grey overlay
9. Select that circle and the grey overlay and slice
10. Step 9 will give you 2 grey stars separate from everything.
11. Delete the circle with a start cut from it.
12. Repeat steps 8 & 9 & 11 with the 2nd circle.
13. Select all 4 grey stars, and like with the grey square, click and drag, but make smaller instead of larger
14. Place the individual stars on the original overlay (mine is a lagoon color) in the solid portions of the overlay
15. Select ONE grey star and the overlay, and slice. (you can ONLY slice 2 layers at one time)
16. Delete (or move) both the grey and the lagoon stars. (move if you might want to cut more stars from the overlay)
17. Repeat steps 15 & 16 for the other 3 stars.
18. You are now ready to cut your stencil!
If you don’t want to do all of those steps (looks harder in writing than it really actually is!!), here is the link to my stencil that I am using in the video!
I really do love seeing the creations that you guys and gals come up with! Leave me a comment and let me know what you think, and show me what YOU come up with!
Welcome to another Man Card Monday! I’ve decided to ramp up this series again, as I had many people tell me that they love it! We lady crafters seem to have a hard time making cards that aren’t too froofy to give to the guys in our lives!
So, today I have a card for you that I hope you will like! I was inspired by this card on Pinterest. So I decided to recreate it with the stamps and papers that I have!
Make sure to watch the video to put it together. The sizes for each of the pieces are at the bottom of this post.
{Can’t see the video in your email, click here to watch it!}
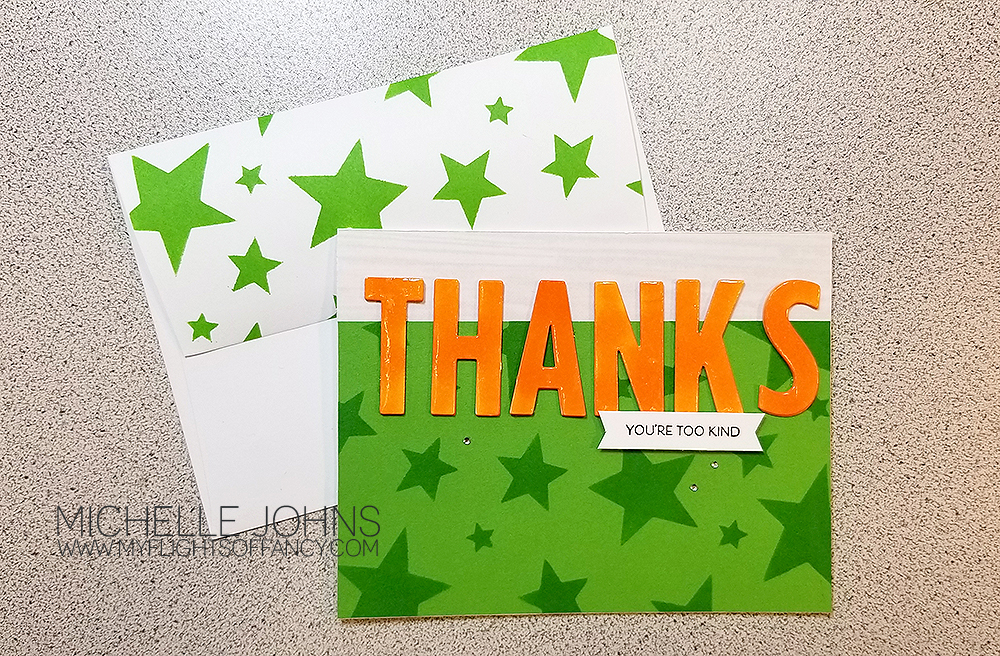
Welcome to August! It’s a new month, and a new week, and a new challenge! Today over at H2H, the new challenge is all about coloring! There are so many ways that you can color your images or your paper, or even your embellishments, it’s crazy! Today I am keeping the coloring fairly simple! (With everything else I used on this card, it’s probably a good thing!)
Now, I have been getting a bit more adventurous lately, in mixing and matching my stamps and thin cuts. But, today’s card is a bit crazy! If you had to purchase the full package items brand new, pulling nothing from your stash to make this card, it would cost $445! (though, I did not include blocks or the paper trimmer in this number!) WOW! Crazy, right??
Now, of course, I did not use whole packets of anything on this card, and most of those things are things that will be used MANY MANY MANY times! There is a list at the bottom of the post, so you can see everything listed out (including the blocks and trimmer), so you can add things to your stash, if you wanted! 😉
So, let’s get started, shall we?
So, the challenge, as I said above, is coloring. I knew I wanted to use the paper pal sets. I decided to color one to look like my youngest daughter. She is very tomboy, so she has a blue t-shirt (her favorite color) and green shorts. This is the combo that you will see her in the most frequently! She almost always has a hat on, something that she started doing last summer. Recently she and her friend died their hair to be a rainbow, with purple at the front to red at the back. So, you can see a bit of purple, blue, and green peeking out from under the bill of her hat. As a quick side note, the hair in the set is a traditional ‘guy’ hairstyle. I just turned it so that the side would be peeking from under the brim, as opposed to over the left ear on the paper pal. (her hair is short on the sides and long-ish on the top) If she has sunglasses available, she is almost always wearing them! So, now I have her little person all colored, it’s time to figure out how the card is going to go together!
So, I reached to the Make it from your Heart, volume 2 for a card design. I picked pattern 25. I have a bunch of scraps from all of the paper packs, so I was looking through those to see what pieces would work well with the colors that I had already colored. So, I have scraps from the Craft On, True Love, and Into the Wild paper packets. I used a pattern from the Mix In packet for the front of the card, so that it had a bit more interest.
I didn’t want to have a super weird cut off for my paper pal, so I used the smallest stitched rectangle to create a frame. She is partially inside and partially outside of this frame, and I think it gives it a fun somewhat 3-D look.
So, now I need a sentiment. (this seems to be my theme, recently . . . create the card and then figure out what the sentiment is going to be! LOL) Seeing as she is such a tomboy, I didn’t want to use the super frilly/scripty fonts that are in the Flower Market cartridge (even though I DO love them so!). I decided to do a bit of stamp surgery, and cut the frame from one of the stamps in the You Are Here sets, use the “Girl” from Sweet Girl Scrapbooking set, and the “love you” from the Flower Market set.
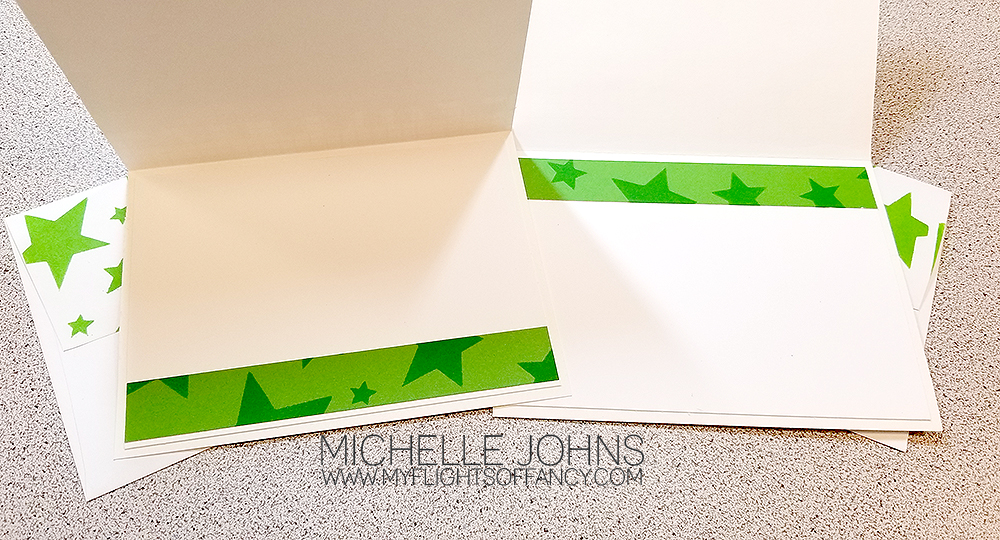
Of course, I couldn’t leave the inside or the envelope out of the fun! So, I used the same paper scraps to mimic the front onto the inside, and two of the main papers from the front onto the flap of the envelope.
I am really happy with how this card turned out! (even if it is, technically, really expensive!) It shows that you don’t have to stick to just one set. I know that if you are a crafter, you have a stash, even if it isn’t very large, you can be creative with how you use it! So, use your stash creatively, let your creativity go, and make something that makes your heart happy!
Thanks so much for stopping by! I hope you like my little card! What color would your paper pal be wearing?
All supplies used are CTMH, unless otherwise noted:
Welcome back, folks! This week we are talking about borders. As always, it is up for interpretation. This week, I went with the Decorative Borders Thin Cuts! Now, like you have seen me do in the past, I went for the Make it from your Heart books to get me started. Today, I was perusing Volume 1, and I gained inspiration from both patterns 25 and 30. More the artwork of those patterns than of the patterns themselves. (This is one of the things that I love about all of the books, there is artwork to show you that it can be done similarly, but differently at the same time!)
So, I started with pattern 30, and in that artwork, there is a scalloped border that is done, probably with the old corner punch, and there are a few layers of it. So, my brain said, if they can do a few, I can do a whole card front of them, right? Right! So, I ended up cutting about 24 strips! I used 20 on the front of the card, and 2 on the inside, and have a few left over that I can use for another project!
So, I have my card front, what do I do now? So, back to the book I go, and I pause at pattern 25. It has this fun rectangle on the front, and I knew that I could use the Stitched Rectangles thin cuts for this! I thought about just leaving the rectangle empty, but didn’t much like it that way. So, I decided that I would use a scrap of vellum on it, and that would be perfect! I would be able to see through it and still see that border background. I had a scrap of the Mix In paper packet on my desk, and thought that it would be perfect to add a bit of color to the card, but still soft enough to not take over the card. So, then I decided to add a bit of color to the frame that I had cut from the rectangle die, so I grabbed my pink watercolor pencil, and colored it in, and then went over it with the medium waterbrush. I did another scrap of the frame for the inside as well.
Then I needed to decide what to do for the front sentiment and focal point of the card. I had stamped and die cut the flowers from the Escape to Paradise stamp and thin cuts, so I grabbed those, and thought they would be perfect! So, I grabbed the watercolor pencils again, and colored away! Now, I had not stamped these on watercolor paper, so I tried to be very gentle with the amount of water that I used on the flowers and the frames too!
Now, I have everything but the sentiment! What in the world am I going to do? While I like the sentiments in the set, they just didn’t seem to fit with the direction that this card was going! So, I looked through what I had, and fell back to my trusty favorite set, the sentiments from the cricut Flower Market cartridge bundle! I LOVE these things! This sentiment worked perfectly with these flowers! And gives the card so many more possibilities! (I actually already know who I am giving it to, but won’t say just yet, as I want it to be a surprise!)
I attached the vellum to the frame with micro glue dots. I used them also on the flower in the back. Then I used some thin foam tape behind the frame, behind the sentiment strip, and for the top flower. Then, the card needed a bit of bling, so I added some silver glitter gems to it. Now that I am looking at it, I could have added a ‘nest’ of the silver embellishing thread behind the flowers, and that would have added yet another nice little touch.
I hope that you like my little card! Let me know what you think, should I have added the silver thread in a nest?
Thanks so much for stopping by! I hope you play along with the challenges over at Heart 2 Heart, they are super fun! You always have until the end of the month to complete your challenge, with a new challenge every week!
All products used are CTMH unless otherwise noted:
Welcome back! This week are are focusing on the wild! This can mean so many different things, and I went with the Pacific Northwest version of it! Where I am here in Washington, we have the mountains an hour-ish away and the ocean about two hours away. We really do have the best of it, right here! I love to go to both places, for different reasons. The mountains are so quiet and peaceful, and I don’t get there nearly enough!
At first I didn’t know what I was going to do for this challenge. I have this problem where I tend to come up with too many ideas, and then keep looking for another idea, because, what if that new idea is better? Well, this time was similar, except I hadn’t actually come up with any full ideas yet. I was trying to go with supplies, instead of the end result. I was chatting with my friend Danielle (about something else entirely) and the image for this card popped into my head! I could NOT wait to try it!
So, I grabbed a piece of scrap paper and the Into the Wild Scrapbooking stamp bundle, and some post it notes, and tried it. And it WORKED!! Then I did it with actual cardstock, and more post its, and this is what I came up with!
I stamped the mountains in pewter ink, and used the post it notes to mask the mountains, so I could add the peaks in the back. Then I used the largest tree and stamped it in New England Ivy ink randomly across the lower third of the card. Next was the medium tree with Fern Ink, grouped around the large tree. Then I used the smallest tree and stamped it in second generation New England Ivy Ink. I copied this onto the back flap of the envelope as well.
The sentiment comes from the You Are Here cricut bundle. There is a cricut cut for it, however, I just hand trimmed it, as I didn’t have my cricut handy when I was making this card.
Now, the sky is done with the medium flat waterbrush. This was a two part technique. I squished the sapphire ink pad, to put some ink on the lid of the ink pad. I also stamped 6 sets of mountains in the sapphire ink and trimmed them out. I then stuck the post it notes down to cover all of the mountains. I watered down the ink in the lid of the ink pad, and did a quick wash starting from the post its and going up to the edge of the paper. This pulls the ink from the post it and also from the ink pad. I made this a quick process, as the post it notes are not water proof, and I didn’t want the water seeping through and ruining the mountains. You can see that some did seep, but not a ton, and it’s ok!
The front and inside are matted with the light side of the New England Ivy cardstock. As you can see, I also stamped one of each sized tree on the inside of the card.
I LOVE how this card turned out! I hope you do as well! Leave me a note and let me know what you think! Then, go and make one for yourself, and share your creation with me!
All products used are CTMH unless otherwise noted:
If you watched my Facebook live on Sunday, you heard that I haven’t had a chance to do much crafting this last week! Well, I decided that I would participate in a few challenge blogs! So, I came up with this card fairly quickly, since I was using the sketch from Case This Sketch #330, and I went with the AAA Birthday challenge of ‘for the girls’. Their challenge blog is ALL about birthdays! It is such a great blog to go and check out! You will find ALL sorts of ideas for birthday cards! I decided to round it off with Time Out Challenge’s prompt this fortnight, which was a prose from Oscar Wilde. “With Freedom, Flowers, and the Moon, who could NOT be happy?” Hence the flowers from the Craft On paper pack! I was also going to play along with another challenge, but I missed part of it, but that’s ok, I still like how this card turned out!
I used the shaker thin cuts for both the circle and the frame, the shaker window foam and acetate for the shaker part, and I filled it with bits and pieces from the gold sequin mix, and a few of the smaller pearls. I used the happy birthday sentiment from the Hippo-Partymus stamp set stamped in Archival Black ink.
I hope you like my little card! It went together very quickly! Plus, I have found a few fun challenge blogs to play along with! I would love it if you left a little note to let me know what you think!
This week we are celebrating! All those good times!
Today I have a fun mini page for you. This is a 6 x 8 page perfect for our mini album binders. Some of these papers might be hard to place, and that’s because they aren’t going to be where you look for them! The Hearts paper is from the Mix In Packet that is retiring in August. That fun striped paper? Would you believe it is the paper that is included in the Stories by Stacy Short Story Workshop? I had a bit of it left over that I haven’t used up yet! I thought it added the perfect pop of color on this page! I also used a tiny bit of scrap from the True Love paper pack for the sapphire topper on the journal spot.
There will be a photo at the top (obviously, right?) that will be of the gifts that we will be bringing to the nurses at Randall Children’s hospital for Audrey’s 1 year anniversary of her “got rid of me day”!
There is a little spot on the bottom right for some journaling about the day.
I used the Simply Said alphabet for the date that will go over the photo, and use the Sweet Girl Scrapbooking set for the line of dots on the date and the journal card, and the little sentiment on the left.
I really like how this page turned out! It’s not super busy, but it will be perfect for the day! And, should I need, I can add some flip flaps to the page as well, to add more photos!
All products used are CTMH unless otherwise noted: