Monthly Archives: January 2020

3-D Project Friday | Mini Pizza Box

It’s 3-D Friday! Danielle & I love having all these little projects for you! Today we have a little mini box for you! You can use it for treats or cards or even jewelry!

We used this pin for inspo.

Now, I went a bit differently on the box, so my measurements do not match the ones given in the inspo post, however, I do give my measurements in the video itself.

It was fun to make these little cards to go into the box. I had a specific person in mind for these (and I won’t say just yet, as I know she hasn’t gotten them yet!). I know that she will enjoy giving them to her co-workers on random just because reasons.

I think they turned out absolutely adorable!! And I love having a new use for the Spruced Up Cardmaking workshop stamp set and die!

Check out the video to make this box along with me!

Thanks so much for stopping by! If you haven’t already checked out Danielle’s box, make sure to go and do that now!

Mini Wednesday!

Welcome back to another Mini Wednesday! Danielle and I are at it again! (you knew we would be, right?)

Today I chose this page to do a “choose your own adventure” type of page! There are so so so many options! I went with two 4×6 pieces, that will go in a page protector that is made for that. (I photographed them outside of it, as it’s easier to photograph!)

For the top piece, I use a piece of the Spruced Up B&T. Aren’t those trees just adorable? I found a piece of scrap vellum and stamped “grateful”, from the Say It In Style stamp set, in espresso ink and used my hair dryer to help the ink dry faster. I just glued it to the back side of the B&T. It will lay flat when it’s in the protector, no need for any other glue! My photo will be 3 1/2 x 3 1/2.

The bottom piece is the same piece of B&T, but the back side! This will be for journaling, but another photo could easily be added!

Super fast, super simple, and I have another page done!

I would love for you to pick and choose some of your own adventures, and make sure to share them with us!

Make sure to check out Danielle’s page too!

It’s time for Bluebird!

It’s time for another challenge over at H2H! this week’s challenge is to use the color, Bluebird!

I found this fun card, that was a great inspiration!

I used two different stamp sets for this card, Colorful Texture from the Story by Stacy line, and the Spruced Up Cardmaking WYW stamp and die set.

The hearts are all stamped in first and second generation stamping. (and honestly, they are pretty straight and evenly spaced for just eyeballing it!)

I colored the white ribbon with the bluebird ink and dried it with my hair dryer! I think it looks awesome!

The banner was die cut and then stamped with archival black for the sentiment and bluebird for the outline. I wanted to have a bit more dimension, so I popped up the top banner with some foam tape.

This card was super simple to put together, took no time at all! And you could TOTALLY do this with ANY or EVERY color! Even if you don’t have the cardstock, you could use the ink to color the edges of a white daisy piecee so that you could have completely matching colors!

Anyway, I hope that you try it! I would love to see the card that you make with this!

Until next time, check out the H2H blog and play along with us!

Wednesday is Mini Day!

Hey everyone! Welcome back to another Mini Wednesday! As you have seen the last few weeks, on Wednesday, Danielle and I are challenging each other (and all of you) to participate in a sketch challenge! Well, today, we went a slightly different route! Danielle chose a mini album page straight off the Artbooking cartridge! Perfect! I love using my cricut!

And then, my computer and design space decided they weren’t going to play nice together! Whaaaaaa?!?!?! Sooo, she suggested that I go with using it more as a sketch, and not use my cricut. So, that’s exactly what I did!

In place of the honeycomb, I used some vellum to tone down the floral paper from the Celebrate Today paper packet, just a smidge. I used pixie cardstock for some ‘Polaroid’ frames. Those acrylic hearts . . . don’t you just love them? I used the bright pink marker to give them a pop of color against the background.

On the left page, I again used some vellum, but ran it horizontal, and the backside of the flower paper is a pink wash, and I used that to help the photos pop against the background. A quick heart from the stitched hearts die, and this page is done!

These pages went together in less than an hour, even with the coloring! It was so awesome! I love it when things are easy and fast! Especially when they turn out this good!

I would love to see what you come up with for this week’s sketch! I do hope you will share with us! If you didn’t yet, hop on over to Danielle’s blog to see what she came up with! It is super cute!

I look forward to seeing what you guys do with this one!

Until next week!

Stay Crafty my friend!

The easiest lay flat box ever!

Welcome back to another box tutorial! Danielle and I have made this same box, and it is the easiest box ever! Seriously, SO EASY!!

So, you will need a piece of cardstock that is 7 1/2 x 7 1/2, and 8 pieces of B&T paper that are 2 x 2. (I also had 4 pieces of coordinating cardstock that were 2 1/4 x 2 1/4.)

Score your large piece of cardstock at 2 1/2 inches on all 4 sides.. Attach all of your pieces (with or without mats) and then hole punch. Thread your ribbon through, and viola! You have a box!

I even have a quick video for you!


{If you can’t see the video, click through to the blog post!}

I even made this teeny one! Look at how cute it is! This one is 3 3/4 x 3 3/4, scored at 1 1/4 each side, and the gold glitter paper is just one inch square! Perfect for just one Ferrero Rocher!

I do hope that you make one of these boxes! They are super simple to make! And the best part is they lay flat until you need it! So, make sure you go and check out her post as well!

Mini Album Challenge, week 2!

Welcome back to the 2nd week of the Mini Album page challenge! Danielle and I are at it again with this weekly sketch challenge! We are having a LOT of fun with this, and we hope that you are enjoying seeing what we come up with each week!

Today we are working with this sketch.

For these challenges, we are picking a sketch, and we are working on them separately. That way you get two different ideas (in theory, at least!) for the same sketch! (in this case, if you follow the pin, there are even more ideas for this sketch, on multiple days)

Today I used the Spruced Up papers to make this fun little mini layout. the flip flaps allow me to add more photos to this small page! I just love how easy they are to add to the page protectors!

(I’ve found that it’s really hard to photograph pages in page protectors! Sorry!)

Now, I have actually created a cricut file for this page! You can find it here: Week 2 Sketch

This week I have a quick process video for you, the sketch is pretty simple, so I didn’t give any measurements, but it’s easy!

I hope you enjoy!

Remember, go over and check out the page that Danielle has for you! We would LOVE to see you participate! Let us know if you play along with the same sketch!

Cutting it Close!

Welcome to 2020 and the challenges that H2H are doing! I missed last week’s challenge, but I’m back in the saddle with this one! This week’s challenge is all about cutting things close! You can fussy cut, cricut cut, or like me, use some die cuts!

This was the fun candy treat that my crop ladies got at the last crop. They were super simple to put together, some random stamping, and coloring!

I just cut my paper to be the same width as my cello bag, and created a bottom and backing for it. Then used some B&T to make the top pretty too!

I die cut and stamped my images. Then I used our water colors to paint each of the flowers. Then some of the flowers were colored again with a shimmer brush. Then, I stamped each of the die cuts again, so that the outlines were nice and brisk!

Isn’t it so pretty?? I love how it turned out!

Here are the things that I used:
White Daisy Cardstock
Spruced Up Cardmaking Workshop stamp & Die
Mix In Paper Packet
Watercolors
Water brush
Archival Black Ink
Canary Ink
Eggplant Ink
Charcoal Ink

Thanks for stopping by! Now, head over to the H2H challenge blog and see what some of the other ladies have got to show you, and maybe even consider playing along!

Let’s put a spin on things!

Happy Sunday, everyone!

Today I have a fun spinner card, complete with video! Danielle and I are both doing a “Spinner” card, however, they are both so totally different! Make sure to go over and check out her card, and watch her video showing how she did it!

Today’s card is somewhat simple, decoration wise, but that spinner makes up for it! (I think!)

We both used the January SOTM, Everyday Magic. Such a great set!

I used a number of dies in this card, but that made it super simple to put together!


{The video is above, if you don’t see it, please click through to the blog post to see the video!}

Sizes:

B&T papers: 4 x 5 1/4 (qty 2)
Julep Cardstock: 3 1/4 x 3 1/4 (Cut the frame and then the largest stitched circle from the inside negative piece from the frame)
White Daisy Cardstock: 3 x 3 ~ Largest Stitched Circle

Here are the things that I used:

Mix In Paper Packet
Julep Cardstock
White Daisy Cardstock
Value Pack Card Bases & Envelopes
Shaker Window Thin Cuts
Basic Circles Thin Cuts
Stitched Circle Thin Cuts
Shaker window foam and acetate
Liquid Glass
White Acryllic Hearts
January 2020 SOTM
Black Archival Ink
Micro Glue Dots
Glue Dots
White string/thread from stash

Hopefully you like the card and the tutorial is easy to follow! I would love to see any cards that are inspired by this card and tutorial! Remember to hop on over to Danielle’s blog to see her card!

Let’s Make a Box!

Danielle and I are at it again! Today’s challenge is to make a box! We decided to go with the same tutorial, and see how it comes out! So, we are using this tutorial.

This creates a box that is 6 inches by 6 inches! (Well, on the outside!) The inside box is 4 inches square and 3 inches tall. You can fit quite a things into this not so little box! Now, there is one correction to the video that I found when I was making mine. The first measurement that she gives is that you need two sheets of card(stock) that are 6 x 3. However, that measurement should be 6 x 9.

This box does use 2 sheets of cardstock (before decorating), and 2 sheets of B & T paper. If you also do the inside of the box, you will use a bit more than that. I did choose to not cover the inside of the box. I used Celebrate Today and the Mix In paper packets for this fun box! Don’t you just love how well the paper packets go together?

If you use liquid glass instead of a tape runner, you will have a bit more of a sturdy box. I ran out of the bottle that I was using when I was putting the box together!

I decided to top the box with a fun title and some flowers. Then I added some greenery and flowers along the front inside right corner. I used colors from the paper packet, Raspberry, Lagoon, Nectarine, Evergreen, and Mink.

Here is the design space link for the flowers and title for this box! You will need to have these cartridges to cut for free, or you can purchase the individual files through your design space: Flower Market, You Are Here, and Art Philosophy.

This box is really easy to put together! I think you should try it!

Thanks so much for stopping by! Remember to check out Danielle’s box too, her’s is super cute! Let us know if you decide to make the box! We would love to see!

Until next time!

~ Michelle

{If you get my posts via email, my apologies for a double post!}

Join me in a Mini Album weekly challenge!

My friend Danielle and I are doing a weekly challenge between us to create a mini album page each week. We will both have the same sketch to work with, and using currently available products, we are going to make a page. I think that it will be good to get caught up on some past photos, because, what scrapbooker doesn’t have some photos that they don’t need to get caught up on, right?

I was thinking that the mini albums allow you to get things scrapped, but you don’t have to spend a lot of time to be able to do it. You have space to do some journaling, add some photos, and you are good!

Today’s page doesn’t have any photos on it yet, but I am hoping to get them on there for next week’s post. (so, that might become a thing? We’ll see!)

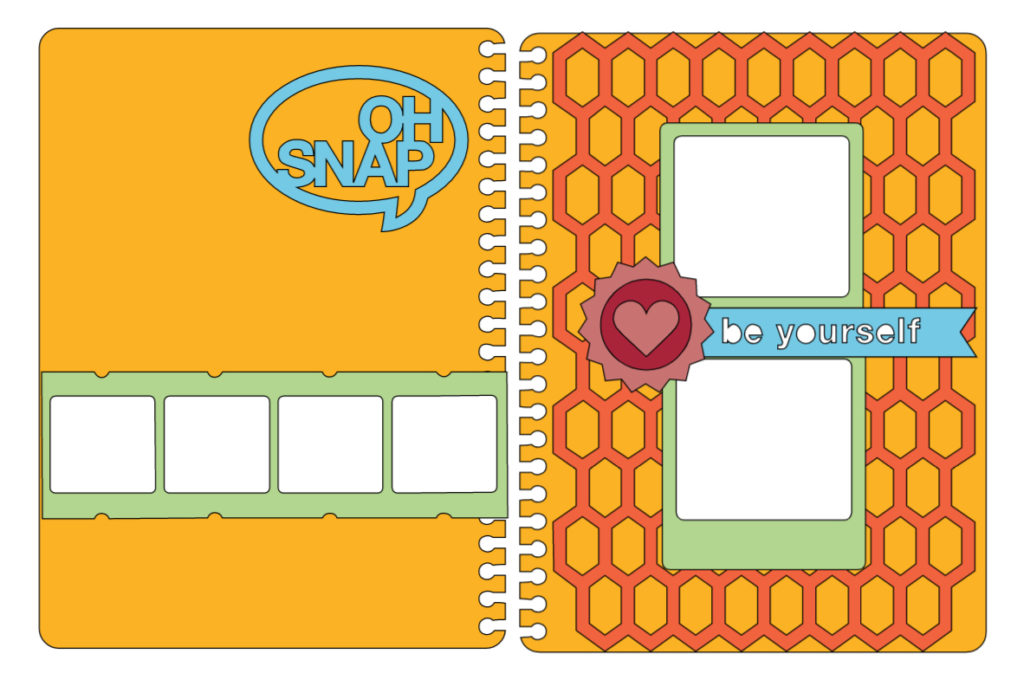
So, here is today’s sketch.

I think it is designed more for an 8×10 page (which you could also do), but I went with a 6×8 page.

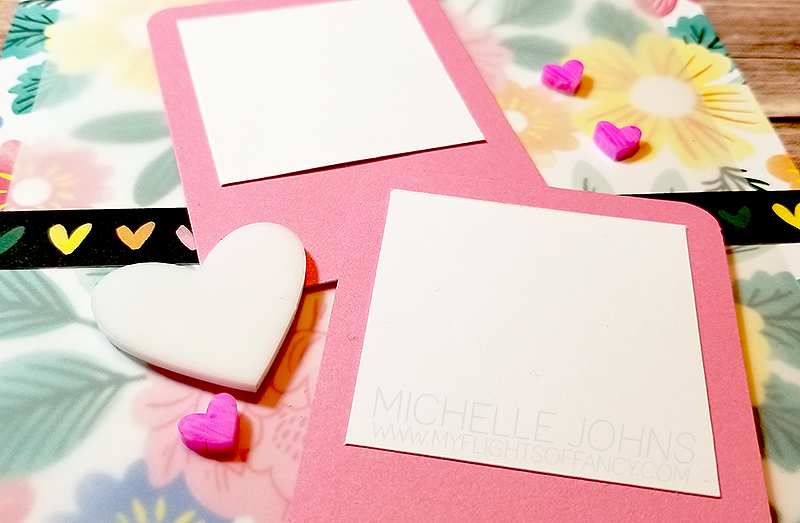
With four kids, I have a lot of birthdays each year! Not only my kids’ birthdays, but the birthdays of the kids in their classes! So, there can be a LOT of photos for those! So, I went with a birthday theme! This page can be used for either Evan or Audrey, as they both like these colors. I used papers from the Mix Ins paper packet and the Celebrate Today paper packet! The balloons (and string) I grabbed from my stash, but they are CTMH! The balloons are Lagoon, Avonlea Teal (it was a cardstock specific to that paper packet), and I believe Juniper. So, two of those colors are retired, but they worked so well! The cardstock mat in the back is Glacier, light side.

Don’t you just love the flip flaps on this page? Yes, the balloons are outside of the page protectors! I attached them with some glue dots. (I used 3×4 and 2×2 flip flaps)

I made multiple layers with the balloons, to add more depth to the whole balloon cluster! There is room for 5 photos on this one little 6×8 scrapbook page! And even room for journaling too!

I would love to see what you do with this sketch! Won’t you play along with us? Make sure to hop over to Danielle’s blog to see what she came up with for this page!

Thanks for stopping by! I hope you will take a look around! Let me know what you think!