Tag Archives: Card

On the Border with H2H!

Welcome back, folks! This week we are talking about borders. As always, it is up for interpretation. This week, I went with the Decorative Borders Thin Cuts! Now, like you have seen me do in the past, I went for the Make it from your Heart books to get me started. Today, I was perusing Volume 1, and I gained inspiration from both patterns 25 and 30. More the artwork of those patterns than of the patterns themselves. (This is one of the things that I love about all of the books, there is artwork to show you that it can be done similarly, but differently at the same time!)

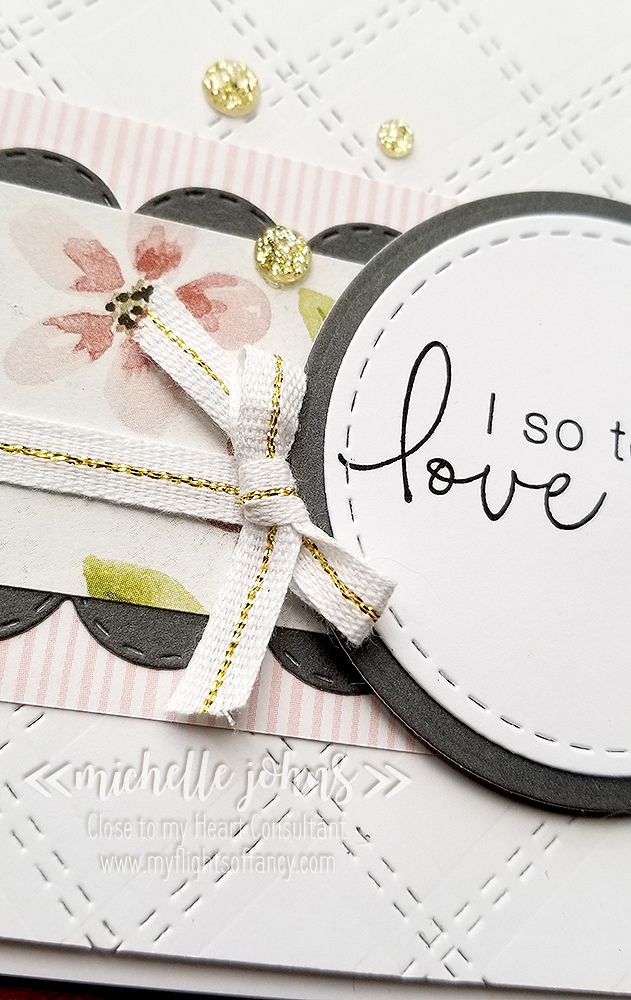
So, I started with pattern 30, and in that artwork, there is a scalloped border that is done, probably with the old corner punch, and there are a few layers of it. So, my brain said, if they can do a few, I can do a whole card front of them, right? Right! So, I ended up cutting about 24 strips! I used 20 on the front of the card, and 2 on the inside, and have a few left over that I can use for another project!

So, I have my card front, what do I do now? So, back to the book I go, and I pause at pattern 25. It has this fun rectangle on the front, and I knew that I could use the Stitched Rectangles thin cuts for this! I thought about just leaving the rectangle empty, but didn’t much like it that way. So, I decided that I would use a scrap of vellum on it, and that would be perfect! I would be able to see through it and still see that border background. I had a scrap of the Mix In paper packet on my desk, and thought that it would be perfect to add a bit of color to the card, but still soft enough to not take over the card. So, then I decided to add a bit of color to the frame that I had cut from the rectangle die, so I grabbed my pink watercolor pencil, and colored it in, and then went over it with the medium waterbrush. I did another scrap of the frame for the inside as well.

Then I needed to decide what to do for the front sentiment and focal point of the card. I had stamped and die cut the flowers from the Escape to Paradise stamp and thin cuts, so I grabbed those, and thought they would be perfect! So, I grabbed the watercolor pencils again, and colored away! Now, I had not stamped these on watercolor paper, so I tried to be very gentle with the amount of water that I used on the flowers and the frames too!

Now, I have everything but the sentiment! What in the world am I going to do? While I like the sentiments in the set, they just didn’t seem to fit with the direction that this card was going! So, I looked through what I had, and fell back to my trusty favorite set, the sentiments from the cricut Flower Market cartridge bundle! I LOVE these things! This sentiment worked perfectly with these flowers! And gives the card so many more possibilities! (I actually already know who I am giving it to, but won’t say just yet, as I want it to be a surprise!)

I attached the vellum to the frame with micro glue dots. I used them also on the flower in the back. Then I used some thin foam tape behind the frame, behind the sentiment strip, and for the top flower. Then, the card needed a bit of bling, so I added some silver glitter gems to it. Now that I am looking at it, I could have added a ‘nest’ of the silver embellishing thread behind the flowers, and that would have added yet another nice little touch.

I hope that you like my little card! Let me know what you think, should I have added the silver thread in a nest?

Thanks so much for stopping by! I hope you play along with the challenges over at Heart 2 Heart, they are super fun! You always have until the end of the month to complete your challenge, with a new challenge every week!

All products used are CTMH unless otherwise noted:

Escape to Paradise Bundle Z4085
Mix In Paper Packet
White Daisy Cardstock
Decorative Borders Thin Cuts
Stitched Rectangle Thin Cuts
Flower Market Cricut Bundle
Intense Black Ink
Water Color Pencils
Medium Round Waterbrush
Silver Glitter Gems
Liquid Glass
Micro Glue Dots
Thin 3-D Foam Tape
White Cards & Envelopes Value Pack
2 x 3 1/2 Clear Acrylix Block
1 x 3 1/2 Clear Acrylix Block
Fiskars Paper Trimmer

Into the Wild with H2H!

Welcome back! This week are are focusing on the wild! This can mean so many different things, and I went with the Pacific Northwest version of it! Where I am here in Washington, we have the mountains an hour-ish away and the ocean about two hours away. We really do have the best of it, right here! I love to go to both places, for different reasons. The mountains are so quiet and peaceful, and I don’t get there nearly enough!

At first I didn’t know what I was going to do for this challenge. I have this problem where I tend to come up with too many ideas, and then keep looking for another idea, because, what if that new idea is better? Well, this time was similar, except I hadn’t actually come up with any full ideas yet. I was trying to go with supplies, instead of the end result. I was chatting with my friend Danielle (about something else entirely) and the image for this card popped into my head! I could NOT wait to try it!

So, I grabbed a piece of scrap paper and the Into the Wild Scrapbooking stamp bundle, and some post it notes, and tried it. And it WORKED!! Then I did it with actual cardstock, and more post its, and this is what I came up with!

I stamped the mountains in pewter ink, and used the post it notes to mask the mountains, so I could add the peaks in the back. Then I used the largest tree and stamped it in New England Ivy ink randomly across the lower third of the card. Next was the medium tree with Fern Ink, grouped around the large tree. Then I used the smallest tree and stamped it in second generation New England Ivy Ink. I copied this onto the back flap of the envelope as well.

The sentiment comes from the You Are Here cricut bundle. There is a cricut cut for it, however, I just hand trimmed it, as I didn’t have my cricut handy when I was making this card.

Now, the sky is done with the medium flat waterbrush. This was a two part technique. I squished the sapphire ink pad, to put some ink on the lid of the ink pad. I also stamped 6 sets of mountains in the sapphire ink and trimmed them out. I then stuck the post it notes down to cover all of the mountains. I watered down the ink in the lid of the ink pad, and did a quick wash starting from the post its and going up to the edge of the paper. This pulls the ink from the post it and also from the ink pad. I made this a quick process, as the post it notes are not water proof, and I didn’t want the water seeping through and ruining the mountains. You can see that some did seep, but not a ton, and it’s ok!

The front and inside are matted with the light side of the New England Ivy cardstock. As you can see, I also stamped one of each sized tree on the inside of the card.

I LOVE how this card turned out! I hope you do as well! Leave me a note and let me know what you think! Then, go and make one for yourself, and share your creation with me!

All products used are CTMH unless otherwise noted:

White Daisy Cardstock
New England Ivy Cardstock
Charcoal Ink
Pewter Ink
New England Ivy Ink *photo shows old style pad
Fern Ink *photo shows old style pad
Sapphire Ink *photo shows old style pad
Shaker Window Foam & Acetate
White Cards & Envelopes Value Pack
Micro-tip Scissors
3 x 3 Clear Acrylix Block
1 x 1 Clear Acrylix Block
2 x 2 Clear Acrylix Block
Fiskars Paper Trimmer

Making Waves with H2H!

This week’s challenge over at Heart 2 Heart is all about making waves! There are so many things that we could go with on this one, but I went more crafty, than photographic!

I decided to create my own B&T paper with the wave stamp from the Escape to Paradise set. I used sapphire ink on sapphire paper, and a little bit of masking to make the fun paper!

I used the Make it from your Heart, Volume 1 book, pattern 22 for this card. The stars paper is from the Into the Wild paper pack. I stamped the ship and tree with Intense black ink, and the sentiment and envelope with the archival ink. I colored the ship with the Carmine Touch Twin marker, and the tree on the inside used the Vivid Green and Clay markers. I did use the matching thin cuts to cut both the ship and the tree out. Both the front and the inside are layered with some sapphire cardstock.

I really had fun coming up with this card! I hope you enjoy it as well! Let me know what you think!

Supplies used are all CTMH unless otherwise noted:

Escape to Paradise Bundle Z4085
Into the Wild Paper Pack
White Daisy Cardstock
Sapphire Cardstock
Intense Black Ink
Archival Black Ink
Sapphire Ink *photo shows old style pad
Carmine Touch Twin Marker
Vivid Green Touch Twin Marker
Clay Touch Twin Marker
White Cards & Envelopes Value Pack
2 x 3 1/2 Clear Acrylix Block
1 x 3 1/2 Clear Acrylix Block
Fiskars Paper Trimmer

Candy Apple Color Challenge at H2H

This week’s challenge at Heart 2 Heart is all about Candy Apple Red! I don’t know about you, but I LOVE how red this color is! Valentine hearts, 1950’s Chevy Truck, and Candied Apples all come in this fantastic red color! This week’s challenge is to show you different ways to use it! You have a whole month to play along with us, so I do hope that you join us!

Today I drew inspiration from the Make it from your Heart volume 1. These books give you sketches with the cutting sizes, they also give you a finished piece of artwork to help you with ideas. Today I went from the idea, more than the actual sketch! We are using pattern 20 from the book today, so go and look it up! If you don’t have these books, I promise you, they will help you so much in your crafting!

Today my colors are Candy Apple (of course), White Daisy, and Black. I used a piece of Black cardstock cut at 4 1/4 x 11, scored at 5 1/2 for my card base. I then used two pieces of white daisy cardstock, both cut to 4 x 5 1/4. One for the outside and one for the inside, as it is easier to write on white cardstock than it is to write on black (well, it is if you want it to be able to seen!)

I random stamped the large heart from Stacy Julien’s Story by Stacy, Colorful Texture stamp set in candy apple ink on one piece of the white daisy, and just one single heart in the bottom right corner of the second piece. While I had the stamp out, I random stamped the back flap of the envelope and put one single heart on the bottom left of the front of the envelope.

Now I did some die cutting! I used the largest heart from the Basic Shapes – Hearts thin cuts on some candy apple cardstock, the 2nd largest stitched circle from the Stitched Circles thin cuts on some white daisy cardstock, and the torn notebook edge from the decorative borders thin cuts in black cardstock.

I grabbed the words from the Colorful Texture set to create the sentiment on the card, also stamped in Candy Apple Red ink. I created the colon using the round end of my embossing tool. I used the i from ‘this’ in the stamp set, upside down, for the exclamation point after the word ‘you’. I used the journaling pen to create a stitched line on the outsides of the Candy Apple Heart.

Next, I cut off about 9 inches of the Candy Apple Striped ribbon, and used some glue dots to create the wave in the piece. I then used a few more glue dots to secure the black piece cut from the torn edge thin cut to the back of the ribbon.

Now it is time to put the whole thing together! I adhered both white daisy layers to the front and inside of the card using liquid glass. Then I glued the ribbon/paper cluster to the card just below 1/3 of the way from the bottom of the card. I used foam tape to pop up the heart from the card, and again to pop up the white circle from the heart. To finish off the card, I added some black enamel dots!

I really like how the card turned out! If you compare it to the artwork in the book, you can see that it very closely resembles it! (the stamps and such used in the book are now retired, so I used currently available items.

I hope that you like the card that I came up with! I would love to know what you think! Please leave a comment below and let me know!

Thanks so much for stopping by!

~ Michelle

I So Totally Love You!

Today marks another challenge over at the Heart 2 Heart challenge blog, and I know you want to play along! This week’s theme is Happy Times. This would be a GREAT scrapbook page, as it could be so very many different things!

Today I decided to go with a card with a sentiment that speaks volumes for many a happy time!

This card uses many different dies, and I LOVE how it turned out! So, let me walk you through my process, shall I?

I started with the Make it From Your Heart, Volume 4, and found pattern 3 (so, yeah, didn’t get too far into the book! LOL) that I loved how the stitching looked on the card. I’m all thumbs with a sewing machine, so I thought, “Hey! I have the stitching dies in the Decorative Borders Thin Cuts set!” So, I grabbed that out, started with a white daisy piece of cardstock that was 4″ x 5 1/2″, and marked at every inch, lightly with pencil. Then I ran the cardstock and die through the die cut machine 15 times! (this is definitely not a card you want to make a LOT of!)

Then I cut a piece of charcoal cardstock to be slightly larger than what the pattern called for, because I decided I wanted to use the scallop from the same set. (I ended up cutting that piece in half, to get the scallops where I wanted them) I glued that to the back side of a piece of B&T from the Feels Like Home paper pack. Then I attached the stripe pieces from the Something Fierce paper pack to the back side of the scallops. Then I attached that little cluster to the piece that I had done the stitching to.

Next up, I cut the largest circle from the Basic Circles Thin Cuts from charcoal cardstock, and the largest circle from the Stitched Circles set from white daisy cardstock. I stamped the stitched circle with one of the sentiments from the April Stamp of the Month, Love So Sweet in Archival Black ink.

I wrapped a piece of the White & Gold Ribbon around the flower B&T, and attached on the back with a piece of foam tape, on both sides. Then I added Foam tape behind the rest of the white cardstock piece. I glued the white daisy and charcoal circles together and popped them up on some foam tape as well. Then I tied a bow in the white and gold ribbon, and attached it to the card at the meeting of the circle and ribbon with some micro glue dots.

To finish off the card, I added some Gold Glitter gems, after I placed the whole stitched piece onto a card base from the value card and envelope package.

I decided that I wanted to up the envelope a bit, so it would match the card a bit more, and to make it a bit more fun to receive. So, I glued a piece of the striped paper from the Something Fierce paper pack, the same piece that was used on the card, and trimmed with my microtip scissors.

I hope that you really like my card, and would LOVE it if you decided that you needed to make one just like it! It would be great if you would leave a comment and let me know what you think of this fun little card!

These paper packs and the stamp of the month will both only be available until the end of April, so you will want to make sure to hop on over and get them before they are gone!

Man Card Monday ~ We’re Related?

Today’s card is super fun and a little spunky! Plus it’s super easy to do!

There are just a few pieces for this card, so it goes together SUPER fast! And when you use the cutting guide below, it makes it even faster!

Make sure to watch the video to see how fast it comes together!

The paper sizes are as follows:
Yellow Stripes: 4 x 5 1/4 & 1/2 x 5 1/4
Pewter: ~ 4 x 3
Canary: ~ 4 x 3

The items used for this card are:

Card Base & Envelope
Mix In Paper Pack
Pewter Cardstock
Canary Cardstock
Archival Black Ink
Liquid Glass
Shaker Window Foam & Acetate
Cricut Cartridge: You Are Here
Black & White Dots

You can find the cut file here. You will need the You Are Here Cricut cartridge to be able to cut it, so if you don’t have that, let me know, and I can hook you up!

Favorite Sketch Challenge

Howdy! It is another challenge day over at H2H! Today we are showing off our favorite sketches! I have a hard time choosing just one, so I narrowed it to two! LOL!

So, the first card that I chose was pattern 27 from the Make it from your Heart, Volume 1. It is a great, easy, but versatile pattern!

I used the April SOTM, and had fun with it! I stamped the butterfly in pewter on the white part, as well as the sentiment. I then stamped the butterfly in ballerina ink and cut it out. I also stamped the stripes on either side of the white ribbon. It just added a bit of texture and interest.

The second card uses pattern 23 from the Make it from your Heart volume two. These flowers from the SOTM are so beautiful! I stamped them in canary ink and cut them out. I stamped the cut out leaves in pewter ink, 2nd generation, and then under the flower and the thanks sentiment, I stamped the leaf image in 3rd generation pewter ink. It’s really hard to see in the photos, but adds just a bit of interest.

I popped up the top flower with foam tape, and tucked those leaves in here and there to help balance out the whole image. I love the little pop of color with the canary yellow!

Both of these cards use the Feels like Home paper pack, but they still look a bit different!

I hope you like my fun little cards! Come on over to H2H and play along and share YOUR favorite sketch!

Man Card Monday ~ Happy Wishes

Welcome to another Man Card Monday! Today’s card is a simple one, but can be used for so many different things! It would be super easy to swap out the papers for another card!

Here are the measurements for today’s card:

Black (2): 4 1/8 x 5 3/8
Heather: 4 x 5 1/4
White Daisy: 4 x 5 1/4
Striped paper: 3 1/8 x 3 7/8
Plaid paper: 2 x 3 7/8
Heather strip: 1/2 x 4
Black strip: 1/8 x 4 1/8
Scraps: White Daisy & Heather

This is a beautiful yet simple card that works for so many things!

Make sure to watch the video to see it come together!

Supplies used:

Seasons Mix In
Heather Cardstock
Black Cardstock
White Daisy Cardstock
Card Base
Flower Market Cricut Bundle
Stitched Ovals Thin Cuts
Fiskars Paper Trimmer
Micro Tip Non Stick scissors
Liquid Glass
Tombow Glue
Black Archival Ink

Man Card Monday ~ Thanks for Sticking by me!

Today marks the fist in a new series for me! This Man Card Monday is for those of us that love making cards, but have a hard time with the cards for the guys. Guys are hard! We want to put bling and pretty bits on the cards that we take the time to make, but the guys . . . well, they don’t generally wants the glitz and bling!

So, each Monday, watch for a video from me that will walk you through making the cards, maybe with a little too much talking, sometimes . . . but that’s me! Some cards will be easier than others. Today’s card is a bit of a futzy one, but I LOVE how it turned out!

Today’s card uses papers from both I Heart Us and So Much Happy. Using the Make it From Your Heart, Volume 4 book made it REALLY easy to do!

The white dots from the Black and White Dots helps give it some ‘bling’, but still makes it ok for the guys!

Adding the water coloring on the cacti is what took the most amount of time, well, maybe fussing cutting them took a bit more time? Anyway, those cacti took the most amount of time of the whole card, but I think they are totally worth it!


(Don’t see this video? Click here to watch it on YouTube!)

I hope you like the cards, and that you join me each week for Man Card Monday! I look forward to seeing you next week!

~Michelle

If you like what you see in this post, why not;

  • Subscribe to my Youtube channel
  • Subscribe to my blog.
  • Ask me how to earn a free pre-cut kit each month, with a qualifying purchase
  • Join my CTMH Team!
  • Here is the supply list for the cards, today. They are linked directly to my shop, so if you feel the need to have some come live with you, by all means, click away!

    So Much Happy Paper
    I Heart Us Paper
    White Daisy Cardstock
    Pewter Cardstock
    Value Pack Card Base & Envelope
    C1751 Sticky Notes Stamp Set
    Archival Black Ink
    Black and White Dots
    Make it From Your Heart, Volume 4
    Water color Pencils
    Small Round Water Brush
    Micro Tip Scissors
    Piercing Tool
    3-D Foam Tape
    3-D Thin Foam Dots
    Fiskars Paper Trimmer

    Thanks again for stopping by! Have a great day!

    March SOTM Blog Hop – This Happened

    Welcome to the March Stamp of the month blog hop! This month’s stamp is called This Happened, and is a super fun set! It can be used for scrapbooking or even card making! This set is available for just $5 with a qualifying purchase. Today you should have arrived from Erin’s blog, but if not, that’s ok, it’s a circle, and you will come back around to her!


    This super fun card uses the I Heart Us paper bundle that is on special during March. It also uses some of the white gems from the Grey Gems that are available online, but are not in the Seasonal Expressions book.


    I added some fun doodles with the LePen Journaling pen. The sentiment was stamped with Intense Black Ink onto the canary cardstock.

    Want to get this card and 4 mini album pages free? Place an order that qualifies to get the SOTM for $5 (and get the SOTM), and I will send you a pre-cut kit that includes this card, for FREE!

    Thanks so much for stopping by! I would love it if you left a comment before you hop on over to Amy’s blog! I’m positive that she has some super cute somethings to show you with this set!

    Happy Crafting!

    ~ Michelle