Category Archives: CTMH

15 years of Close to my Heart goodness!

Spring time Mini Layout

So, as you know, my mini layouts have been geared towards the trip that hubby and I did to NYC. Sometimes that becomes a bit difficult, but other times not so much. This time, Danielle and I chose this layout to be inspired by. It’s in a Traveler’s notebook, which is a different size than our mini albums. So, I was looking at the colors, the layout, all the little pieces.

When we were there, we happened upon the Easter Bonnet Parade! Totally unexpected event! Neither of us had ever heard of an Easter Bonnet Parade before! (and we had come upon people after the parade, as they were slowly dispersing, so it was a hat here and a hat there, and then more and more, and then found out what was going on!)

I don’t know if/what we got photos of (I didn’t consult the photo folder before making this page!) but I am hoping that we got at least a few! If nothing else, we will have something to journal on! LOL!!

I know it’s plain, kind of, at this point, but I want to get the photo on here before I add the title or embellishments (just in case I don’t have any photos that will work for what I want!)

Oh, that photo size, looks weird, right? I was going to do a 3×4, but then decided I wanted to have more space, so it’s a 3×6! I’m sure I can find something that I can chop off 1″ on the long end!

I would love to know what you think! Will you be playing along? Can you name the papers in this page? Leave me a note below, I would love to hear what you have to say! Then make sure to hop over to Danielle’s blog to see what she came up with for this page!

April Stamp of the Month Blog Hop – O-fish-ally Awesome

Welcome one, welcome all! Ok, so that sounds like it’s a circus today, but it’s just time to jump into the pond with the rest of us! Since we can’t do that right now in person, let’s do it virtually! This is going to be O-Fish-ally Awesome!! (hahaha!) So, you should have gotten here via Becca’s blog, but if not, that’s ok! You can start here and follow the fishy tails! If you get lost along the way, Melinda has the whole blog hop list up here.

So, let’s get swimming, shall we? I went crazy pinning a BUNCH of ideas for this set, because it’s just adorable! And with so many fish options, who couldn’t find a good reason for using it?? So, I picked this one to be inspired by, and just started coloring!

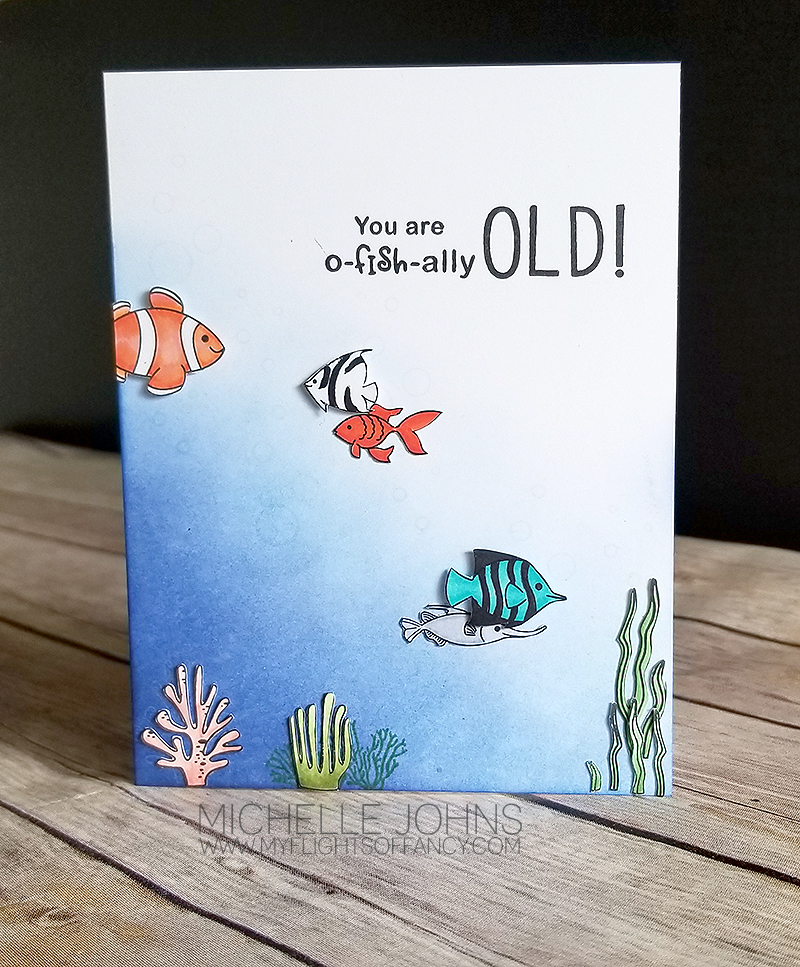
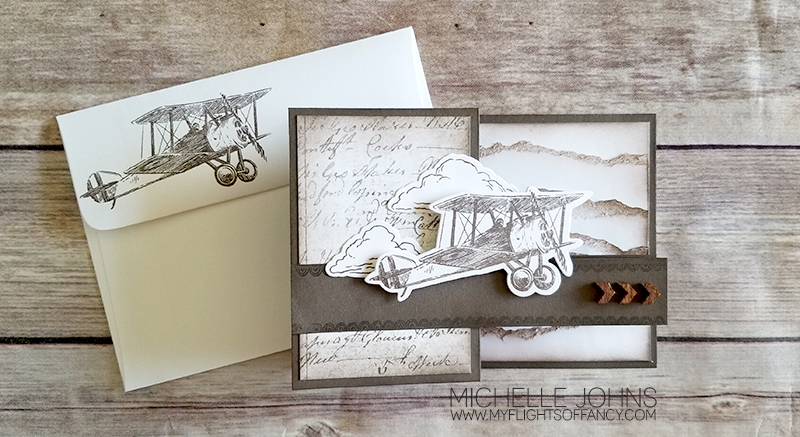
I used a handful of the Spectrum Noir alcohol markers to color everything in, after stamping it in intense black ink. Then I cut them all out by hand using our micro tip scissors! (they give some great fine line details!)

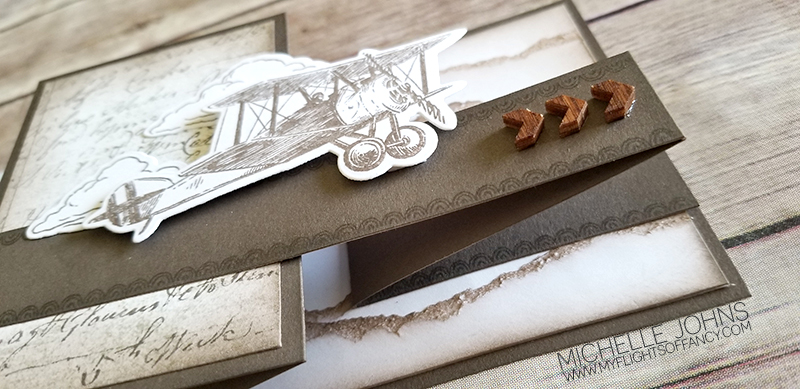
Next, I did some ink blending. I started with bluebird ink and then moved to sapphire ink. I just LOVE how much depth there is to this coloring! (I truly am amazed!!) Then I needed to add in the bubbles. At first I was thinking of using water drops, but then I decided that I wanted to actually use the bubbles in the stamp set. So, I loaded them onto three different 1×1 blocks, and stamped them with linen ink! (There really is a use for this ink color, I promise!!) It is very light, but it looks like it lifted some of the blue color, but still also stamped in the linen color where it was white (or mostly white)! I did swipe the stamps after every press with the shammy, so that I didn’t transfer any of the blue ink to the linen ink pad!

I stamped one of the coral pieces in evergreen ink at the bottom. I also stamped one of the seaweed pieces with the linen ink, so that I would know how to place it, and it wouldn’t ruin anything if I wasn’t perfect in placing it! Then I used the tombow glue to add my seaweed pieces to the bottom of the card, and also the fishes that are flat on the card front. I used some thin 3-D foam tape for a few of the fishes, to give some dimension to this not so many layer card! (I can’t and won’t call it a CAS (Clean and Simple) card, since it does have things attached to it, whereas a CAS card does not.)

I got everything glued on, and realized I hadn’t done my sentiment yet! OH NO!! I was terrified! I know you know how that felt! I didn’t want to do it, I was debating just leaving it blank, and maybe putting something on the inside! I didn’t want to mess it up! LOL!! So, I consulted hubby (who really liked the card!) and we came up with something fun. So, first I grabbed a ruler and made a SUPER light line on my card, in pencil. Then I worked backwards with my sentiment, since I wanted it on the right side of the card. I used the Simply Said alphabet to stamp the word “OLD!”, and then I used some tape and masked off the word ‘awesome’ from the sentiment. (I did test it on a scrap piece first, just so that I knew it would look good!) Success!! It worked! The only little annoying part, is there was a hair on the stamp! (or ink pad, not sure, but darn cats!) If that’s the only ‘ooo-bo’, I’m ok with it! LOL!

I would LOVE to hear what you think of this card! Who would you send it to? What might you have done differently? After you leave me a comment, please hop over to Miss. Carrie’s Creations, because (a) she’s next and (b) she ALWAYS has fantastic things to share!

Thanks so much for stopping by!

10 things mini

So, Danielle and I decided to do a 10 things layout. And, we both . . . kind of . . . have pockets on our pages. . . sort of. . . LOL!! I designed mine in design space, and then ended up not using that at all, but I wanted to keep some of the feel of it! We went off of this page as our inspiration.

I went ‘old school’ and every stamp on this page is retired. (sorry, not sorry!) I started with some sapphire cardstock, and stamped my NYC in Rustic Alphabet with versamark so that I could use the gold glitter embossing powder! It really does shimmer when it moves! Then I used Jennifer’s Hand with the versamark and white embossing powder. The little heart came from the Share the Love set, and I used the versamark and white embossing powder on it too. (The camera image comes from that same set)

To add some “stars” to the background, I used the Ink Blot set and the versamark ink with the gold glitter embossing powder.

I used one flip flap that was 3×4 and 5 that were the 2×2 size. I cut my cardstock to the right sizes and added the numbers. I haven’t decided if I am going to stick with just words for the numbers, or try to do some photos too!

Now, hop on over to Danielle‘s blog and see what fun stuff she has come up with! (I know she has a video for you too!)

Have you torn any paper recently?

So, last week, when I was looking for inspiration for the Vintage Vibe challenge over at H2H, and I came across this Pin, and I KNEW that I wanted to use it as inspiration for this week’s challenge, Tearing Paper!

So, I am again using the Yesterday & Today Paper packet and the Dreams Take Flight stamp and die set for this card. I cut some white daisy cardstock to be 5 1/4″ long, and tore it to pieces, well, strips! Then I inked the sides and top of each piece with Espresso Ink. I cut a piece of printer paper to 3 3/4 x 5 1/4 (so that my card base would be 4 x 5 1/2 once closed, saving some cardstock for later!) I glued each piece to the printer paper, creating my background piece. I used Espresso cardstock as my card base today, because I wanted this slightly different fold.

I used foam tape to pop the plane off of the band, and glued the clouds directly to the card base, making sure that the cloud that hung off the edge did not have any glue on that part. I used the frame and sentiment from the same set, and glued that inside. I decided last second to add those little wooden arrows that I colored with the Earth Brown Blend Marker.

I really like how this card turned out! Hopefully you do as well! I would love to hear what you think! Please leave me a comment below, and let me know!

Until next time, make sure you go and play along with some of the challenges over at H2H!

CTMH Items used:

Yesterday & Today Paper packet
Dreams Take Flight stamp and die set
Into the Wild Scrapbooking & Die set
Shaker Window & Confetti Thin Cuts
Card Front Spinner Thin Cuts
White Daisy Cardstock
Espresso Cardstock
Toffee Ink
Espresso Ink
Earth Brown Blend
wooden arrows

Bubbling fun with a Mini Layout!

Ok, that may sound silly, but it’s what I see everytime I look at the sketch that Danielle and I are using today! Originally I think it was designed for a card, but I thought it could EASILY be made into a mini layout! So, that’s what we did!

Now, this could EASILY be done with my cricut, but I didn’t want to have to pull it out and do all that, I just wanted to sit at my desk and make it happen. So, I grabbed a few different dies! I used the large scallped circle from the card spinner set, and the three smaller circles from the Basic Circles thin cut set, and the large circle from the Shaker Window set!

The journal box comes from the New Beginnings set, which includes a die, too! I masked off “word of the year” on the journal spot, so I could have enough room for hubby to write Brooklyn Bridge, since that is what I will be putting on this page!

All of the papers are from the Mix In paper packet, it’s so versatile! Originally I had used glacier ink to put the color behind, but that just kind of vanished in the few hours that I had put it onto the paper! ACK! So, then I tore it apart, I know none of you have ever done that before, right? hahaha!! So, then I grabbed my lagoon ink and redid the sponging to get that color behind there.

Take a look at the difference! (I made a couple of other changes too, but essentially the same) WOW!

I really like how this turned out! I used the lines on the different papers to go with all of the cables of the bridge, I thought it tied it all together, really well!

I would love to know what you think! Leave me a message below, and then hop over to Danielle’s blog to see what she came up with! (it’s adorbs, btw, in case you didn’t already know that!)

Ever get that Vintage Vibe?

This week’s challenge over at H2H is Vintage Vibe, and we have a boatload of products that fall into that! Check out what I made for it!

I started with the Yesterday and Today paper packet, paired it with the Dreams Take Flight stamp and die set, and then added a few more elements! Let’s take a look!

Now, let me say that I was inspired by this card I found on Pinterest. It doesn’t fit the ‘vibe’ of this challenge, but I knew that I could use the plane from the Dreams take Flight set, and make it mine. And I don’t know about you, but I think I totally rocked this one!

I used three different patterns from the Yesterday & Today Paper packet. I used the large spinner die cut from the Card Front Spinner Thin Cuts and the large circle from the Shaker Window & Confetti Thin Cuts. The banner? That came from the Into the Wild Scrapbooking & Die set (which is only available online!)

The plane and banner are stamped in Espresso ink, I stamped and inked the clouds with toffee ink. Now, if only we still had the waxy flax still, that would have been perfect! Alas, we do not. So, I grabbed my mink twine and my Earth brown blend marker, and colored a tiny piece of the twine, and attached it with some mini glue dots!

The circle and banner are popped up with foam tape. The plane is then popped up with some thin foam tape. The clouds being tucked in various places in various depths on the card I think give it an added extra pop!

Now, of course I couldn’t leave the envelope blank! So, I stamped the large cloud on a bit of post it note and cut it out, then stamped the clouds with a slight overlap on the flap of the envelope.

I’ve already said that I really like how this card turned out, and I hope that you do as well! You should totally come over and join in on the challenges! We have a new one each week, and they last until the end of the month, so you have plenty of time to get your entry in!

CTMH Items used:

Yesterday & Today Paper packet
Dreams Take Flight stamp and die set
Into the Wild Scrapbooking & Die set
Shaker Window & Confetti Thin Cuts
Card Front Spinner Thin Cuts
Toffee Ink
Espresso Ink

Mini Layout – choose your own adventure!

Do you remember the choose your own adventure books from when you were a kid? I always loved them. Sometimes I would cheat, but not always! LOL Well, today Danielle & I have a “choose your own adventure” type of layout, again! So, we chose this page as our inspo page. The thinking is, you could use any 4 blocks either together, or not, to create your own little mini layout page. You could do it as one single page or you could do it as one of the 3×4 page protector pages.

I chose to use the 3×4 page protector, and go from there. I don’t know if I told you my theory last week (I could go back and check, but who has time for that??), but that I had decided that I was going to try to create a mini album for the trip that Hubs and I went to NYC on. So, I am going to use all of the prompts, and I will have a finished book (and probably more than one) by the end of the year! I think I will get some journaling throughout the process from hubs too, so that it isn’t just “my” book. I will have to incorporate some pics from him, too! (yaay! more pages!) LOL

So, I started with stamping the city scape from the “Fly-by Greetings” stamp set in intense black ink. It just screams NYC to me! Then I colored it with the tri-tip markers. I didn’t get the banner ropes quite masked off, but I still am very happy with it! (excuse the cat hair! I didn’t notice until after I posted!)

Then I needed the pocket for the top right, that will hold a 2×2 photo on top, then I can put some journaling on the little tag. I did cut the page protector so that the tag will pop out easily! I used a little 1/8″ punch for the hole and a bit of mink twine.

The bottom right will be for a photo that is either 3×4, or maybe slightly smaller, so that I can have the white border.

Then, the bottom left is a little pocket card. You can see the blue/white circles (it’s the same paper from the last page!) sticks out over the photo spot. It’s tucked in a vellum pocket! I know you can’t tell very well just yet, but when the journaling/photos are on there, you will be able to see the difference! The heart stamp is from the Love These People stamp set! I thought it fit perfectly!

I am so happy with how this turned out! (Even if I did have to remake the vellum pocket and tag, because I didn’t pay attention to how my page protector was laid out…) I hope you like it too, and that you are a bit inspired by it! Make sure to hop over to Danielle’s blog to see what she came up with! (A little birdie told me she used the same stamp set that I did!)

CTMH Items used:
White Daisy Cardstock
Mix In paper packet
Vellum
Fly-by Greetings Stamp Set
Love These People Stamp Set
Intense Black Ink
Spectrum Noir Tri-Tip Markers
Raspberry Ink
Stitched Rectangle Thin Cuts
Mink Twine
Foam Tape
Non stick Micro-tip Scissors
Paper Trimmer

Isn’t it Punny?

Now, I don’t know about you, but I LOVE puns! And CTMH has come out with a FANTASTIC set of punny stamps! They generally do pretty good with them, but this one, is so much ‘riskier’ than they normally do, and I LOVE it! (Did I mention that I love it yet?) And it’s pretty fantastic that I can show them off AND play in this week’s H2H challenge!

I used the Seas the Day Cardmaking workhop, which means that the stamp set also has dies! AND, to make it even better, it’s beach themed! Now, how could you go wrong with this? I don’t even know! These cards are adorable, the puns are funny, and I can see so many cards being made with this set! (Not just the ones in the workshop!)

I didn’t even do much changing on these cards!

I only added a bit of shading behind a few of the images, to help them pop!

There are some fun, older techniques on these cards, that I forget to use, all the time!

I didn’t even change much on the cutting! Only a smidge to help conserve paper, because I want to make more cards!

And check this out! This is the first of the White Daisy that they want you to cut the die cuts from. It is the exact same size as they have (this is not an adjusted cut) If you count all of the things needed (12 shells, 8 anchors, 4 hearts, 4 crabs, and 4 whales) you can see that I am only short by 4 shells! So, you can either cut into the 2nd sheet of white daisy that they include, or you can find a piece of white daisy from your stash that is large enough to cut 4 shells from!

I am going to do a youtube live on putting these together on Thursday, 3/19! It would be fantastic if you joined me on the video! I know you will LOVE having this workshop! You can find my YouTube channel here.

Thanks so much for stopping by! Make sure you go and see what the other ladies have made for the Punny challenge over at H2H, and you can play along too! The challenges are always open until the end of the month!

CTMH Items used:
Seas the Day Cardmaking workshop
Smoothie Ink
Sapphire Ink
Mink Ink
Mint Ink
Liquid Glass
Mini Glue Dots
Non-stick Micro-tip Scissors
Paper Trimmer

It’s a beautiful day for a card!

Welcome back to our normally schedule blog posting! Danielle and I have been getting back on track, and you should be seeing the fun and fantastic artwork that we come up with! I know it’s really fun for us to do for you! I have been slacking a bit on the videos, but I know that Danielle has been doing awesome, and I will be upping my game, I promise!

Today we have this Dahlia fun fold card for you. The original poster has a video on how to put it together. I know Danielle has one as well. I have photos and words… so, between the three of us, you should be golden!

I struggled at first as to how to finish this card, because this flower is so large! However, I think I came up with a fantastic solution! This card turned out so very pretty! Let’s walk through the steps, shall we? Let’s start with a photo:

I used the 2nd largest stitched circle thin cuts. You will have to put space between your petals with this size, however the next sizes up (both in stitched and basic) are too large for this. You could cut these circles on your cricut and not have a problem!

I cut 8 circles in the B&T paper and 1 circle in the white daisy. (This could be done in any scrap paper, and you may want to use a smaller size) This paper is from the These are my People special that is available until April 30th!

You can see the different steps in the photo above. First you fold in half. Then you fold in half again, so you have quarters. Then you fold a small pinched oval up from the rounded edge (from fold line to fold line), and you do it again on the other side. Then you open your circle up, keeping the pinched ovals folded. Then you fold the straight folded edge (of your pinched oval) to the back side, lined up with the center fold line. Then you repeat on the other side.

You will do each of these steps for all 8 of your B&T paper pieces. Then you will line them up and glue them to the white daisy circle.

It sounds complicated, however it really isn’t, I promise!

Once you get your flower done, it’s time to dress up the rest of your card! I used more stamps on this card than I normally do, but they all fit so well together!

So, what did I use? Well, I used the paint swoosh from the These are my people stamp set, the you make me happy from the Operation Smile set, and the inside sentiment comes from the Sentiments & Stitches set.

The paint swooshes are stamped in canary ink and all of the sentiments are in sapphire.

You can also see little arrows in the background, those are also from the These are my people stamp set. I wanted to give a little extra to the background, and this is how I did it! I added some vellum above it to help soften it a bit more. Then I finished it off with a few of the white acrylic hearts. Isn’t it adorable?

I really like how this card turned out! I would LOVE to see your creation with this dahlia fold! I hope you make it and share! Now, make sure to hop over to Danielle’s blog and see her card (which is also super cute!)

CTMH Items used:
These are my people workshop
White Daisy Cardstock
Card Base & Envelope
Carolina Cardstock (from the workshop)
Vellum
Canary Ink
Sapphire Ink
Stitched Rectangles Thin Cuts
Stitched Circles Thin Cuts
Liquid glass
You Make Me Happy Stamp Set
Sentiments & Stitches Stamp Set
Micro Glue Dots
White Acrylic Hearts (from workshop)
Non Stick Micro Tip Scissors
Paper Trimmer

Fun Desk Organizer

Hey there, crafters! Danielle and I are at it again! Today we are making this super fun desktop caddy for all sorts of things! First taught by Sam of Pootles Paper Craft (I do so love her videos!), it looked like fun! The directions are easy to follow! The only change I would make is that any of the measurements that are 1/4, change to 1/2. Her’s are 1/4 because that is the size of the cardstock that she has. So, here in the US, you could change that to 1/2 and have a smidge more space for your glue.

I went with black cardstock, because I knew that it would pop any color off it. I decided to pair the new Mix In papers with it, because they are so springy!

This thing fits so much stuff! And you can re-arrange the boxes inside (a bit, at least!)! Here you can see them all split apart. So you could grab one that has the items that you need, if you need to move to a different area!

You should totally go and check out Danielle’s creation (it’s so bright and springy!) and then go watch Sam’s video on how to put it together!