Category Archives: CTMH Cards

Cards made with CTMH Products

Twisted Sketches #77

it’s that time of week again! Anam has a wonderful sketch over on the Twisted Sketches blog, you will have to go over there and see it! I was having so much fun with it, that I made two cards!

First is the vertical card, with some of the new, yummy designer Rhinestone brads! They are so fun and so easy to use! They add just the right amount of bling to this card, I think! Paired with the Believe paper and Kraft cardstock, it makes it so fun!

Then, sticking with the winter theme, we have some snowflakes! The Wonderland paper is so soft and pretty. With the Glitz Glitter Glue, I didn’t get glitter everywhere either! It made it so easy to add that little bit of bling to this card!

I hope you had as much fun with these cards as I did! Go and check out the Twisted Sketches blog and the other designer’s work!

Michelle

Products I used for these cards:

Red, white, & Blue!

Hi Everyone!

Jessica, over at My World Handmade is having a fun month on her blog, every day in July she has been having a project, with how to’s, posted on her blog! And every project will involve red, white, and blue! Lots of guest posters (like me!) are helping her! I got to close out the month with my little tutorial, so I hope you enjoy it!

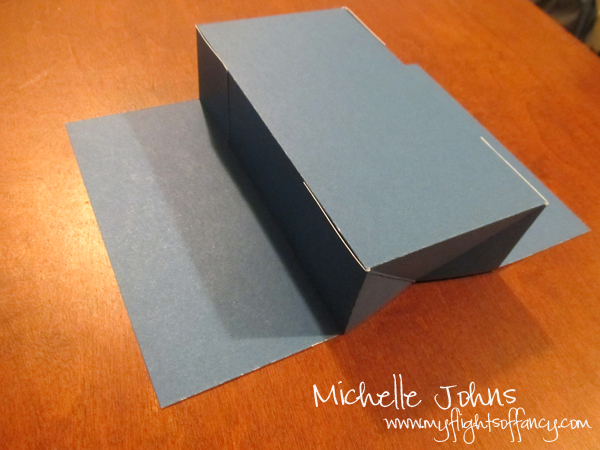
So, for my project, I thought I would share a fun little card box! It’s a box, that folds flat, even with your stuff inside! (well, depending on what you put inside!)

While I would love to claim that I made this up, I didn’t, and you can find other tutorials all over! LOL!! I’ve adjusted mine just a bit so that it will fit into a regular envelope (the ones that fit a 5 1/2 x 4 1/4 card). That way, you can send your little box in the mail, if you wanted!

You will see photos from 2 box cards that I made. I forgot to take some pictures, so had to do other photos! The blue box card does not fit into that envelope mentioned before. However, if you trim 1/2 an inch off each flap, and adjust the cardstock and paper, like on the white box, then it will easily fit into the envelope!

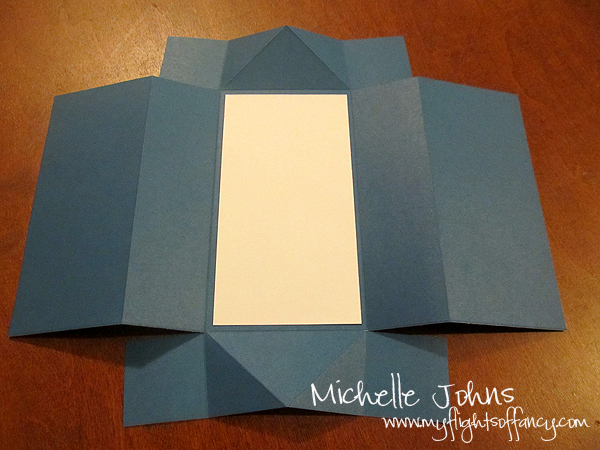
This is what you will end up with, when you are done!


null

I used Close To My Heart’s Fanfare Workshop on the Go, which contains the cardstock, Background & Texture, and stamp set.

So, you will need the following things to make this box:
Cardstocks:
8 1/2 x 11 (main)
2 1/4 x 5 1/4 (contrast)
1 1/2 x 12 (main band)
3/4 x 12 (2nd band)
Sentiment Mat
Sentiment Cardstock

Background & Texture:
2 x 5 (two of these)
1/2 x 12

Stamps & Inks dependent on your papers and stamp image!

null


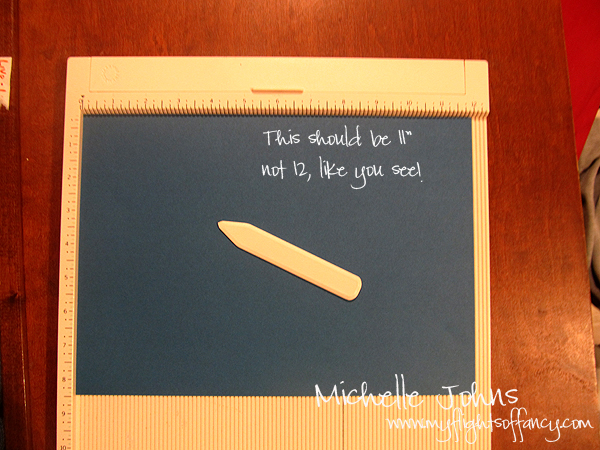
So, first you are going to score your cardstock along the longest side: 2 1/2″, 4″, 7″, 8 1/2″

Next you are going to turn your cardstock, and score it at 1 1/2″, then flip the paper and score it at 1 1/2″ on the other side.


null

{If you want your card to fit into the envelope, now would be the time to trim off 1/2 inch from each end (so, from the 2 1/2 & 8 1/2 spots), or, at least, the easiest spot to do so!}

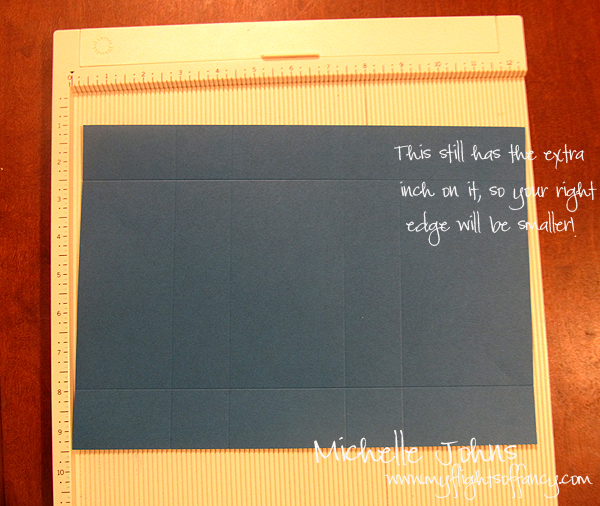
Now, you are NOT going to fold all of your score lines just yet!

You want to mark your middle point of the biggest box (in the middle). Just a little mark with pencil, or I did mine with my bone folder. You want to mark on both sides of your paper (this is along the long side).

Once you have your middles marked, then you are going to score, BUT ONLY on the long sides. (that 1 1/2″ score mark that you did) And here’s why. You need to make a couple more score lines, but you need to have the middles marked, and be able to fold to see the corners.

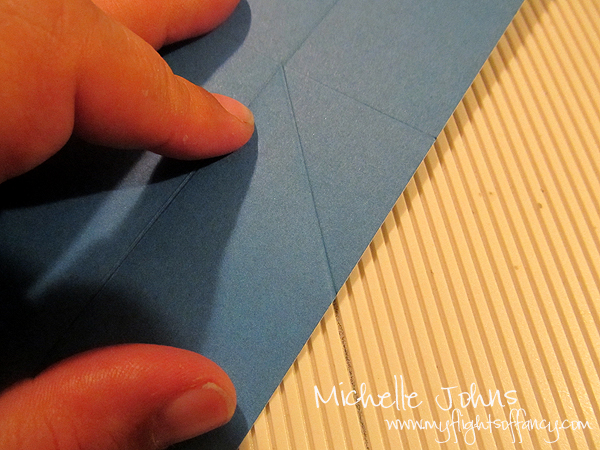
Here on my handy dandy MS scoring board, you can see that I have marked one line with a pencil. I did this the entire length of the score board. I do this because it makes it SUPER easy to line up my lines in the right spot. What you are going to do, is make a diagonal line from the inside corner of the biggest box to your middle mark. (all within that 1 1/2″ score mark) First, line up your corner with the line, by getting it as close as you can. Fold your edge in, and make sure that your corner is on the line.


null

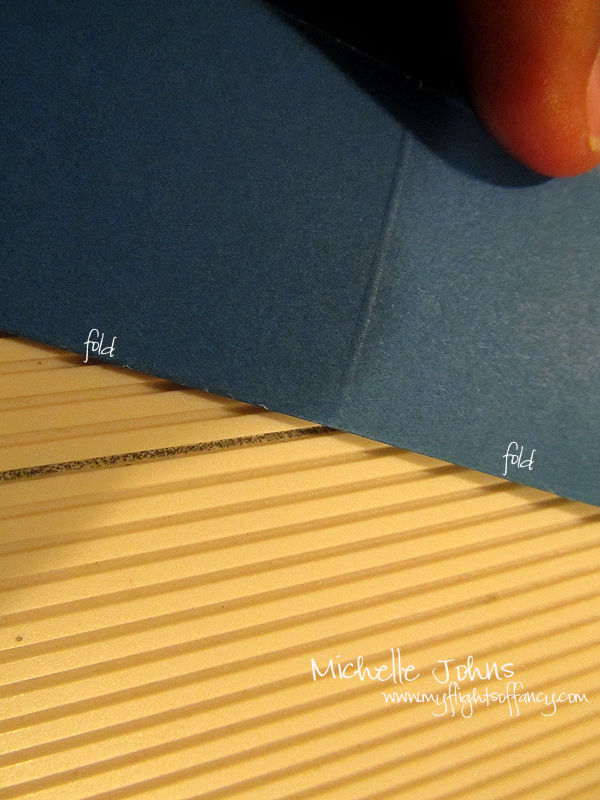
Then you are going to unfold the edge, and get the middle lined up on the same line.

Double check to make sure your corner is still on that line, and then score.


null

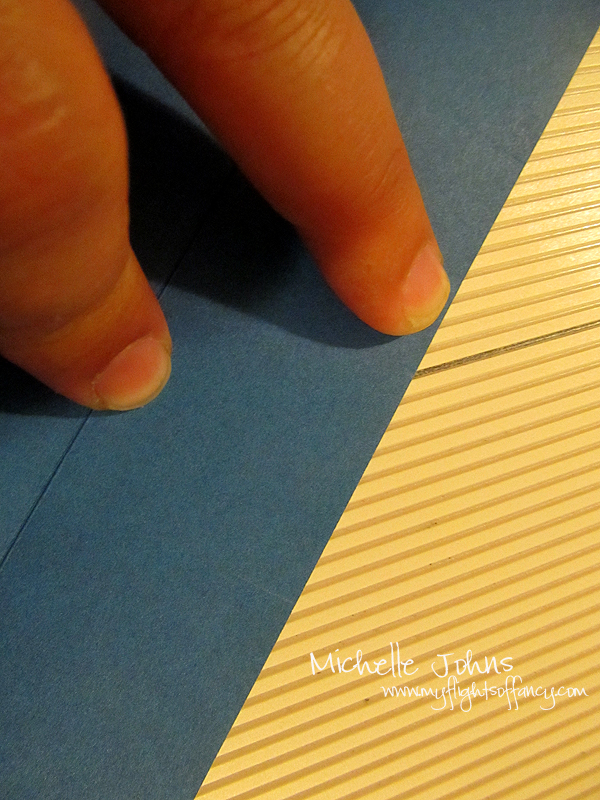
Repeat with the other side of the same box, and then the other side of the page.

null

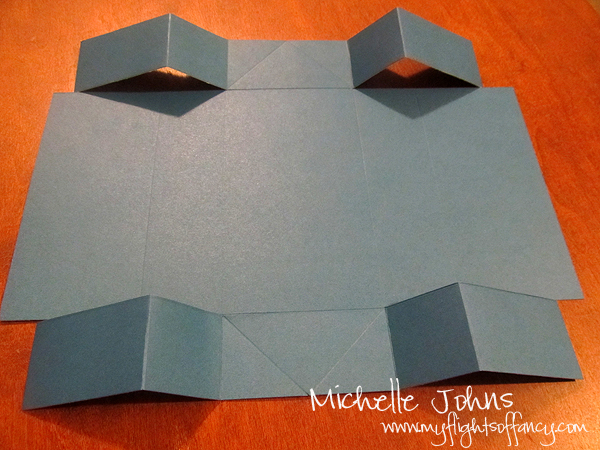
So, now that you have that done, fold along all of the score lines.

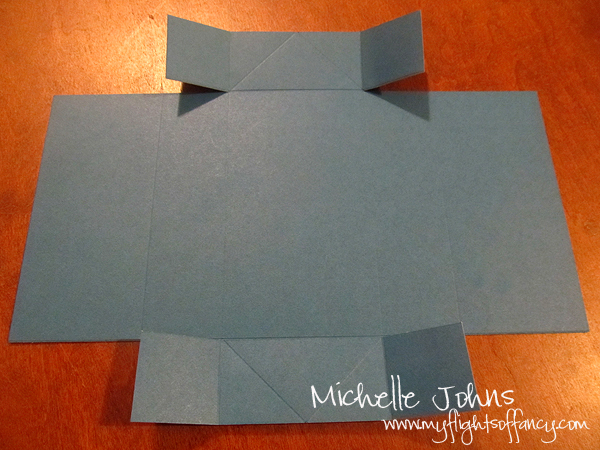
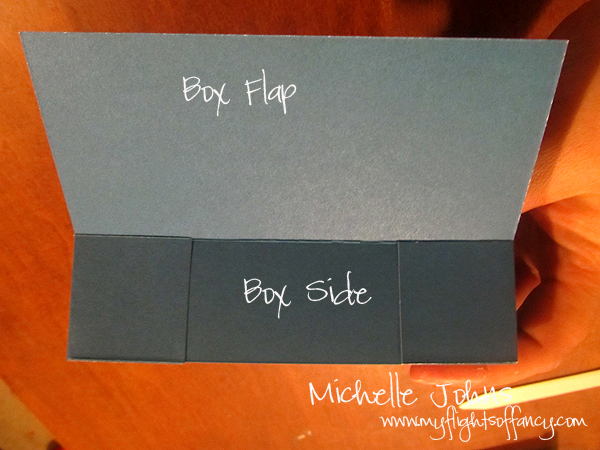
Next you are going to cut your score lines so they look like this:


null

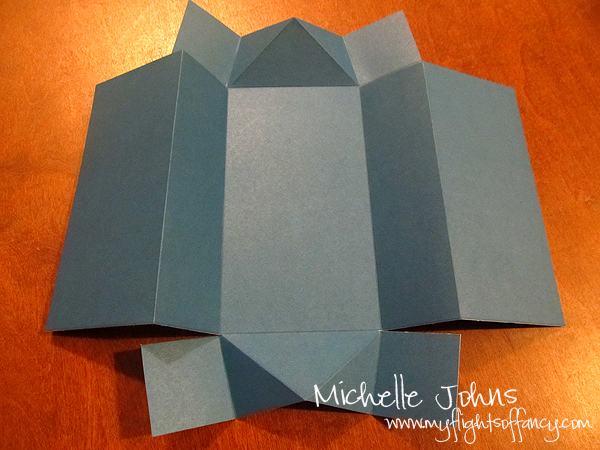
Then you will cut off the end corners, so it will now look like this:

null

Now that they are all scored and cut, your box will look like this:

null

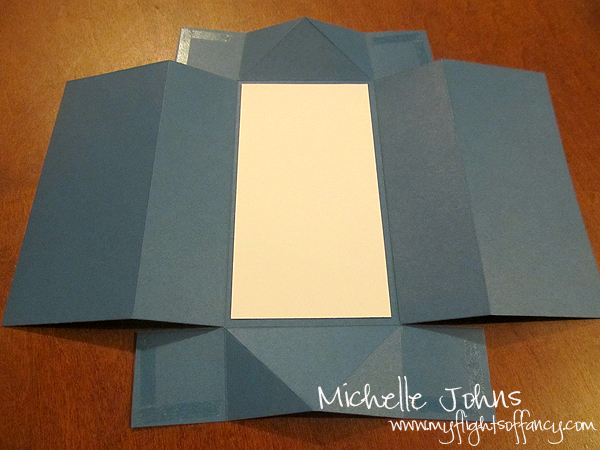
If you want to insert a back / greeting on the card, now would be the time to do it. You can see that I just added a white piece of cardstock.

null

Add glue to the top and bottom corners of the cut pieces. (You should be able to see the glue in my photo) How much glue you use, will depend on the stickiness of your glue. ATG or scor pal or red tape would be the best here.

null

It’s really hard to get a good picture holding this together, but I tried! You are going to fold up the middle ‘flap’ and glue the flaps with glue at a right angle.

null

Here is a shot with both ends on one side glued.

null

Here is what the box will look like, at this stage when you get both ends done, and have it sitting on your desk / table!

null

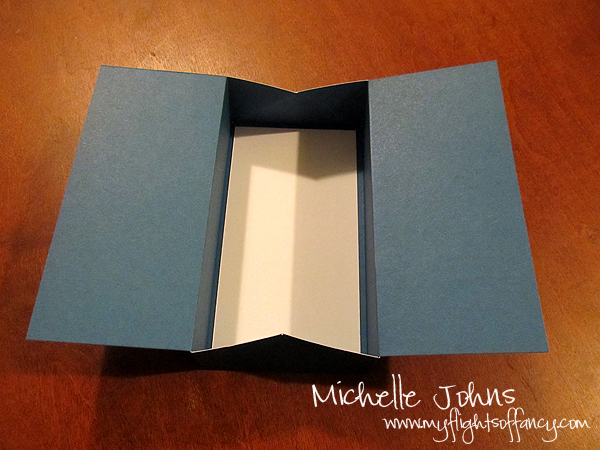
And what it looks like sitting upside down on the desk / table

null

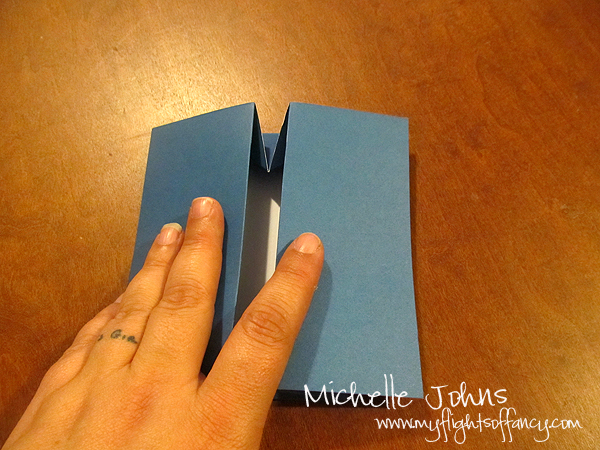
Now for the technical terms . . . . you are going to ‘smoosh’ the flaps in, to teach them that they need to lie flat! (those score marks that we made will help!)

null

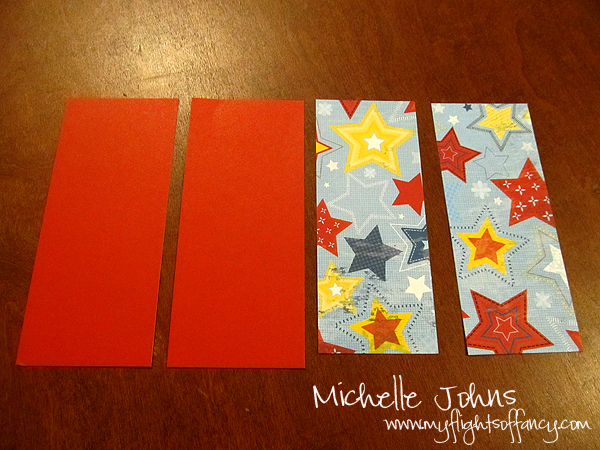
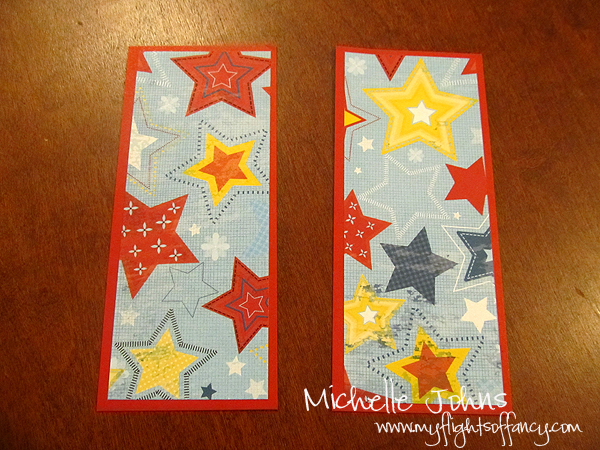
Now your box is all done, and it’s time to decorate!! You can do this any way you see fit, but this is how I did it! I have used cardstock and paper on mine, but you could use just a piece of cardstock and stamp it and put a pretty border on it.


null
null
null

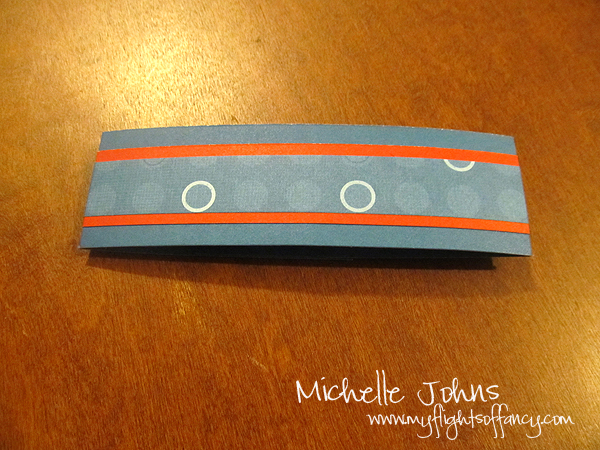
Now it’s time for the band!

Now, theory would be, you glue all pieces, and then fold them. However!!! Let me tell you from experience, that this won’t work!! Your paper will buckle, and not be pretty! LOL the easiest way to do this, is to glue the middle of the paper, on all levels. (I have 3 levels, you might do only 2) Next, you are going to hold it across the front of the card. Then you are going to bend the cardstock that is closest to the card. You do not want this to fit super snugly, you need to have space. Make sure they overlap, and you can cut off the excess once you get all the folds figured out. Once all the papers are folded, you will want to attach the ends with a strong tape (again, ATG, scor pal, red tape).


null

So, what you are going to do next, I don’t have photos of. (sorry!!) You are going to stamp your sentiment, and then mat it with your cardstock. You will then use Scor pal or red tap to attach this to your band.

null

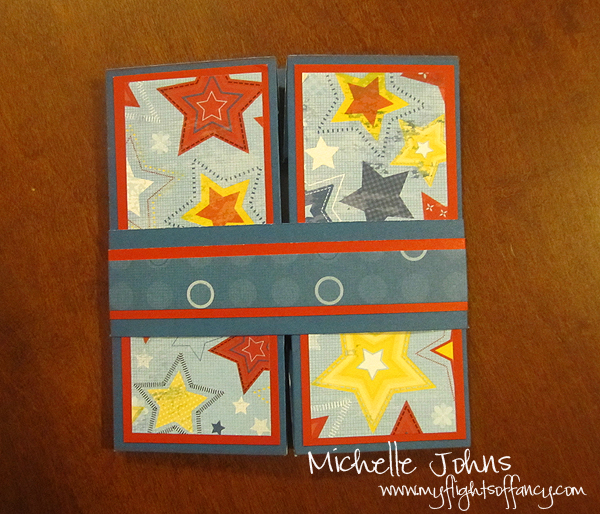
The secret to making your project look more finished and professional, is to attach your sentiment where the band meets! That way you hide that meeting of the ends of the band and it looks all nice and neat!

Here are the few pics of the cards as they are done! You can see on the white card, I put the sentiment sideways, and on the blue card, it’s up and down. How you do this is completely up to you (and your sentiment!)


null
null
null

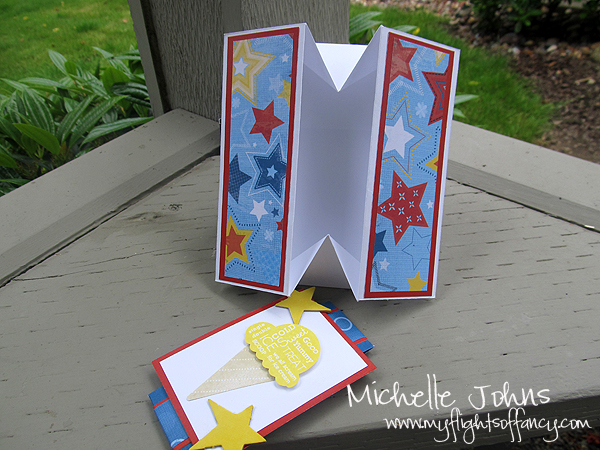
You can put all sorts of things inside! I’ve put in little thank you tags, cupcake toppers, and even to/from tags! The possibilities are endless! You could even put a gift card inside, make a little pocket so that it doesn’t slip around.

I hope you had fun viewing my how to make a box card! I am having a give away, so I hope that you enter!

~Michelle

It’s a giveaway!!

Who likes free stuff?? I know I do!!

So, you saw that I am doing a guest spot post over on My World, Made By Hand, right? If not, you need to go take a look!!

Here is what you get!!

A custom made brand new product with brand new papers! Here is a box that I have made with the Memory Game box, it’s brand new! I have used the Elemental paper pack. Inside you get 24 coasters! This is great for a count down, for boredom busters, scrapbook in a box, or even a memory game! You get to choose which paper pack and what the general theme will be. I will cover one side of the boards with paper, and you can put whatever you want on the other side.

I’m sure that you are wondering how to win this wonderful set of schtuffs, huh? Well, there are lots of ways to enter!!

1. comment on this post
2. comment on this post with which project over at My World Made by Hand was your favorite
3. comment here and let me know which card is your favorite!
4. 1 entry for each person that you refer to my facebook page, they need to “like” my page, and comments there with who sent them! (make sure they say who sent them!) (that would include yourself if you aren’t already a ‘liker’) If you already like my facebook page, then comment with that info!
5. Sign up for my newsletter, and leave a comment letting me know that you have
6. 10 entries if you place an order from the party listed to the right
7. 10 entries if you schedule a home party/workshop date with me!

Contest entry will end on August 5th at 9pm Pacific time. I will announce the winner on August 6th!

Today is the last day for the July special with Close to my Heart! Purchase $50 worth of products, and have the ability to choose 1 of 5 products for only $1! (normally $8.95) What a great deal!! Order through me or on my website! Make sure to check my earlier posts about things that are retiring! You don’t want to miss out on those.

And remember, the new idea book is available TOMORROW!! There are some really wonderful things in there! You should come see what’s available!!

~Michelle

Guest Spot

Hey everyone!

I have a guest spot post over on My World Made by Hand, so you should go over and take a look at what I posted, and all of the other great projects that have happened this whole month!

When you do that, come back and see my giveaway that is happening!!

~Michelle

April Stamp of the Month

When I first saw this set, it didn’t scream out at me. But when I started playing with it, I had a LOT of fun! There are still some things that I would like to try with it, but I wanted to show you what I have made with it so far! Here’s the stamp set itself. . .


This is a cute little 3×3 card that would be perfect with a little gift.


This card is 4.5 inches x 4.5 inches. I used the tag template coluzzle to cut out the kraft paper to make a cute little label shape. The white dove shows up perfectly against it!


This card took the longest to do! I had to make a number of masks so that the flowers wouldn’t stamp over each other. I wanted it to be a garden full of flowers to go with the quote. What do you think?

So those are my cards so far! Remember to check out all of the workshop dates that I have available! We will be making these cards and a few more too!

And you have heard about the Hope for Japan set, right? It is an awesome little set that is only $5 (plus tax & shipping). (normally that A sized stamp set would be $7.95) All of the proceeds go to the Red Cross to help Japan after the horrible tragedies that they have had to deal with. (this means I make no money off it, and neither does CTMH) What a wonderful thing for them to do! You can order this set on my site, or call/email me to place the order!


Christmas Crafting

So, I made a bunch of stuff for family . . and didn’t get any fancy photos of them! LOL In fact, I really didn’t get any photos at all! I did think to snap these two photos of the cards that I made for my Mother in Law for Christmas. From the sounds of her reaction, she really liked them!

These cards use the new Wings paper available NOW!! It is sooooo pretty and cute but not ‘cutesy’!

I used the January Stamp of the Month, which you can get for $22.95, 25% off, 50% off, 75% off, or even free!

I also used the brand new bohemian alphabet. There isn’t a photo up yet on the sites, but you can see it on page 11 of the Inspirations Brochure. You can look at that here: Inspirations Brochure

Close to my Heart is changing the way the idea books are done, going from 3 books per year to just 2 books. To bridge the gap between the two, we have the Inspirations Brochure. It’s the first time that there has been a mini idea book for Close to my Heart. There are some absolutely GORGEOUS pages in here, with some awesome stamps! AND! There is a way to get the January Stamp of the month FREE (***without*** spending $100!) So make sure you check that out!

Items used for cards above, all CTMH unless noted:
Cardstock/Paper: White & Vinyard Berry, Wings paper
Inks: Juniper, Sweet Leaf, Vineyard Berry
Stamps: January SOTM, Bohemien Alphabet
various: clear buttons, Juniper ribbon, liquid glass, 1 1/4 inch punch, fiskars scalloped punch

Thanks for visiting! Remember, I have lots of workshops available! I can also come and do a home party/gathering for you and some friends!

It’s that time of year!

The new catalog is coming out in 2 days, and I have some GREAT cards to share with you! They are so super fun to make! I have some great project workshops coming up too, so you will want to make sure to get signed up for those! (Halloween, Thanksgiving, Christmas (cards and presents!)

I hope you are ready for some photos!!

These are all made with the Hooligans paper pack and/or the Hooligans Workshop on the Go (WOTG) (which comes with paper, cardstock, and a stamp set that you can ONLY get in the Workshop on the go kit!). I am absolutely in LOVE with these little monsters! (and Kami has named the one on the easel card “Steve”, and Steve says Hi!)

These first five cards are all made with the WOTG kit:


These cards are made with the Hooligans level 2 paper pack. This first guy, his horns, nails, and feet are all shiny/glossy with liquid glass.

Steve here, is sporting the new pearls that we are carrying. You can see on the lagoon (blue) and gypsy (purple) papers, that the paper has a bit of a pattern, and it is ‘finger prints’! It is pretty cool!

These cute little cards use our flip flaps to make the stars dangle! Isn’t that just adorable!?! And there is Glitz Glitter Glue on the stars to make them sparkle more!


And these two gorgeous cards were made from the Mistletoe paper pack, aren’t they beautiful? (there will be some card workshops so that you can make these, and I will even make up some kits so that you can purchase the pieces to make multiple cards, if you would like!)

This first card uses one of the new flowers that are available. How perfect are they for cards? Adorable!! They are available in both red and white.

This card uses some of the new pearls as well. You could use some sparkles on this card instead, and it would really be blinged up!

I do hope that you like these! If you would like to schedule a home party for you and some friends to make these (or other cards) or if you would like to sign up for one of my workshops, just drop me a line!

Need a {fun} challenge?

Brae’s blog is one that I follow, and love the cards that she makes! And she has posted a great little challenge for us! She looked at something a new way, and made something creative from it!

With that little bit of info, can you guess what she looked at differently to make this card?

Well, click the image to go to her blog, and take a look and see if you were right! Plus find out what her challenge actually is! AND . . . if you participate, then you just might win a set of 5 handmade cards!! (and who doesn’t like prizes, let alone hand made cards?!?!?!?!)

I will be participating with this challenge too, and I can’t wait! It is such a good idea!

Boxes and cards and candy, oh my!

So, I am REALLY loving this paper pack, and the colors!! I have made more with it than anything else! (well, unless you count the 50 card workshop that I did with the Jingle pack!) These browns and reds and pinks and greens work so well together, it is just awesome! (and that’s what CTMH is all about, making things simple!)

So, there is this challenge blog, called JUGS (tehehe) It’s Just Us Girls, and they post a sketch/challenge each week for everyone to contribute to, or use to get their mojo back. They have some pretty awesome stuff! And they are having a DT call (see vocab lesson below!). Well, of course I want to apply, that means I get to craft stuff more!! So, they had a sketch for us to use to make our cards, and we were to make a card and a 3-D object. And let me tell you, there are some pretty cool entries in this so far! (I haven’t checked today, but there are likely more!) And, if you know me, I *have* to be different a bit . . . so . . . of course I am! I took the shapes that they had in their sketch, and used different shapes, and a different size card than most people make. Then I made a CAS 3-D box. But, what if it’s too plain? I thought. So, what do I do? Make another that is exactly like it! LOL (they will be perfect little teacher thank you boxes, since they are cute and small and involve chocolate!) So, then I think, well, I have to do something else too . . . so, I made another box. Both boxes are created completely by me, from the seeing of similar boxes online in various places, to creating the pre template to the template, to the final carrying out of the project. And, this may sound like I am tooting my own horn, but I LOVE how they turned out!!

{the card for the JUGS challenge is on the left in the photo below}
{the card on the right is for the Unscripted challenge}

Earlier in the week, I finished a box, that probably should have been sent out already to my contest winner on my FB fan page, but it hasn’t been sent yet (getting it in the mail tonight/tomorrow, I promise!!) so I took some much better photos of it too! And that cute little envelope? I made that too! So, all of the boxes you see here are my own templates, my own designs, and CTMH papers! (as are all the ribbons, and stamps, and buttons & brads)

I hope you like them all!

Oh! I forgot the vocab lesson!! Apparently, there is a difference between the digi scrapping world and the paper world. If you are a digi scrapper, and you create pages for a site or designer, you are on a CT (Creative team). If you are a designer, and you join a site/store, you are then on the site/store’s DT (design team), meaning you are making the papers and elements for the individual kits. If you are in the paper world, and you create pages/cards/projects, you are on a DT (design team).

My creativeness

Well, I had a box I needed to make for a prize that needs to be sent out, and was feeling overall generally creative! Apparently I didn’t get enough creativeness in yesterday! LOL

So, I made a really cute box for Heidi, since she was my winner, (had the cards made on Saturday) and made a cute card from the Unscripted Sketches Challenge # 54 and it also fits into the Heart 2 Heart technique challenge!

They are both made with the Close To My Heart papers and cardstock, chocolate brown and the Creative Basics papers, and the “A Little Buzz” stamp set.

I tried a couple of new techniques with the card. I used a grunging method, using the edges of scissors to rough it up. And I used my piercing tool to put the holes in the papers. I found that I can easily color my paper flowers this weekend, without using a spritz/spray method. I held my green ‘flower’ on the inkpad directly with my paper piercing tool, and then used my blending pen to put the color onto the flower itself.

It was fun! I hope you enjoyed seeing them! I am sure there will be many more crafty and creative things coming!!

Michelle