I’m a Practical Scrapper!

There is this great blog, Practical Scrappers, that has some great challenges, inspiration, and more! I’ve been invited to their design team! I think it’s fabulous!!

Today there is a great sketch up for you to play with! So many ways to go with this sketch!

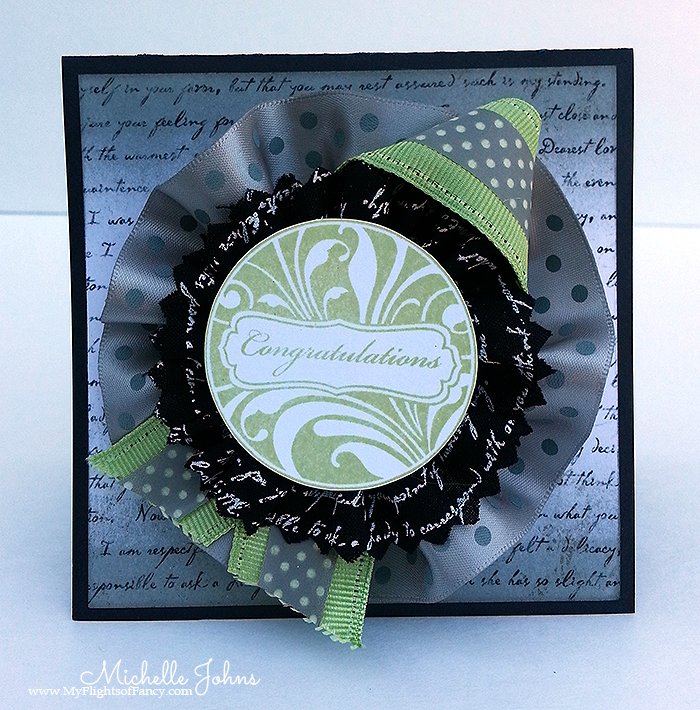
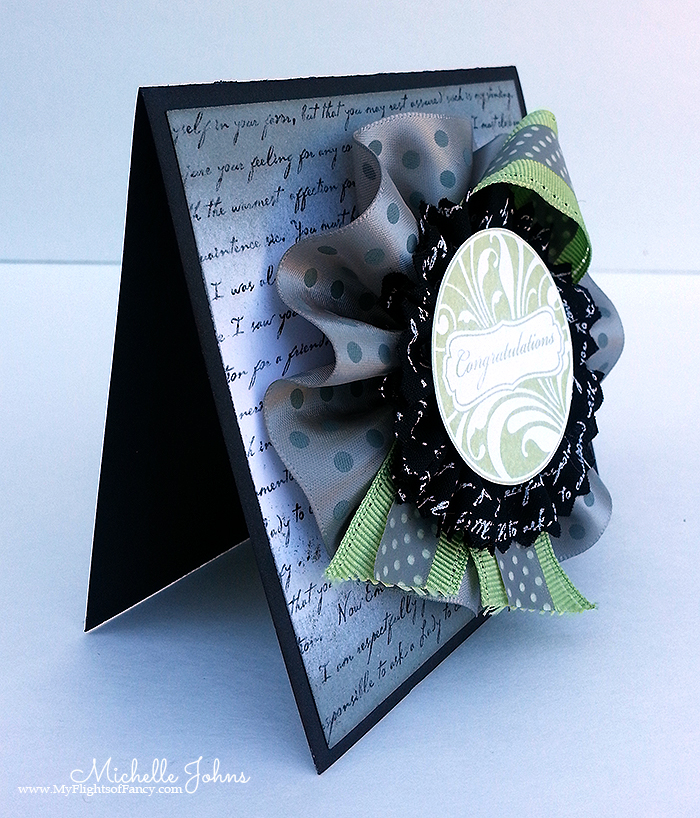
Using the sketch as a base starting point, and a card from Card Inspirations 10, I came up with this card. I like the soft lines that I came up with.

I used For Always papers with the black cardstock base. I then used some Slate Dotted Ribbon and a bit of For Always textiles for the rosettes. I put some of the slate washi tape on top of the sweet leaf ribbon to get the layered effect.

I used sweet leaf ink to stamp the Congratulations stamp from the Salutation Seals Set onto a circle that I cut out with the cricut.

I had fun with this card! I hope you are inspired by it and the fabulous stuff over at Practical Scrappers!

Be Crafty!

~Michelle

A Flowering Bunch Blog Hop

Hey Hoppers!

Welcome to my little spot in the great interwebs! As I am sure you have seen, we have more than 60 great consultants participating to show you some GREAT artwork with this month’s Stamp of the Month! Today you should have come from Vicki’s blog (Price of Paper). If you get lost along the way, Helen has the whole line up listed on her blog!

A Flowering Bunch is available for $17.95, or for just $5 with a $50 order!

I was inspired by a card that I saw in one of the many card magazines that I have stashed in my crafty stuff!

I went with two different cards. Just to see the difference that it made!

First I stamped the image with colonial white ink on colonial white cardstock, then embossed it with clear detail embossing powder.

Then I used my sponge and 3 different inks, and just sponged the ink in a gradual fade to the top. As you can see, on one of the cards, I added some green at the bottom. I didn’t worry about whether or not the ink got into the flower petals and leaves. One of the cards has the ink all the way to the top, and the other does not. I used one of the great sentiments in the set to stamp the top.

Once the ink was on there, I then took my water brush, and used the ink from just the Sunset and olive ink pads to color in the petals and the leaves. The deeper the color means the more layers of ink there are on the card!

I used some of the fabulous seam binding, sunset bakers twine, and a button/brad on the top of the card. Each base is made up of Sunset cardstock.

I think they turned out pretty awesome! What do you think?

Next in the blog hop is Carla over at Carla Creates! Thanks for stopping by!

I hope you have a crafty weekend!!

~Michelle

Oklahoma Tornado Relief Campaign

If you have been around CTMH for any length of time, you know that the founder, Jeannette Lynton is fabulous. With every disaster that has happened, CTMH has always done a fundraising campaign. I remember the Haiti campaign, Japan, and others as well. Well, the tornado that hit Oklahoma is no different.


{click image to add to your order}

This stamp set will be available in the new idea book (that goes live August 1st). However, it is being released early. 100% of the profits from this stamp set (which is priced at JUST $2.95) are going to American Red Cross to help the tornado victims.

Won’t you join us in helping? Add this fabulous stamp set to your order between now and June 30th!

I hope you have a crafty day!

Chantilly meets Mo’s Digital Pencil

I just love this little baker girl image from Mo’s Digital Pencil! She is adorable!

I’ve colored her with CTMH Water color pencils. Just the Bubblegum, Autumn Terracotta, Grey, Chocolate & Sunkiss Yellow. I did use a blending pen instead of a water pen to blend these colors nicely.

I used was the Chantilly Paper Pack. I added a button from the Wooden Mini Medley tied with hemp to help keep the card closed, and then some pearls from the Mocha adhesive gems to give it a little bit more fun.

The card is a gatefold card, so it’s a bit different than the ‘usual’ card, but I think it works nicely!

Have a crafty day!

Happily Ever After Blog Hop

Hey hoppers! I hope you are having a blast along the hop! I bet you have seen some super cute things!

I have had some car issues this week, and haven’t had a chance to get a project done for you. I am so sorry about that!

To keep you going along the hop you should have come from Penny’s blog ~ It Makes Total Cents

And next on your hop along trail is Jennifer over at 4 Hearts Scrapbooking

I hope you have a crafty day!

Have you heard the news?

Studio J got an upgrade!

Now, you can add photo wells and journaling spots to your page, wherever you want! It’s pretty fantastic! How does it make it more fantastic? Well, you know how you put off printing those larger photos, because they cost more? What if you could do a BUNCH of photos, at one time, in the larger sizes, your way? Interested? Take a look!

This is the no boundries layout in Studio J. It is a blank canvas, or was, before I started playing with it!

First I made the pages into text wells, so that I could add some paper behind it. I didn’t have to do this, but it gave me a difference in background, so that I could see what I was doing. {and, as an added bonus, I get a spotted monkey holding a spotted umbrella, that I can use wherever! Take a look at the bottom left corner of the right page!!}

Then I added 4 5×7 photo spots on the left page. On the right page I added 1 8×10 photo, 4 wallet sized photos (2.5 x 3.5), and even four 2×2 spots! {I don’t know about you, but I am still trying to deal with my ‘problem’ of cutting photos. I just can’t seem to do it! This way, I can add 2×2 photos to my pages, and I can see exactly what will show before they are printed, AND I don’t have to actually cut off any of the photo! It’s a win win!!}

I thought I would do a quick price comparison for you. So, I pulled up some popular places to get your photos printed, just to compare.

So, I listed the prices for each in the top group. Note that one store doesn’t offer the Wallet sized prints. All of the other stores offer the prints, however, you have to have them printed in sets of 2 or 4. That means a LOT of extra photos for you to store. (because, really, who throws away photos?? Certainly not any of us scrapbookers!!)

In the second group, I listed out the prices in each group for the sizes of photos shown in the Studio J layout. And priced them each for you.

Now, if you wanted the 2×2 photos (which, you can see, no one actually offers), you would either have to cut up a 4×6 photo, or get some wallet sized photos, and have even more photos to store.

So, as you can see, the Studio J layout offers so much savings, it’s kind of silly to NOT use it!

Here is a quick video actually showing you how to add the photos to a page, change the sizes, and even making your own photo collage to add straight to your scrapbook, without having to cut anything at all! (whaaaaat? Scrapbook without cutting? What’s that you say??)

http://youtu.be/LaVGGGspSLk
{if you are viewing this in your email, you may need to click through to the site to see the video}

I know you will want to take advantage of this great new product that we have! Let me know if you have ANY questions at all!!

Want to treat mom this Mother’s Day?

Ever wonder what to do for mom for Mother’s Day? This year, I have paired up with Chris and Catherine from deda’s bakery to offer you this great deal!

Doesn’t this look scrumptious? I got to have some of both of these cakes, and let me tell you, they are FABULOUS!!

Pre-order your cake and card {and topper} before Mother’s Day, so you can surprise mom with this yumminess!

Cake, cake topper, and card for just $27. You know you want to! Order soon, so that you don’t miss out!

Happy May Day!

I hope that you were able to enjoy some warm weather wherever you were today! Here in Vancouver, it was beautiful!! It made it really nice to be able to hand out some May Day Treats!

This poor one single little treat was all that was left this morning, and it even found a new home!

I used some retired Dotty for You papers for the top. Everyone that got one was pleasantly surprised, so that was great! I was happy to bring a little happy to others today!

Have a fabulous day!

May Stamp of the Month Blog Hop

Welcome!

Do you remember having pinwheels when you were a kid? Seeing how fast you could make them go with blowing on them? Maybe running around the yard (or beach?) with them to see if they would go faster that way? This stamp set will bring all sorts of memories back when you look at it and use it! If you have been hopping along from the beginning, at Helen’s blog, then I’m sure you have seen some fantastic stuff so far! Hopefully it’s given you some great ideas! We have more than 60 consultants participating in this blog hop this month! So you should have plenty of ideas on how to use this fantastic stamp set!

If you have arrived from Melissa’s blog, then you are on the right track! Let me show you what fun stuff I have come up with!

pinwheel scene

Isn’t this fun? I had to use my neighbor’s yard, since they have had this cute pinwheel up for a couple of weeks now!

Would you believe this card is all ink and cardstock? As a matter of fact, it’s all white cardstock? No? Let me share with you!

I have used White Daisy cardstock, Ruby Ink, Buttercup ink, my micro tip scissors, and my piercing tool! I did use two stamp sets for this card, the May Stamp of the Month, and the Chantilly WOTG stamp set (exclusive to the WOTG, so you really do need to get it!)

http://img.photobucket.com/albums/1003/queenmychl/pinwheel-close.jpg

First I marked off about 3 inches on a piece of white daisy cardstock. Then I random stamped the cloud image with the buttercup ink, making sure that some of them overlapped. I then took my piercing tool and poked holes along the outline of the stamp, not piercing the middles when the clouds overlapped. Then I stamped 2 of the pinwheel images (the stripes and the dots) a few times in both ruby ink and buttercup ink. Then I used my microtip scissors to fussy cut them. (I got this idea from Wendy & her card here) Then I glued the pieces onto the opposite color pinwheel, to make it a two toned effect. Next, I cut a 1/4 inch piece of cardstock to rub my ruby inkpad directly onto, since I am out of ruby cardstock! I masked the sentiment and stamped onto separate banners (you really can’t see the banner cut ends on them, sorry about that!).

I think this is such a fun card! I know you would have fun making it too! I did combine a couple of ideas that I had seen to get to this card. This card by Rita Wright, and This card by Kirsty Brown.

As always, the May Stamp of the Month is ONLY available during the month of May. You can pick it up for just $17.95, or you can get it at a discount, for just $5 when you place a $50 order! {and, in May, when you order $35, you can get the Dream Pop paper pack, also exclusive to May, for just $10!) Make sure to get your orders in so you can take part in this fun stuff!!

Thanks so much for stopping by my blog on this hop! I hope you liked what you saw! Next on your hop is Jen! So hop on over to her blog to see what fun stuff she has for you!

signature

“Happy Mother’s Day” Blog Hop

Welcome to our April Art Philosophy/Artiste Blog Hop! As you know, both the Artiste and the Art Philosophy cartridges are available exclusively through a Close to My Heart consultant. If you don’t already have a Consultant that you are currently working with, please contact one the Consultants in our hop with any questions you have!

If you have just hopped onto my blog, please start at the beginning at Lucy’s blog – Love 2 Create . If you came from Wendy ~ My Scrapbooking Blog then you are in the right place!

Our challenge this month features not only one of these amazing cartridges but we also have a Mother’s Day theme since Mother’s Day is less than a month away. Have you started your Mother’s Day projects yet?

My card doesn’t look like your traditional Mother’s Day cards, but I love how it ended up!

In this card, I used White Daisy, Black, and Lagoon cardstocks, a smidge of Later Sk8r, archival black ink, For Always textiles, Black shimmer buttons, bitty sparkles, and sparkles assortment.

I used the Art Philosophy cartridge for all the bits and pieces! The lagoon flowers, the black rolled flowers, and the sentiment and mat as well!

On this one, you can see the Sakura Clear glitter pen that I used on the frame of the stamp. This pen is super cool, and I love using it! It adds just a bit of bling, without lots of wait time!

Your next stop on our “Mother’s Day” hop is Jennifer at 4 Hearts Scrapbooking.

Here is the complete lineup in case you get lost along the way:

Lucy ~ Love 2 Create
Theodora ~ Celebrate Crafts
Wendy ~ My Scrapbooking Blog
Michelle ~ My Flights of Fancy <-- You are here!! Jennifer ~ 4 Hearts Scrapbooking
Traci ~ Paper Crafting 101
Stephanie Feist ~ Quilted Scrapper

Thanks for hopping along with us – we hope we were able to inspire you in creating your own Mother’s Day projects!

I hope you are inspired to be crafty today!

~Michelle