Author Archives: Michelle

Fall Cards Class

Hey everyone! Have you seen the new shop here on the site? I’ve added kits ready to be mailed, Retreat options, and my classes will be there too! Trying to make things be a one stop shop for you!

The next class coming up is the Fall Cards Class. This is a great class for those fall card needs. You will make a total of 6 cards, one of each design, and walk away with the envelope for them too. Your cards will be done completely, and will be ready for you to give to someone immediately!

fall-card-class

The times for the class are:

Fall Card Class | Oct. 25 @ 9am
Fall Card Class | Oct. 25 @ 6pm

Classes are limited to 10 people per class, so make sure that you get your spot! I hope to see you there!

~Michelle

JCB Blog Hop Swan Lake

Welcome to the Just Crazy Blessed Mini Team Blog hop! Today we are going to show you some fun projects with the fabulous Swan Lake papers! These papers are SOOO fun! They are filled with great fall colors.

swanlake-sm

Today I made a double page layout, with photos! (hey, Erin, you proud of me??) These papers are so very fun!

tt-01

I used the Artistry cartridge for the title on my page, I like the chunky-ness of the font for this.

tt-02

I didn’t do a whole lot of fussiness on this layout, and I do need to add journaling, that’s what I keep telling my ladies, so I should probably follow my own advice, right? That will be added later, somehow. . .

Anyway, I hope you liked my project today! Now, since it is a mini hop, after you leave a short note, hop on over to Janna’s blog to check out her project!

CTMH Technique Blog Hop – Wacky for Watercolor

Welcome to the Wacky for Watercolor blog hop! While it’s storming outside, we are playing with water inside, too! Well, water-colors! haha! Yup, had to toss a ‘dad’ joke in there! Today you should have arrived from Jenifer’s blog. However, if you started here, no worries, it’s a big round circle!

14440812_10153946393982934_3250347755644831195_n

Have you seen all of the watercolor options that CTMH has? You have the traditional Watercolor paints, of course. And with it you have the paint brush set, and the water brushes too! There are also the Water color pencils! I LOVE these things!! I have used them in the past, many times, like with the bunny cards, the cupcake card, this other cupcake card, this fabulous you card set, and this fun sweet life card. Anyway, as you can see, I love to use these watercolor pencils! They are simple to use, but you can get many different looks with them, including vibrant colors with darker shading, super light watercoloring colors, and everything in between!

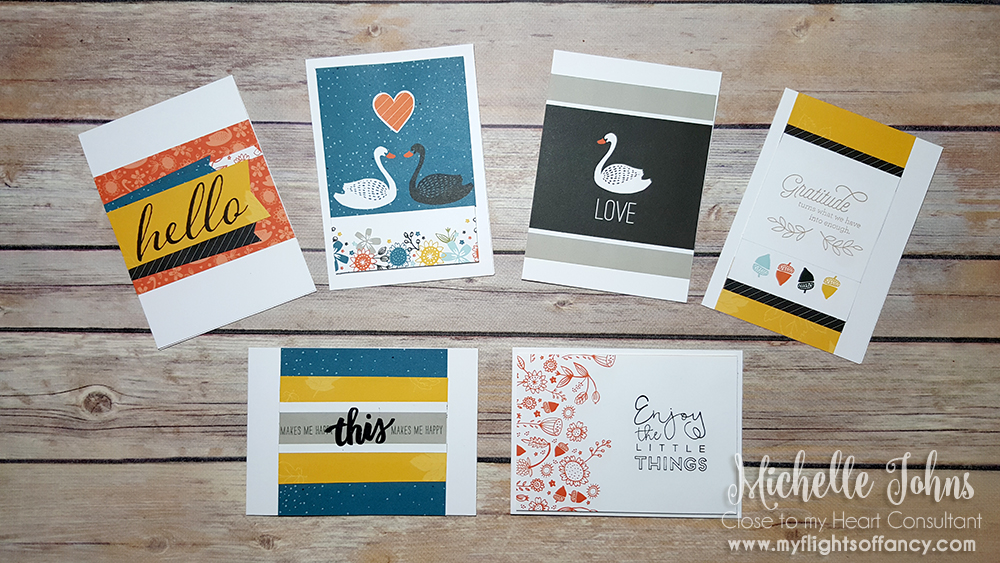
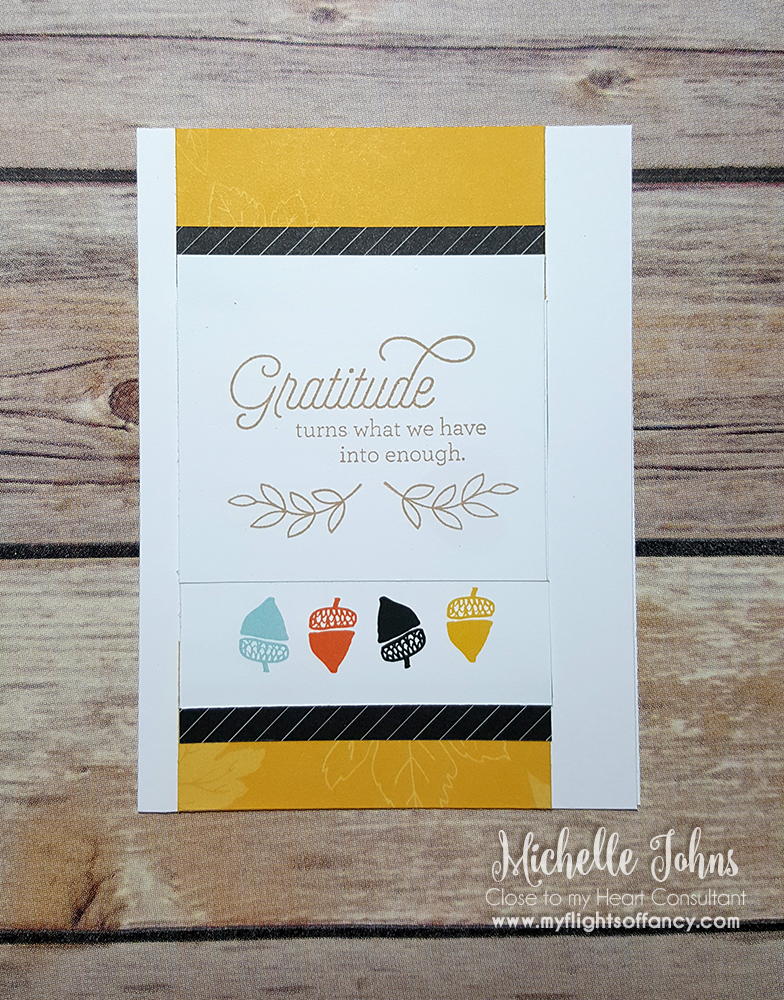
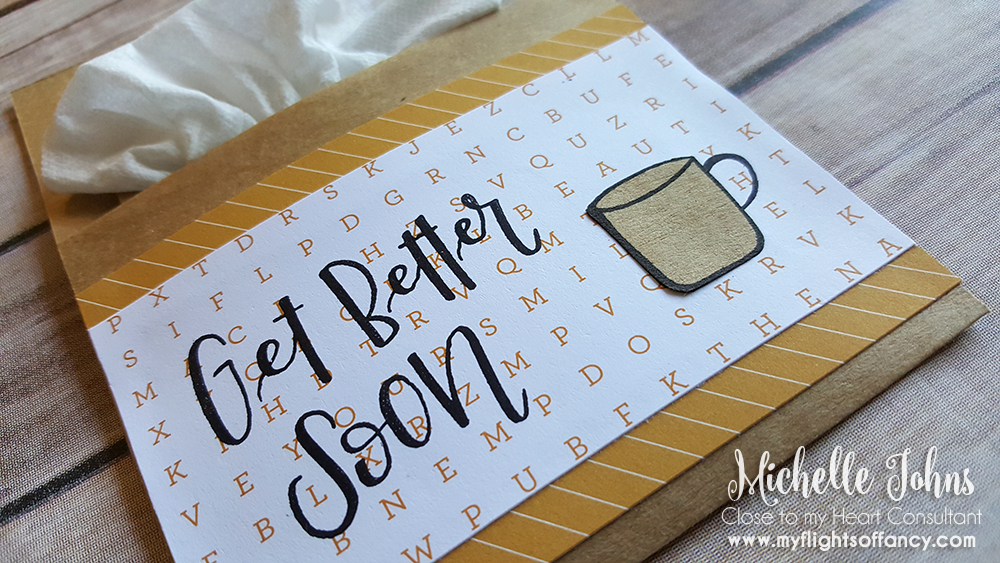
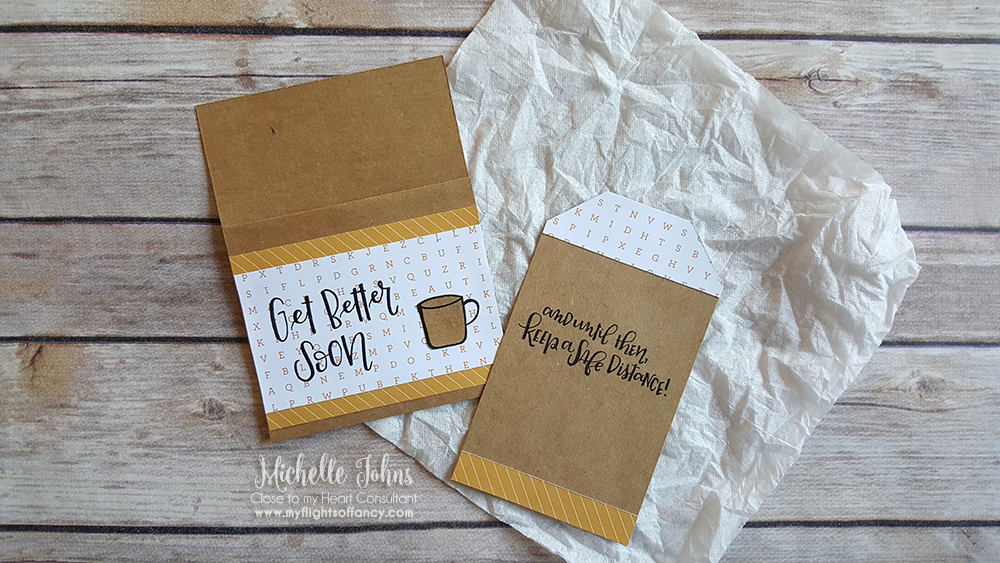
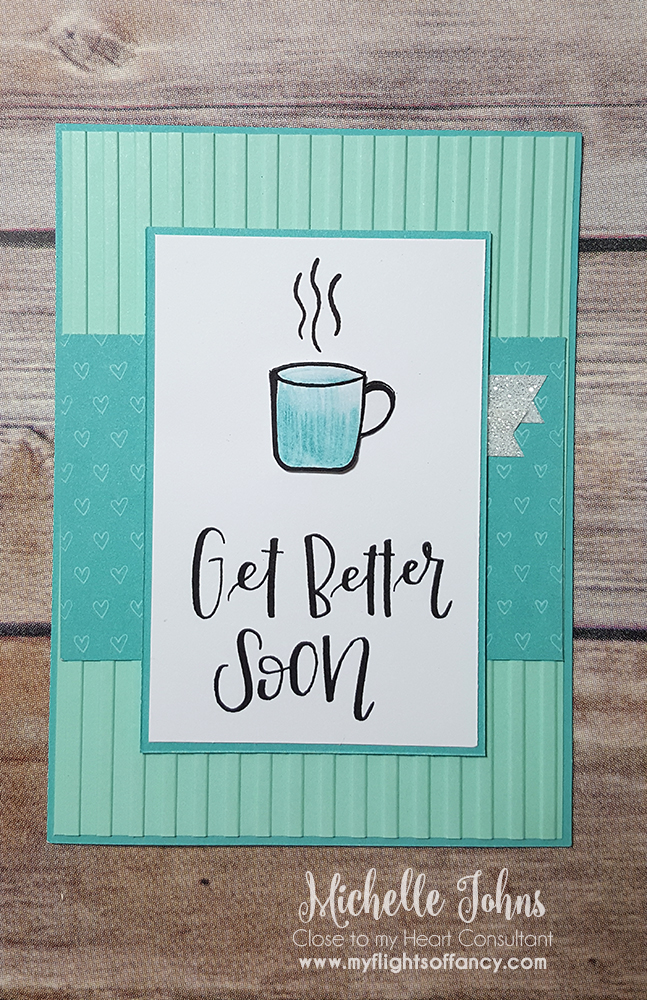
Today I am sharing a set of 4 PML cards that I used the watercolor paints on. Each has a different style/type of effect on them, and they were fun to do with the little resist that is on each of the cards!

wc-01

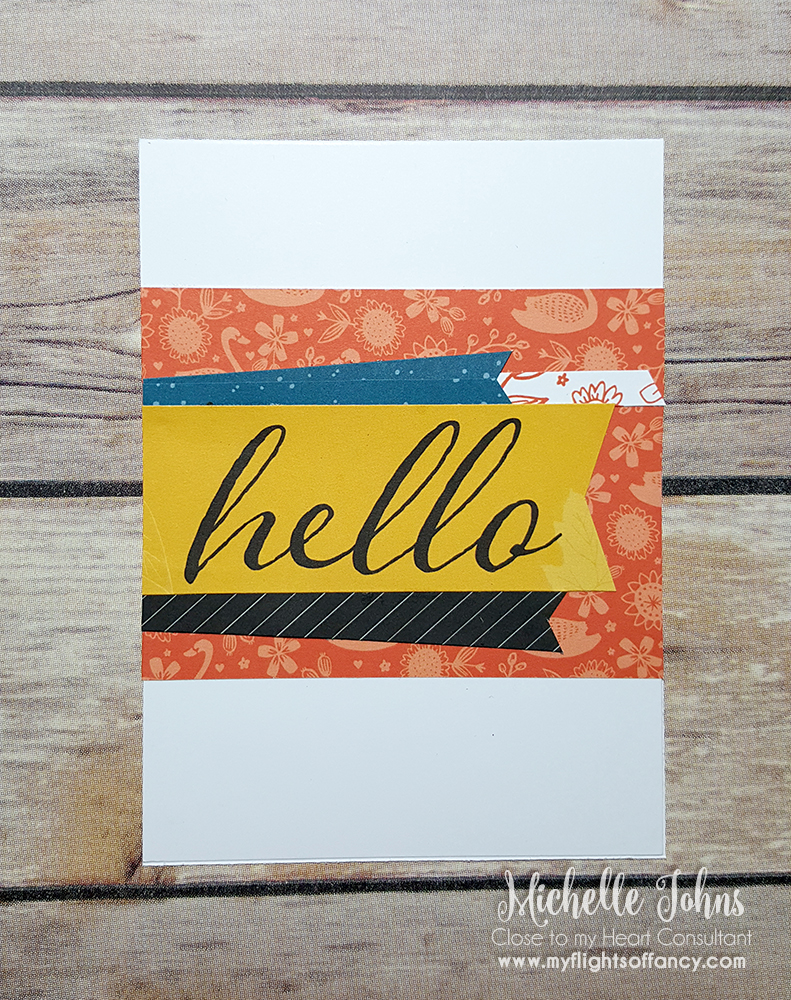
So, the first one is just a solid color onto the card. I had to go over it a few times to get a mostly solid color on the whole card, but that is what is great about the watercolors! You can determine how much color you want with how much paint you have to water.

wc-02

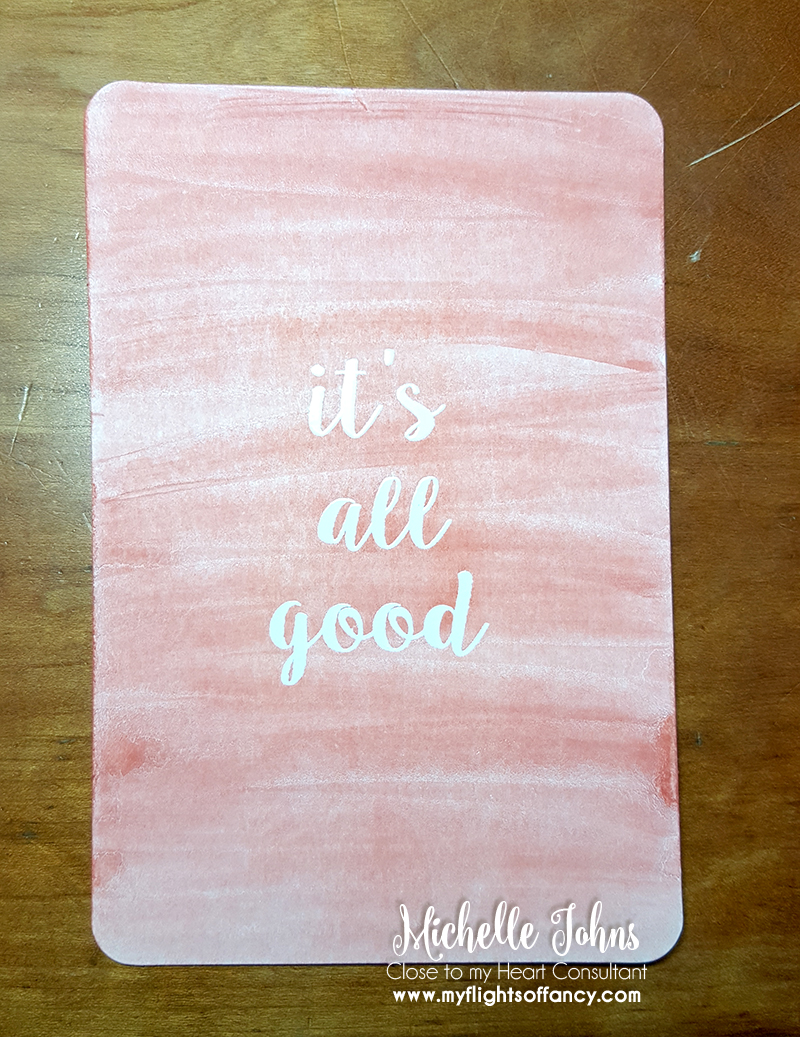
Now, I know this pic makes it look pink, but that is just because of the lighting that I had to use to get the photo. It really is the orange color that you see in the first picture and the next one.

wc-03

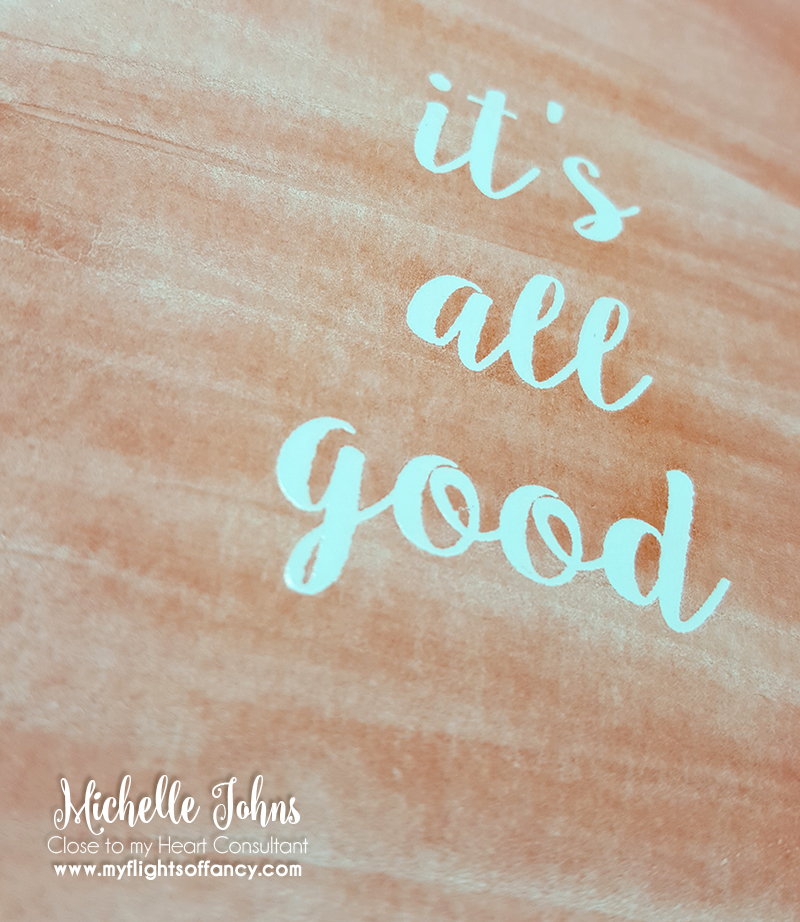
These cards have a clear embossing done on them in different designs and phrases. So when you color over them with the watercolor paints and pencils, the part that is embossed will resist the color and it will show as a bright white!

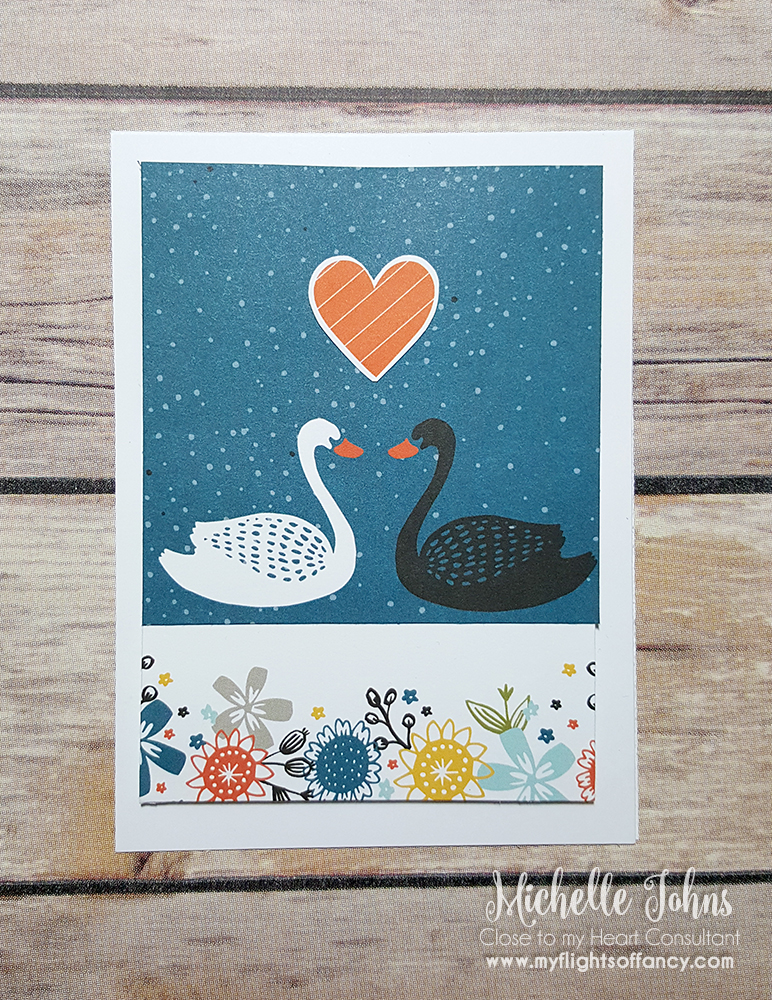
This next card uses the variant technique. You start with one color, and it fades into another color. Here you can see I did blues and greens with the wave embossing card, so it has a feel for ocean waters.

wc-04

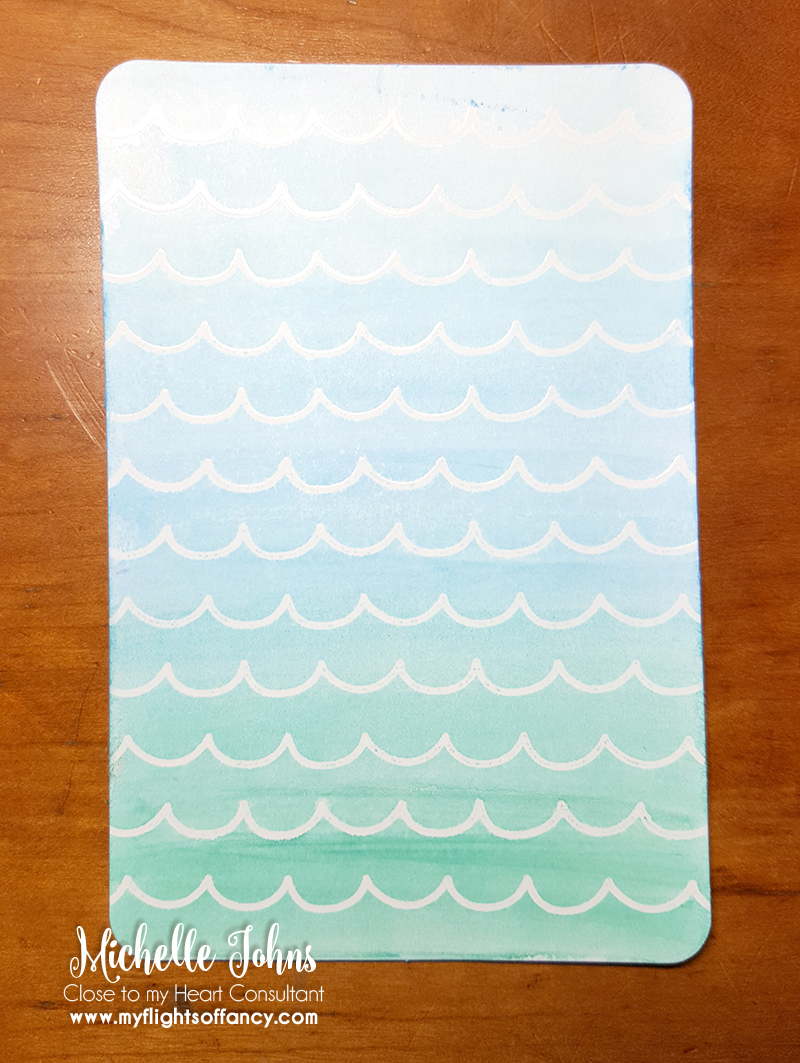
After your paint dries, you want to wipe off your embossed pieces to removed the paint from them.

wc-05

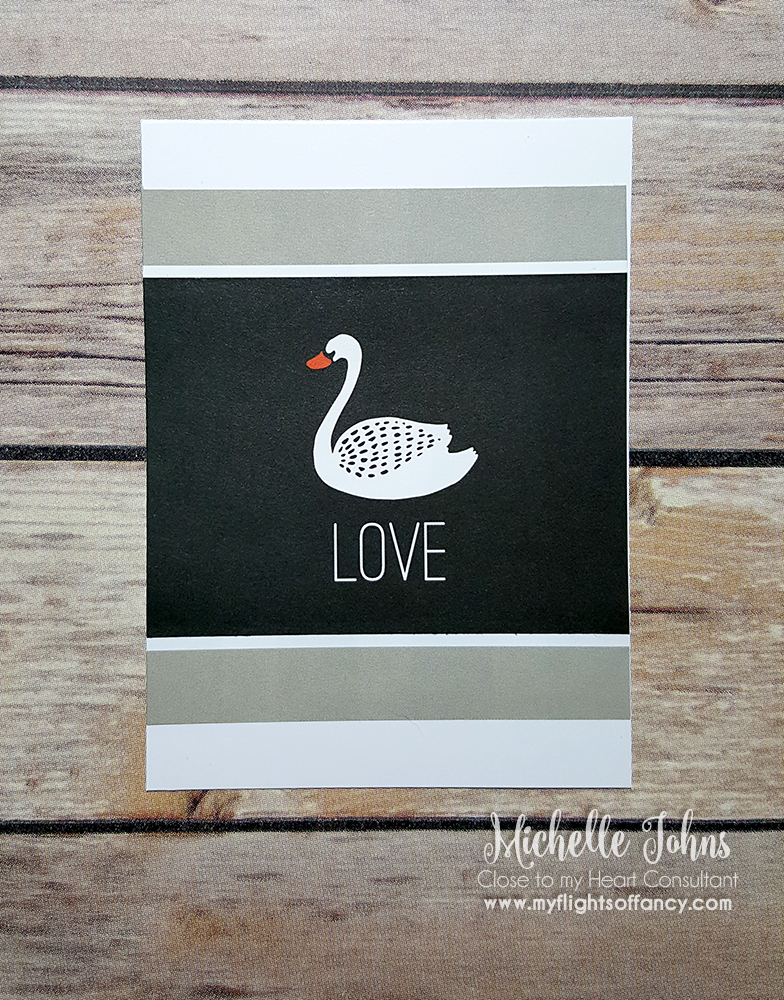
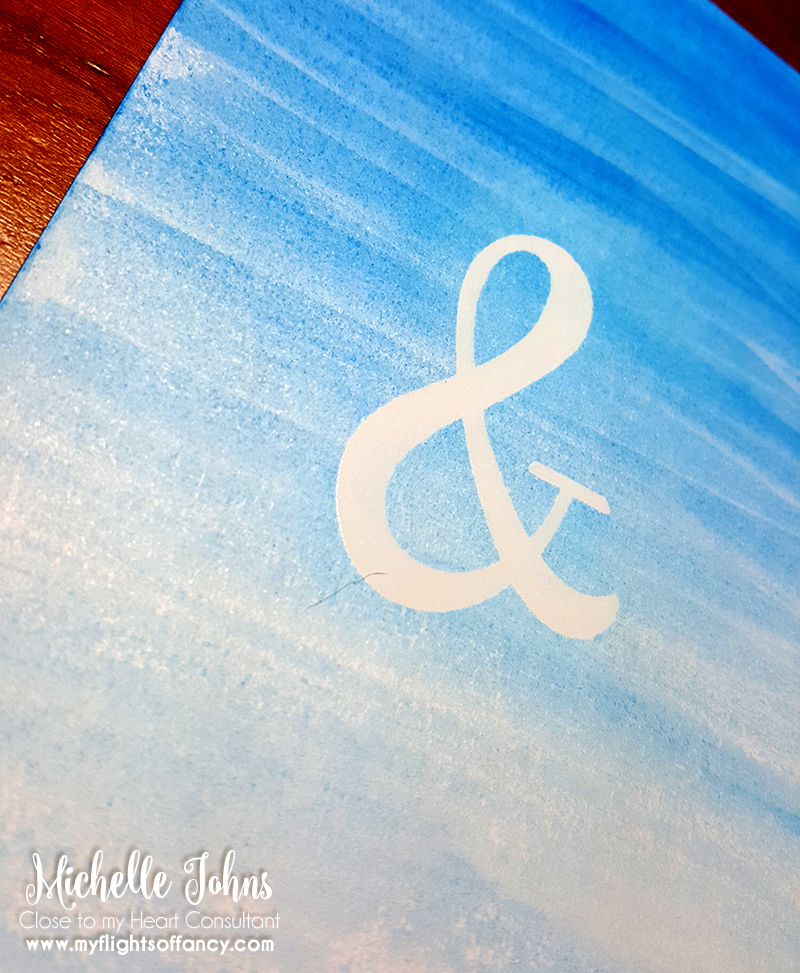
This next one uses the ombre technique. This is much like the variant in that it fades, however, it is all the same color.

wc-06

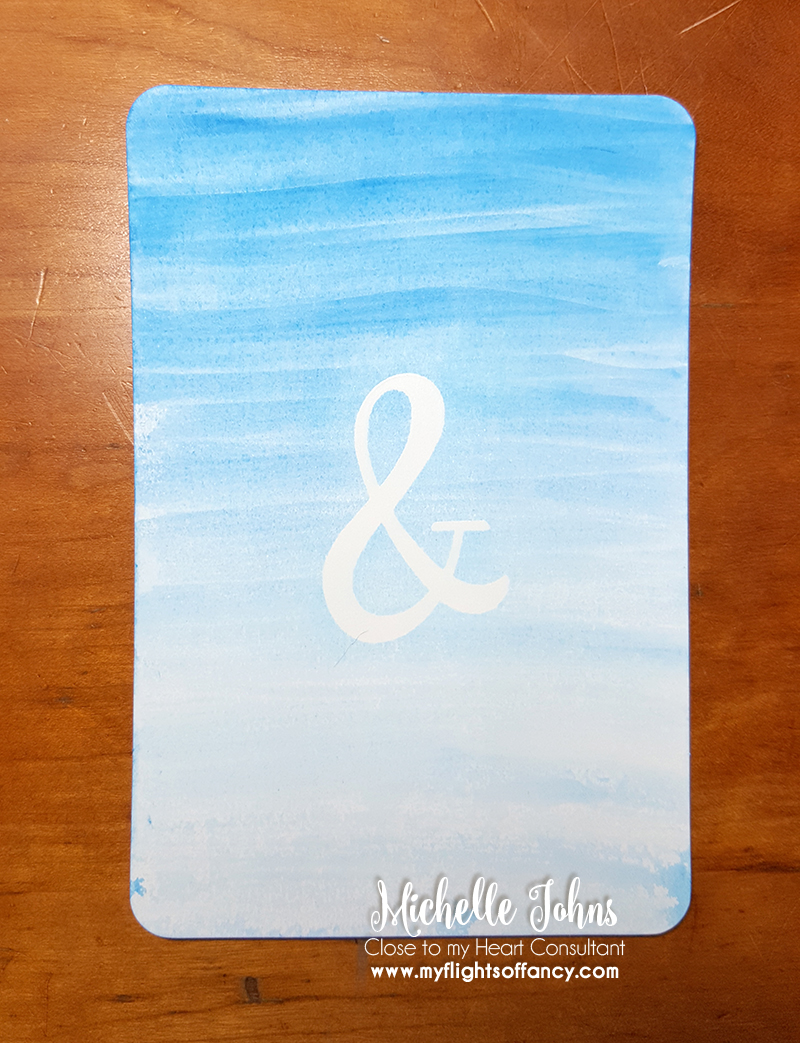
Because your brush won’t hold a TON of color, this card has a few layers on it, starting at the top where the color is the heaviest, and moving to the bottom, where the color is lightest, since the brush is running out of color/water as you are brushing it on the card.

wc-07

This last one was the most fun. It is basically the “smooshing” technique mixed with a flicking technique. So, it has multiple steps. First, you need a slick surface, like the All Purpose Mat. Then you need to pick some colors. For this one I used purple, grey, and a smidge of yellow.

wc-08

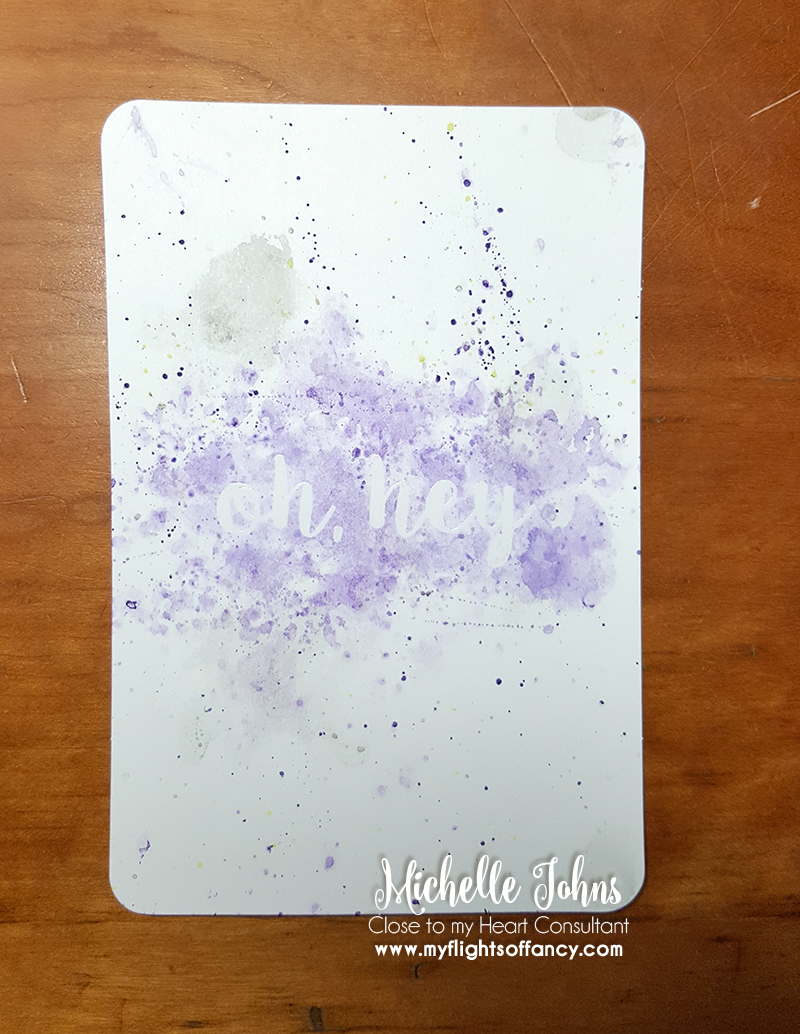
So, what you do is mix your colors with water, and put them in a spread out blob on your mat, then spritz them with water, and smoosh your card into it. I did this a couple of different times for each color, moving the card around a little bit each time, to help get a bit more coverage on the card. Since I didn’t have my heat gun with me, nor did I want to wait (I’m not big on patience), I took a paper towel and dried off some of the watercolor. (if you look close, you can probably see the texture from the paper towel!)

wc-09

Since I thought that the card needed a few more bright spots, I took the same colors and added a bit more paint to them. Put them on one of the acrylic blocks, and then flicked my paint brush from the color to the paper. This gave me the circle splash like dots you see.

I like all of the cards, but I think the last one is my favorite! Which is YOUR favorite?? I would love to know!

Thanks for stopping by today! Next up on the hop is Janna! I’m sure that you will find LOTS of fun projects along this hop!

I hope you stay dry this weekend, and get lots of fun crafty time in!

Until next time!

~Michelle

Just Crazy Blessed Team Blog Hop – Embossing Folders

Welcome to another super mini blog hop from the Just Crazy Blessed team! If you are hopping along, you should have come from Janna’s blog. However, if you started here, that’s ok, you will go to Janna’s blog next! (I did say it was a super mini blog hop, right?)

Today we are going to show off some embossing folders! Embossing folders are so much fun! You can do so many different things with them. Today I am showing you just plain ol’ embossing with them! However, I do have two cards for you!

hug-01

First up is this fun, vibrant card! I love this little girl from the True Love Operation Smile Stamp Set! As you can see, there is a whole lot of the new Sea Glass color happening, in the embossed cardstock and the glitter paper!

hug-02

I used a few different Shin-han markers to color her in after I stamped it with the Archival Black ink. I used the new Wood Slats embossing folder and the new Hello & Thanks thin cuts. And what card is complete without some bitty sparkles spread throughout?!

Next up is another card using the Hello & Thanks thin cuts. However, this time the hello is cut out of the Sea Glass Glitter paper!

hello-01

Now, there are all sorts of fun new things on this card! There is one of the dotted gold foil overlays from the All About the Gold Fundamentals, some Lemon Ink, some ribbon from the Enchantment ribbon pack, Sea Glass cardstock embossed with the Happy Thoughts embossing folder, a new stamp set, that’s just Dandy, cuts from the Flower Market Cricut Cartridge, and the new shimmer brush!

hello-02

The list above doesn’t even include the other not so ‘new’ things, like the Card base, whisper cardstock, white daisy cardstock, peacock cardstock & ink, bitty sparkles, and the things needed to put it together like liquid glass, foam tape and Thin 3-D foam tape!

hello-03

I love all the details that you can see in this photo! You can see the shimmer on the whisper cardstock from the shimmer pen, the sparkle of the glitter paper, the dimension of the embossing folder, and even the edge of the overlay! This card was such a FUN card to make!

I hope you have enjoyed my cards today! Thank you for stopping by! Next, you should hop on over to Janna’s blog! She always has such great artwork!!

I would love to know what you think about my cards! Take a few moments and jot a quick comment for me! I read all of them, and appreciate them very much!

Until next time!

~ Michelle

CTMH Technique Blog Hop – Flower Power

Welcome to the CTMH Technique Blog Hop! You should have arrived here from Darlys’ blog, however, if you are starting here, no worries, it’s a round blog hop!

Today we are going to show you some fantastic creations with the fabulous Flower Market Cartridge. It is such a FUN cartridge! You’ve seen some of my previous cards that I made with it, and here’s another one!!

umbrella-01

I saw a fun card on pinterest, and thought, HEY! I have some of those images on this cartridge!! So, tinkering away I went! I’ve had a lot of fun with shaker cards! This one was no different!

I used the This & That stamp set on this card, paired with Archival Black ink.

umbrella-02

Isn’t that “confetti” fun inside the umbrella? Two different sizes and colors of paper in there! I cut up a page protector for my window, and attached the grey for the handle and spindles right on top of it! I popped up one of the clouds to give a bit more dimension. That tiny pop of color that you see in the background is from the Whimsy Fundamentals pack. These packs are FANTASTIC!!

I know you will LOVE this cartridge! So many images for you to use! Just like the other cartridges, there are 700 different images, before sizes!

Now, it’s time for you to leave a comment and let me know what you think, and then hop on over to Janna’s blog.

Thanks for stopping by!

Until next time!

Just Crazy Blessed Team Blog Hop – Cricut Flower Market & Thin Cuts Dies

Welcome to another week of a Just Crazy Blessed team members blog hop! Today we are showing off the Flower Market Cricut bundle and some of the Thin Cuts Dies. We have just a few stops for you today, but I hope you like all of the projects that you get to see!

Today I have three different cards for you! We will start with the Thin Cuts Die card. I used the Hello & Thanks set for this fun card.

thanks-01

Would you believe that I have ONLY White Daisy cardstock on this card? Really! That’s the only cardstock! I know, it’s kind of a trick question, because there is another color on there, but I used the Turquoise Blue ShinHan Touch Twin marker to make a mat and colored one of the dies that I cut.

thanks-02

It was such a FUN card to make! (and with cards like this, Liquid Glass is your BEST FRIEND!!)

Next I have a card with a fun woven background.

vase-01

The flowers and vase are from the Flower Market Cricut Cartridge. The sentiment is stamped in Archival Black ink with one of the sentiment stamps that are includes in the Flower Market bundle! (as are the cardstock colors for the flowers themselves) The Vase uses a bit of paper from the Whimsy Fundamentals pack.

vase-02

The next card I had a bit of fun with in Design Space. I used the Flower Market font to make the word “happy” and welded the letters onto a rectangle to create the little band.

kraft-hb-01

Then I used the “birthday” from the Sweet Birthday set, and stamped that with Archival black. Wrapped a bit of white twine around the kraft paper and used foam tape to give it a bit of dimension! The pink paper is also from the Whimsy Fundamentals pack.

kraft-hb-02

I hope you like my cards today! If you would like to make some like this, just let me know, and we can get that worked out! Let me know below, what you think about my cards! Which is YOUR favorite??

previousnext

Just Crazy Blessed Team Blog Hop – PML, Instalife, & Everyday Life Scrapbooking

Welcome to the Just Crazy Blessed Team mini blog hop. Today we have just two participants, myself and Janna. Lots of people are away for the holiday weekend, so they weren’t able to participate.

Today I am going to show you a set of 6 cards using the Picture My Life (PML) cards from the Swan Lake paper pack.

swan-01

I made this set of 6 cards with ONLY the sheet of PML cards from the pack, and two sheets of White Daisy cardstock. I think that the set of cards turned out pretty awesome!

Three of these cards have no stamping on them, and three have some stamping on them. I used the September Stamp of the Month, Blessed Beyond Measure, and This & That.

swan-02

I also used one of the Create Kindness stamp sets, Enjoy the little things. These are fantastic little M sized stamp sets that are perfect to add to your stash for quick card making!

swan-03

swan-06

Most of the cards are fairly simple . . . which makes them really easy to put together!

swan-04

swan-07

Just some minimal cutting, and you have some great cards to add to your stash!

swan-05

In the next couple of days I will share how I made the extra cuts on these cards, so you can make a set for yourself!

I just wanted to show you that these fun cards don’t have to be used in the Pocket pages for scrapbooking, nor on a traditional page layout!

I hope you enjoyed them! Please leave me a comment and let me know what you think!

For now, hop on over to Janna’s blog, and see the fantastic layout that she created for you!

PML-prevPML-next

Just Crazy Blessed Blog Hop: Jeepers Creepers!

Welcome to our JCB Monthly Blog Hop!

This month there are a few of us highlighting the Jeepers Creepers paper pack. This blog hop is a big circle so you can start wherever you want and continue through to see all the fabulous artwork incorporating the Jeepers Creepers Paper collection.

f3ce93a0-d7a4-4db3-976a-fdb63df652e0

While I have many years of photos to catch up on for Halloween pages, I just couldn’t pass up the opportunity to do a fun little treat box with this fantastic monster paper!

jeepers-01

I’m all about monsters! I cannot wait until my stamp set and thin cuts get here!

jeepers-02

I found a video that I liked the little box on, but then decided I wanted to change it up some so that my gift card would stand upright and stick out of the top. So, I did! I really like how it turned out!

jeepers-03

It holds a fun gift card in the sentiment portion of the box, and treats inside! I used the Black Shimmer Ribbon tied off with the White Twine to use as a pull tab for the gift card.

jeepers-04

I used the leftover side pieces from the box to make the little banners. I stamped them with Jennifer’s Hand stamp set in Archival Black ink. I don’t know about you, but when this font finally retires (luckily no time soon!!), I will be so sad!

Now, I hope you liked my little treat box! I know I had fun making it! (it’s the first time I’ve designed my own box!) I know the other ladies have some fantastic projects for you! So, use the fabulous little arrows below to navigate through the hop!

Thanks for stopping by! Please leave me a comment to let me know what you think!

jeepers-prevjeepers-next

Danielle Wagner – http://www.danyellscraps.com/2016/09/jeepers-creepers.html
Michelle Johns – http://www.myflightsoffancy.com/just-crazy-blessed-blog-hop-jeepers-creepers
Janna Brown Gray – http://www.jannagray.com/just-crazy-blessed-team-blog-hop-jeepers-creepers/

Just Crazy Blessed Team Blog Hop – Uptown & All About the Gold Fundamentals

Welcome to the Just Crazy Blessed Team Mini Blog hop! I hope you have been enjoying seeing some fun artwork each week with the new papers! I know I have!

This week we are focusing on the Uptown fundamentals and the All About the Gold Fundamentals. Both are super fun! They have gold foil printing (so they are silver on the back side, super bonus!) and vellum, and some are clear overlays! I know you will like these packs!

37dd5303-a0ee-463a-9635-abc9ff60c1ae f77a3aef-32eb-48a7-9cd4-a9173b7d55d5

Today I used the new Sea Glass color for the base of my card. It’s a fun folding card!

gold-01

I created a belly band for it, with more sea glass paper, and one of the stamps from the Wedding Wishes stamp set.

gold-02

Here you can see how bright the foil is! This ‘paper’ is one of the clear overlays with the gold foil. Like I said earlier, the backside is silver, so I could have easily flipped it over and gone for the silver triangles (that actually might have looked better . . . but I do like how it turned out!)

gold-03

Here you can see it open, and laying on my table. There is PLENTY of writing space on the inside, and the triangles follow through on the inside as well.

gold-04

I love this card design! I may have to make some Christmas cards out of it for my Christmas workshop later this year!

I hope you like how it turned out! I would love to hear your thoughts!! Now, hop along the blog hop trail and see what the other ladies have made to show you! (The hop is a circle, so you can just keep going until you end up here again!)

uptown-previousuptown-next

Until next time!
~Michelle

Just Crazy Blessed Team Blog Hop – Enchantment Fundamentals

Welcome back to another mini blog hop by the Just Crazy Blessed team! Today we are going to show off the Enchantment Fundamentals! These papers are so fun! I’ve been working with them for a swap, and could have shown you those items, but I want to wait until they are ALL done! I know you will love them! Anyways! Today you should have come from Jana’s blog, if not, keep hopping, you will get back to her blog!

49e56202-b3ac-41a9-8bb5-6aa1435ec910

The stamp set that I am showing you today is the Get Better set, B1543. I LOVE THIS STAMP SET!!! I think the sentiment is so so so so funny!!

GBS-01

I went with a somewhat monochromatic look with the yellows and whites and kraft. It isn’t quite mono . . . but close!

GBS-02

I almost NEVER stamp on the B&T Duos paper, however, I thought this just went so well that way! Because of how black the Archival Black ink is, it totally pops against the paper!

GB-03

I tucked a tissue in with the tag in this card, just to add a bit more humor and decoration for the card. I think it is so stinkin’ cute!

If you have been following my blog this month, you will have seen this other card that I made with this same stamp set.

free-02

This is one of the card kits that you can earn for free! Check out this post for more information.

Now, it’s time to hop over to Tonya’s blog. Thanks for stopping by! I hope you enjoyed my cards!

Until next time!

Michelle

enchantment-prevenchantment-next