Category Archives: CTMH

15 years of Close to my Heart goodness!

It’s Jubilee Time!

This whole week is dedicated to the Jubilee paper pack! This is such a fun paper! Perfect for fair photos!!

For this layout, I used strips of papers, cut to 1/2″ thickness, and pieced them along the right side. Sounds super simple, right? That’s what I thought when I started doing it, until I started laying out the pieces! It’s a bit harder than one might think! LOL

Here you can see the strips a little bit better. They are fun to work with!!

I had a few pieces left over, so I used them to create a banner on the right side of the page. Super simple, super fun!

My page was inspired by this page.

I know you will love the projects this week!

Happy Crafting!

~ Michelle

Today’s card uses all CTMH items:
Jubilee Paper Pack
Cardstock:  Colonial White, White Daisy
Glue: Tombow, Foam Tape
Tools: Paper Trimmer, Micro-tip Scissors

Timberline WOTG & a Winner!

I hope you have had fun with all of the Timberline projects this week! I know I have had a blast making them for you!

The Timberline Workshop on the Go has a fun travel themed stamp set and wooden embellishments that would be great for camping photos, or hiking, or even just general family vacations!


{click here to view larger}


{click here to view larger}

As with all WOTG, you are able to make both sets of pages, with plenty of papers left over for more pages! Why not check out the Make it from your Heart, volume 1 and volume 2 for great ideas on other pages to do!

I know you will enjoy this WOTG!!

Now, I promised a winner! I think I am even a day or so late! My greatest apologies!

The winner is:

Iris!

Congrats Iris! Please email me with your mailing address, so I can get this fab set of cards out to you!

I hope you all have a crafty day!

~ Michelle

Hinged Display Tray

Happy Saturday! I hope you have all had a fabulous day! I’ve spent all day at my craft sale, so the post is going up a bit late (but still Saturday!)

You’ve seen me show off one of the CTMH Hinged Display Tray in the past, using some Laughing Lola papers and compliments. Today, we are using the Timberline papers (of course), and some pieces of the Wooden Mini Medley.

You would have seen some photos in here, but I had them printed at the wrong size! So, that means you get to see some photo holders! LOL!!

There are a number of embellishments in this mini medley, including a few clothes pins with etched words, some wooden ‘buttons’ that are basically disks with a flower type design (and they are sticky backed, so no glue necessary!), some regular wooden buttons {you can kind of see one in the first 2 pictures}, and some fun wooden swirls {that kind of remind me of waves!}

The great things about these clips, is that I can add any little memorabilia that I might have, or want to show with this frame. (maybe a thin shell, or a fun weathered paper found on the beach.

I used the Framework Alpha to stamp the sentiment. It may not be ‘perfect’ but I had fun making it!

I hope you enjoyed my little project today! I would love to help you make one of your own! Just let me know!

Have a crafty day!

~ Michelle

Today’s project uses these CTMH products:
Timberline Paper Pack
Hinged Display Tray
Cardstock:  White Daisy
Ink: Archival Black
Embellishments: Mini Medley Accents Wooden Collection
Stamps: Framework Alphabet
Glue: Liquid Glass
Tools: Paper Trimmer,  clear blocks

Masculine Thank You

As I said earlier this week (or maybe it was just yesterday?), cards for guys tend to be a bit hard to do. You don’t want them too pink, or too flowery, or too sparkly (usually, anyway). And, as crafters, we generally like to do ‘more’ on our cards.

I used the sketch from Freshly Made Sketches for today’s card. It’s not quite as simple as yesterday’s card, but still just as fun!

I did use a little bit of embellishing on it, and used two of the durables that are in the Rosewood collection. (mostly girly stuff, but these fit well!)

This card was fast, simple, and easy! The hardest part was deciding which sentiment to put on there!

Today and tomorrow I am having a craft sale with a couple of other consultants, and we have LOTS of goodies waiting to be adopted to go to a new home! If you are local, you should come check it out! You can find the Craigslist post, with the address here.

Have a crafty day!

~ Michelle

Today’s card uses these CTMH products:
Timberline Paper Pack
Cardstock:  White Daisy
Ink: Archival Black
Embellishments: Rosewood Mini Medley
Glue: Tombow,
Tools: Paper Trimmer,  clear blocks

All you need is love

The stamp of the month for February is Wild about Love. You have seen a number of cards from me already this month using various stamps in this set. It is such a versatile set, it’s almost amazing! I know that this is a stamp set that you will want, so make sure you don’t miss out on it! It’s only available until the 28th!

Today I am using the sketch from Sweet Sunday Sketches. It’s a simple and versatile sketch! You could easily make a whole set of cards using this sketch!

I also incorporated a few other challenges into this card: SWAT {“all you need is love”}, and Creative Fingers {more than 1 layer, love}. I’m really having a lot of fun with these challenges! It helps me because I can combine a few of them to create something that is “me”, vs. trying to create something that someone else has already done. I hope that makes sense!

I even put in a small panel on the inside, using a bit of the wood paper from the Timberline kit.

I wanted to make sure to remind you of a few things!

1. Tonight is your last chance to win the set of cards! Check out the “Let’s scrap our stash” post to enter to win!

2. I still have spots available at my Retreat at the Beach spring retreat. I would love to have you join me!

3. In February, buy 2 packs of cardstock, and get one of the brand new embossing folders, FREE!

4. Wild About Love is ONLY available for the next 8 days! Don’t miss out!

I hope you had a fabulous day!

~ Michelle

Today’s card uses all CTMH items:
Timberline Paper Pack
Cardstock:  White Daisy
Ink: Ruby
Embellishments: Ruby Chevron Ribbon
Glue: Tombow, Foam Tape
Tools: Paper Trimmer, Micro-tip Scissors clear blocks

Always available

Always available? Well, I’m almost always available, but I was talking about some stamp sets! If the stamp set has a cricut cut on it, then it will always be available to you! How fantastic is that??

Today I wanted to focus on two different sets, so I have 2 different cards for you! Sticking with this week’s theme, we are using the Timberline Paper Packet. I used the stamp set “All the Details“. There are 6 stamps in this set that have a coordinating cricut cut.

I used the sketch from Random Acts of Creativity, and the challenges from Inkspire me {Use white, gold/silver, and another color}, Brown Sugar {Die cut or punch} and Catherine & Cathy {Weather element: although it’s not a tag, so it may not ‘qualify’}. It was super fun!

I used our metallic markers to add the gold and silver linings on the clouds. {one is silver and the other gold . . . anyone else get that??} I also colored the ‘stars’ on the paper with the silver and gold markers, just to give them a bit more pop!

Then, I used the “Perfect Fit – Birthday” Stamp set. There are 4 cricut coordinating stamps on this set.

I used the sketch from Fusion for this one, and it fits Flourishes challenge that ended yesterday . . . LOL!

I was happy with this card, as it is a very masculine card, and as most card makers will tell you, that can be a fairly hard thing to do!

Both of the papers are flat, just the sentiment is popped up just a bit to give it a bit more interest.

There are so many challenges out in blogland, that I am sure that you could find something to play along with to get your mojo going, if it happens to be hiding! Need some help in finding one? Check out my Pinterest Challenge Board to get started! I’ve noted the ones that I have found that aren’t posting new challenges, but they have left up the old ones, so you could still get ideas!

Check out some other cards made with these great stamp sets!


by Debbie Fournier


by CTMH


by Julie Nilsson


by Kelly Janes


by Wendy Coffman


by Allisa Chilton


by Cassandra Bennett


by Cat


by Susie Rostad


by Kelly Janes

I hope you have enjoyed the cards today! If you would like to see some more, I have created Pinterest boards for both stamp sets. You can find them here: Perfect Fit Birthday & All the Details.

I hope you have a crafty day!!
~ Michelle

My cards used only CTMH items:
Timberline Paper Pack
Cardstock:  White Daisy
Ink: Twilight, Chocolate, Metallics Markers
Glue: Tombow, Foam Tape
Tools: Art Philosophy Cricut Cartridge, Paper Trimmer, clear blocks

Card in a Box

Hello crafters!

Today I have another tutorial for you! I have liked the Card in a Box since I first saw it a few months ago. There are a number of tutorials out there. Most of them will give you sizes that you need to create a custom envelope for. Me being me, I wanted something that fit into a regular envelope!

This fun card will fit perfectly into a regular sized envelope! Perfect, right?

This fun little card has a spot on the back for you to write your greeting, so you aren’t missing out on anything! Grab some basic supplies, and make a card in a box today!


{If you are viewing via email ,you may need to click through to see the video}

By the way, this tutorial shows you how you can get 3 cards out of one sheet of cardstock! Two of the cards are Card in a Box, and one will be a small 3×6 card. You will have very minimal scraps left over from your base cardstock!

I hope you enjoy the tutorial!

~ Michelle

All products are CTMH (unless noted)
Timberline Paper Pack
Cardstock: Lagoon, White Daisy
Ink: Smoothie, Archival Black
Stamps: All the Details, Word Balloons {Artiste Collection Stamp Set}
Glue: Tombow, Glue Dots, Adhesive strips
Tools: Artiste Cricut Cartridge, Paper Trimmer, Versa Mat, Scissors, Clear Blocks, Bone Folder
Non CTMH: Martha Stewart Scoring board and embossing tools

Timberline Layout

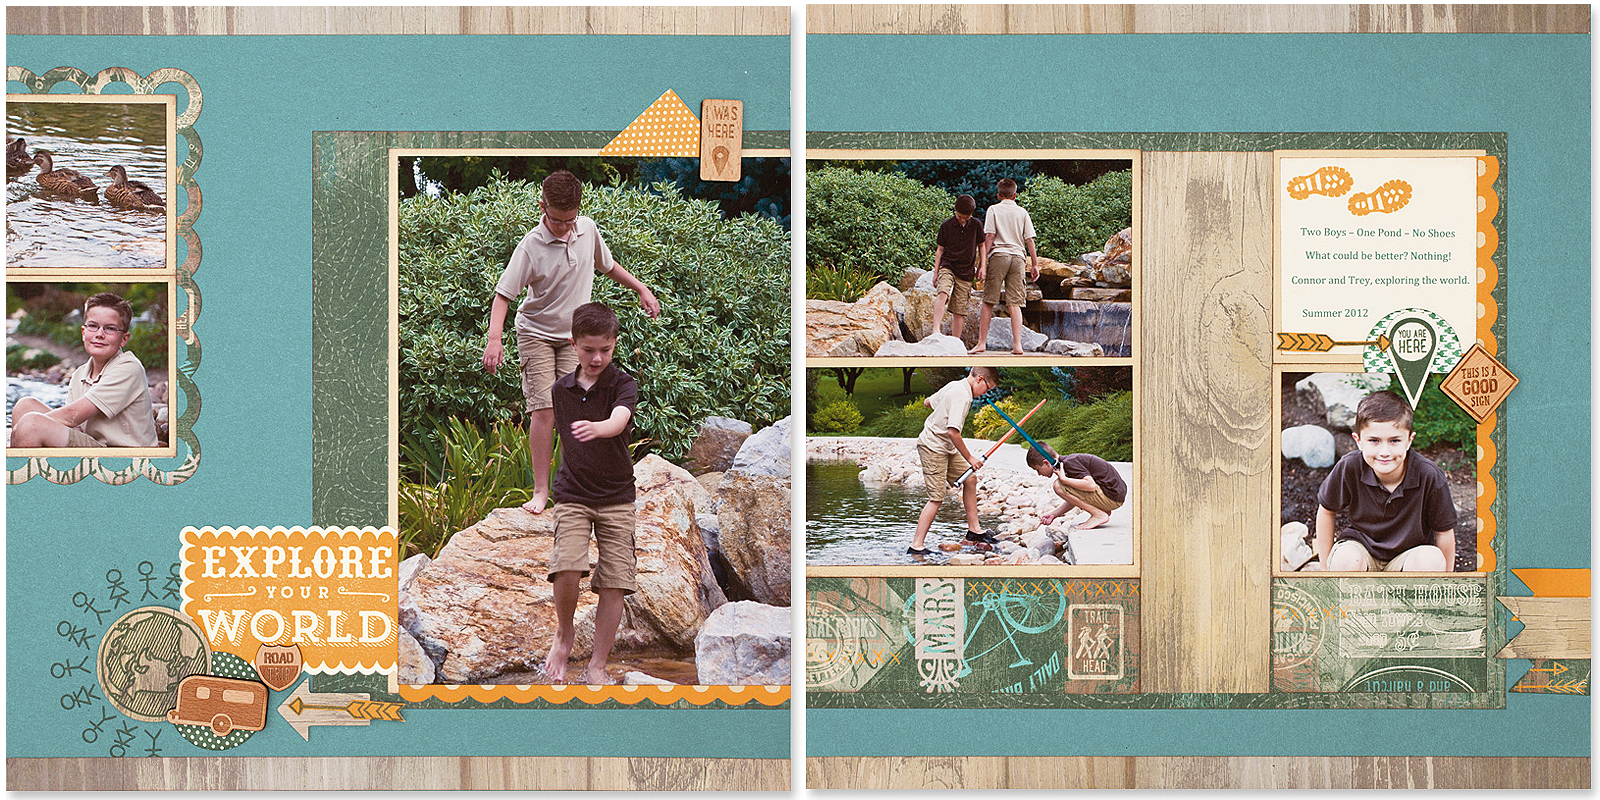
This week we will be looking at the Timberline paper pack. This one is so versatile, with a wood grained paper, it will go with any and everything!

This layout would be PERFECT to use some leftover scraps of any paper pack. I used the other papers in the Timberline paper pack, since that is our focus this week! There are LOTS of places for photos!

I used the Artbooking Cricut Cartridge to cut out a couple of elements for this layout.

Here you can see one of the elements that I cut with the Artbooking cartridge, you can also see a bit more in detail the outside lines of the square. These were a list that was on the zip strip of the wood grain paper! It’s a long list of different things that you would need to go camping! There are only 3 lines, so I used another line from another zip strip.

Although, I realize, that I left off some of my embellishments!! I was going to add some of the gold triangle durables to the corners! So, imagine that they are there!

It was fun to do this layout! I was inspired by this layout.

I hope you have some crafty time!!

All items used are CTMH:
Timberline Paper Pack
Cardstock: Bamboo, Twilight, White Daisy
Embellishments: {not shown: Triangle Durables}
Glue: Tombow, Bonding Memories Glue Pen, Foam Tape
Tools: Artbooking Cricut Cartridge, Paper Trimmer, Craft knife {retired}

Lollydoodle Scrapbooking Workshop on the Go!

It’s the end of the week, which means I get to show you the WOTG for this paper pack! As with all WOTG, you will have enough to make 2 sets of double page layouts, with extra paper left over!

To create these pages, you will need some basic supplies, plus the Cricut Artiste Collection.

You will have these beautiful pages ready to go in no time!!

Each WOTG comes with a full paper packet, plus 3 additional sheets of cardstock {Juniper & White Daisy with Lollydoodle}, a full D sized stamp set {exclusive to the WOTG}, full color instructions with cutting and stamping guides, and 2 sets of embellishments.

With all of this, you can easily get 2-4 more double page layouts with the papers, just by adding the bases for the pages.

Have you seen the blog hop from earlier this weekend? If you become a follower and post a comment on that post, you are entered to win a set of 4 cards! Make sure to go and check it out!

I hope you have had a crafty weekend! I look forward to sharing more fun stuff with you next week!

~ Michelle

Picture My Life

One of the brand new products in the Spring/Summer Idea book, is a line called Picture My Life. It is made to make scrapbooking easier, faster, simpler! It’s also known as “pocket scrapbooking”, because there are pockets everywhere!

Each of the 8 different sets comes with 10 page protectors, 1 “Cover” page, 78 cards that are sized 3 x 4, and 44 cards that are sized 4 6. You get a LOT of cards in this kit!

The cover page is printed front and back, and has spots for photos. I didn’t add any photos yet to the cover page, but I am certain I will!

Now, if you haven’t tried to take photos of scrapbook pages, while in their pages, then you don’t know just how hard it is!

So, I have a straight shot photo (with lots of glare), and an angled photo, with the glare in a different spot! LOL

I’ve used the Surf’s Up kit for my pages so far, and I am using photos from my first annual retreat at the beach!

I think I might use this to do each retreat!

I had fun at the retreat, and fun putting these pictures into the pages! I need to get some more printed! I have cards picked out already for the next few pages, now I just have to decide! LOL

Let me know if you want to check out the cards and how the Picture My Life works, in person! I’ll gladly meet up with you and let you play with it!

Have a crafty weekend!

~ Michelle