Category Archives: CTMH

15 years of Close to my Heart goodness!

Georgie’s Special Delivery!

The Georgie paper pack has been around since last summer, however, I haven’t really played with it until just now. I think this paper is just ADORABLE! This paper pack doesn’t have to be used for ‘baby’, but it is SO easy to use it for that!

georgie01

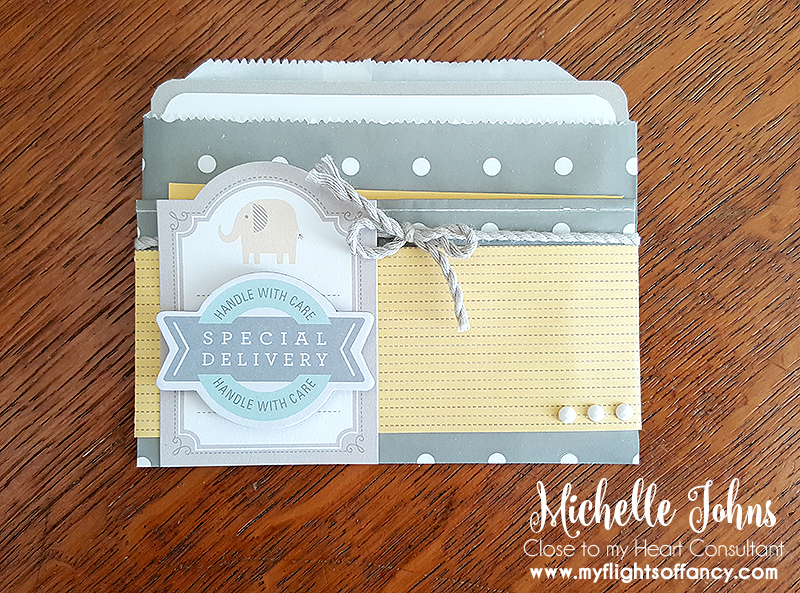
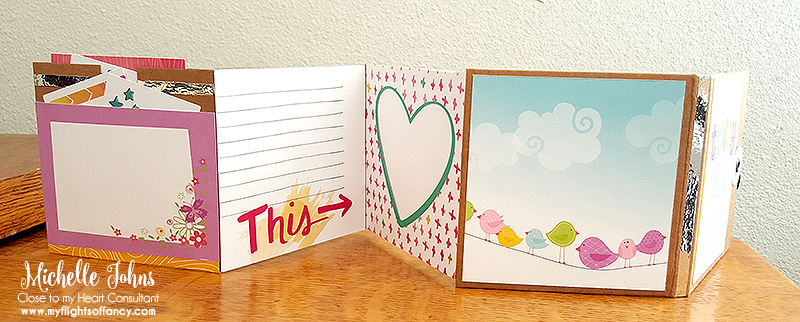
For the base, or container for my little creation, I used one of the Designer Creations Slate paper bags (the chevron one). I folded it, not quite in half, wrapped a piece of paper all the way around the belly of the bag. Then figured out which of the compliments that I wanted to use for this little bag. I used the Cardstock stickers, the chipboard piece, and even some of the clear stickers from the Compliments pack.

georgie03

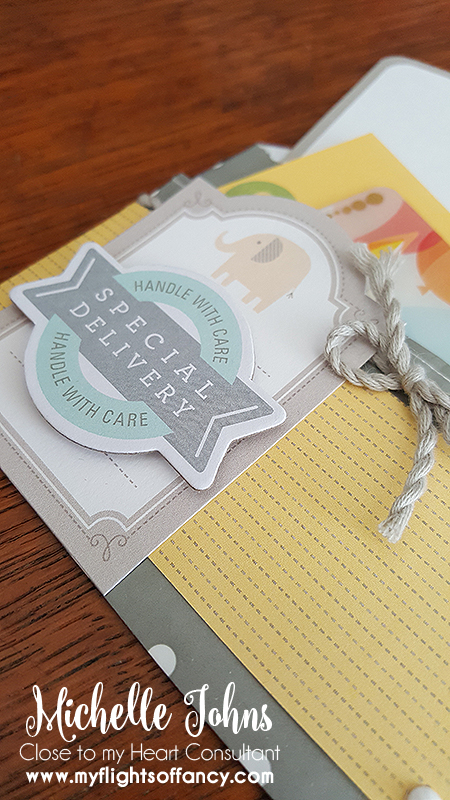
I added some Whisper Thick Twine and three little white gems from the Grey Enamel Gems pack.

georgie04

This little bag holds a card to hold a gift card, and another card spot for your personal message! I put one of the clear stickers on the white of the bigger card, to help tie it in with the rest of the bag/card. (Heck, I don’t even know what to call this thing!)

georgie02

All of the pieces come in the Georgie paper pack & Georgie Compliments with the addition of the Whisper twine and Grey Enamel Gems (and the Bags, of course!). I did add one small piece of white for a note to be written on, for the bigger card.

I hope you like my little card bag thing! Originally I wasn’t going to make the whole set of grey bags into gift card holders with the Georgie papers, but I think I will, just to see how many different little bags I can get with it!

When I get them done, I will share them, for sure! (and then, I bet there will be a workshop coming up with them, too!)

Until tomorrow!

~Michelle

Salt in the Air

I fell in love with the Regatta paper pack the minute I saw it. I LOVE love LOVE the beach! And, while I don’t go sailing, this paper pack is SO fun! I know I will miss it when it retires at the end of the month! You will want to make sure that you get yours before it’s gone!

reg01

I used my handy Cricut Explore machine to cut out some various sized circles of each of the papers in the pack, and then arranged them in the shape of a heart. I was inspired by this layout done by Jennifer de Castro. The stamp from Beach Days was the PERFECT title for my little page, and went along wonderfully with the photo from my Retreat that was almost a month ago now!

reg02

I popped each of the little circles on a layer of foam tape, and my photo and ‘title’ are popped up on two layers of foam tape! I used Archival Black Ink for the stamping (looks like I need a new pad, this one is drying up a bit!). I added the journaling with a pen and tucked it under the photo a smidge.

reg03

To give it a bit more bling, I used a few of the dots from the Enamel & Glitter Duos Blue Dots collection. I think it gives it just a bit more pop! What do you think?

Would you like to make one for yourself? I am hosting a layout night on Friday at 6:30! I would love to have you join me! It’s just $7! RSVP and let me know that you would like to come! I have spots for 10 ladies!

I hope to see you there!

Until tomorrow!

~Michelle

Easy Bling!

I know I have posted about the CTMH Base & Bling line in the past, like here & here, however, I wanted to show you a few more.

BnB01

Here you can see a few different things. There is a mix of old and new. The older style of the Base n Bling has an antiqued look. The newer styles are shiny. There are still both Gold and Silver, and the shapes available are square, round, rectangle, and oval.

BnB02

There are still MANY different charm styles to choose from, including a few in the clearance section, at the time that I am sharing this with you!

As you can see, I have a couple of necklaces, a keychain, and a book ring. It is a GREAT way to give something fun, that is easy to do, doesn’t take up a lot of room, and can be done by a 10 year old! (That means that YOU can do it too!!)

The pendants and glass covers come in packages of 3, as do the charms! That means that if you add just one chain, you could EASILY have 3 necklaces, relatively inexpensively! The fastest way to create these fun pendants (or key chains) is to use the sticker sheets that CTMH has already designed for you! Just stick the sticker into the pendant, add a dot of liquid glass, put the glass cover on top, and VIOLA! You are DONE! The hardest part is going to be which sticker to choose!

BnB03

Want to find out how easy it is in person? Host a necklace buffet! You can pick and choose between some of the different stickers and shapes and have a great evening with your girlfriends! Let me know if this is something that might interest you!

Until Tomorrow!

~Michelle

You must be Kitten Me!

You must be kitten me, that you can get this stamp set and help kids at the same time??

No way, dude!

kitten01

But, seriously! The kitten and saying on this set come from the Animal Greetings set that benefits Operation Smile. I’m sure you’ve seen me talk about them in the past . . . they help children in other countries with cleft plate and cleft lip receive the surgeries they need to be able to survive, and thrive. Each surgery is only $260! When you purchase this stamp set, $7 of every set goes directly to them! That is such a great deal!!

kitten02

For this card, I used one of the Colonial White card bases, Whisper cardstock for the front, the vine stamp from Botanical backgrounds, whisper ink, three pieces of the Penelope paper pack, Whisper thick twine, and Foam tape.

It was such a simple card to put together! A set of these would go together in no time at all!! And you could do 15 different cards in total! Check out some of the other stamps on this set!

b525ae56-6b1b-4bc8-b64d-e716d742a88c

It is a great punny stamp! They could easily be colored in with pens, pencils, crayons, or any other medium that you might like! In fact, I am going to do a special! For every person that purchases the Animal Greetings stamp set from me in April, I will send out one of these card kits! I will send them out each weekend until the end of the month! So, let all your friends know too! I would LOVE to help Operation Smile in any way that I can! (and remember, when you are checking out, you have the ability to round up your order! So you could spend just a few cents more, to make it a nice, even round number for you, and give more help to Operation Smile!)

I look forward to showing you something new tomorrow! Make sure to check back!

~Michelle

Penelope Mini Album

Back a few weekends ago, I got to go to a Spring Launch event, hosted by CTMH to show off the upcoming Seasional Expressions 2 book (you will LOOOOOVE it!!). Prior to the event, one of my uplines hosted a meeting, and we got to make a fun little mini album! It uses the PML cards in the Penelope paper pack that will retire at the end of April (so you will want to get it before it’s gone!)

pen01

It also uses the Colorful Me Instalife cards, Silver Foil Tape, and the MyCreations Mini Folio, and besides glue and photos (and a few tools) that is all that you need!

pen02

When I put mine together, I added a few more pockets, because who wouldn’t want to be able to add a few more things to the mini album??

pen03

Those two little cards that you see (blue stars and yellow/orange arrows) at an angle behind the purple paper are tucked into the pocket. There’s another on the other side of the page. There is also a pocket in the middle with a fun little insert.

pen04

On the 2nd and 4th pages shown here, is where your photos would go. The first photo spot, the photo would tuck behind the birds. The second would slide in from the top, behind the frame.

pen05

Here, the first spot is more of a journal spot than a photo spot. The heart is where your other photo would go. The last two ‘pages’ that you see in this photo are the front and back covers of the mini album.

I don’t know about you, but I am LOVING this adorable little mini album! It is a great way to use up the PML cards that you may not have used if you are a traditional scrapbooker. If you need to order any of the supplies, they are linked above! I would be happy to answer any questions that you may have about it!

Remember, in April, the great SOTM is just $5 with a qualifying order, and it’s just adorbs!! I have seen some GREAT things done with this set! I will show off some examples within the next few days!

s1604

Until tomorrow, stay crafty my friends~!

~Michelle

Weekend Challenge

So, I am a part of a Facebook group that has various challenges and Cricut cut swaps. There is a challenge this weekend to use some specific files, in any way that we would like. So, I grabbed a scrap piece of Kaleidoscope paper that I had left over from Convention this last summer, and cut out the fun box that was included in the files.

frog01

There was also this adorable frog in the files. So, I grabbed the new Fern cardstock and a few scraps of black, white, and cranberry, and cut this fun guy out! Because the little nose bits were tiny, I managed to lose one of them! LOL So, I just grabbed my journal pen and drew his little nose on there. (trying to be about the same size/shape as what was originally cut). I used my Topiary ink to edge the frog, the cranberry ink to do his tongue, and the archival black around all the black bits.

frog2

The box is just slightly angled, with the bottom being slightly smaller than the top edge, so I didn’t want to just glue him onto the box face. So, I grabbed an adhesive spring from Close to my Heart. and now he can move a smidge!

frog3

The top closure of the box looks like 3 little hearts when it’s closed. I think it’s really adorable!

frog4

I hope that you like my little creation! I know I had fun making it!

I look forward to showing you something new tomorrow!

~Michelle

Welcome to April!

April has arrived! And with it, the first day (so to speak) of Spring break for my kiddos! The weather is a BEAUTIFUL 73 degrees, and we are BBQing tonight! mmmmmmm!! I do love some barbecue!!

I just wanted to send out a quick hello to all of the peeps that might read my blog! There are so very many things happening in April, that it is AMAZING!! So, check out some of these things!

1. April Stamp of the Month:
s1604
This adorable set of vintage cameras offers so much! This would be GREAT for layouts, mini albums, and even cards! Take a look at the layout and mini album cover that the art department made for us!

1604-sotm-life-in-pictures-page

1604-sotm-photo-op-album-cover

This stamp set is available for $17.95 or you can get it for just $5 with a qualifying order!

2. Baby I’m Worth It campaign
This campaign is for new consultants. Not only has Home office made the kit even better by allowing you to choose what you get, but the price is lower too! For just $75, you can become a consultant and start your own business! You will get the business supplies, shown here:
1604-se-new-consultant-kit
Yup, the scissors and blocks are included in the business supplies! You also get idea books, seasonal expressions 2, paper and cardstock samples, a medium organizer, sponge, order forms, and so much more!

On top of all of that stuff up there, you also get $50 in SPC to get what YOU want for your kit! Want to start with the La Vie En Rose papers? No problem! Want to start with one of the new paper packs from the Seasonal Expressions 2 book? (that is only available to consultants until May 1st!) No problem at all! (encouraged, even!)

Are you thinking about possibly becoming a consultant? I would LOVE to chat with you about it! There are so many good things happening for consultants this month, that I know that you would be so happy to hear the information!!

One of the fun things, is the Baby I’m Worth it Campaign . . . on top of all of that fun stuff I already mentioned . . . . if you become a consultant, and have sales of $350 in your first 30 days, not only will you have reached your first Straight to the Top level, but you will also get either a free cricut cartridge bundle or $100 SPC!
1604-cc-baby-im-worth-it
You know YOU are worth it! So, talk to me about possibly becoming a consultant in April! I would LOVE to share some of the GREAT things that I have experienced while being with CTMH!!

Until Tomorrow!
~Michelle

Have you seen all that is happening?

The next few days have a lot of things happening! I know you will want to at least take a look and see!

These are ending Monday, November 30th at midnight Mountain time:

1511-cc-simply-fundamental-scrapbooking-01

Purchase the album bundle and you get:

  • Album of your choice (D-ring or Post-bound)
  • Paper Fundamentals Enchantment (1 pack)
  • Fundamental Stickers Enchantment Pack (1 pack)
  • Fundamental Assortment Peacock (1 pack)
  • White Daisy Cardstock (3 sheets)
  • Memory Protectors™ Value Pack (1 pack Side Load or 1 pack Top Load)


November Stamp of the Month, only $5 with a purchase of $50!


This is starting November 30th at 9am Mountain time and ends December 4th at 4pm Mountain time.

1511-cc-cyberweek

There are 39 items that are 25% off for the week, and one of the items is the Artistry Collection! I’ve created a pin board for you to be able to check them all out easily! Check that out here.


Get your new planner, starting December 1st, and get a great deal on it!

1512-cc-planners-gonna-plan-us (1)

What is included in the planner bundle?

• Z3208 Everyday Life™ Album—Black ($10.95 USD)
• Z3209 Everyday Life™ 2016 Planner Pages ($15.95 USD)
• Z3212 Everyday Life™ Perfect Plan Roller Stamp ($8.95 USD)

Additionally, all the coordinating products, including the Everyday Life™ washi tape and the My Crush® Everyday Life pages, will also be available for purchase at the same time.


December Stamp of the month becomes available on December 1st as well!


That’s a lot of things happening in a short amount of time! You will want to make sure to get your orders in, as everything is while supplies last! If you have a scrapbooker in your life, that bundle option is fantastic! The cyber deals are fantastic, 25% off of some great home decor items, fun crafting things, and even some great gift options!

Orange you glad?

That was the theme for my Roomie gifts for Convention. I had so much fun putting these together!! The girls kept finding more and more things in them as the weekend went on! 🙂

orange-04

Here are the baskets all done up, just before I put them on the counter for everyone to get. They really are so much fun!

orange-03

So, since I was travelling to convention, I needed to not have the baskets put together before I left. I did only have so much room available! So, once I got to the room, I took everything out of all of the bags, and piled it onto the bed. Take a look at all of this stuff!!

orange-05

I snapped a photo of all of the things in each bucket. This shows everything that was in the bucket, except the journals. In the little rectangle containers were some ear plugs (orange of course!), shout wipes, pain relievers, safety pins, and throat drops (orange in flavor).

orange-02

These are fun little orange and white chevron journals that I picked up at Michael’s. Since we were going to Disney, I decided to cut some mouse heads out of vinyl, and add each girl’s initial on top of it with orange vinyl. (can’t not have more orange!)

I LOOOOOVED putting together the roomie gifts! However, I’ve been banned from doing roomie gifts next year! LMAO!! I am looking forward to next year! We are doing the same roomies again next year, and just between you and me, I’ll probably have more fun with roomie gifts!

Happy Is . . .

Hey Crafters!

Today we have the last 2 cards in the Modville My Crush Book Card series. I hope you have enjoyed them so far! I know I had a blast making them!

19

This was a fun and simple card to make. The set that I used for both of these cards, Happy Everything, benefits Operation Smile (the group that helps give children with cleft lip and cleft palate surgeries, to help them survive and live a fuller life.

I stamped the banner first, and then thought it would be great to have the little bee with his dashy line on there too. (Did you notice, it’s a scrap from the Truck and Birthday cards from the other day!) It’s a simple card, that can be used for so very many reasons!

20

I used two layers of foam tape in the middle of the banner, and used my fingers to make the curves. The front end was glued directly down to the paper, as was the end. I made sure to flip up the ends just a smidge before glueing them down, to add even more dimension! Then I added the triangle durable stud for some fun texture.

The next card, I did more stamping than on any other card. (probably more than on all of them combined, actually!)

22

I used the triangle stamp (already in a line) to stamp the background on this card, in Desert Sand Ink. I used the little smidge of the blue paper to give it just a pop of color.

23

The sentiment was also stamped in Desert Sand, to keep with the same color scheme.

Supplies needed for these cards:
Modville My Crush Book
Happy Everything
Foam Tape
Triangle Durable
Archival Black Ink (retiring at the end of August!)
Liquid Glass
White Daisy Card Base & Envelope Value Pack
Desert Sand Ink

So, which was your favorite card overall? There are 14 of them to choose from! Like I said yesterday, I used only 7 pages from the book, and have plenty of left over paper, I could probably get another 3-4 cards from it, without having to add any other cardstock!

Now, keep an eye out for all those fireworks! It’s been super dry in the Pacific Northwest, so be very careful!!

Until next time!

~ Michelle