Author Archives: Michelle

Calling all Crafting Addicts!

Have you seen the new offer from Close to my Heart? Anyone that signs up in October, will get one Add on Bonus Kit FOR FREE!! That is an out of pocket $40 savings (if you were going to sign up as a consultant anyway), or possibly up to $85 if you were to just buy the items out right! That’s a pretty awesome deal!

That means that you could have the Roxie Add On

This Add On includes a Workshops on the Go™ Roxie Kit, Rhinestone Designer Brads, Foundry® Pin Clips, My Acrylix® Instant Memories Stamp Set, My Acrylix® Unscripted Stamp Set, Tulip Exclusive Inks® Pad, Cocoa Exclusive Inks® Pad, and a 2″ × 6 1/2″ My Acrylix® Block.

Or maybe you want the Elemental Add On

The Elemental Add On includes a Workshops on the Go™ Elemental Kit**, Dimensional Elements Banners, Décor Journaling Spots, My Acrylix® Love Life Stamp Set, My Acrylix® Happy Clusters Stamp Set, Olive Exclusive Inks® Pad, and a Desert Sand Exclusive Inks® Pad.

**Cricut® Art Philosophy cartridge required to complete workshop layouts and bonus project (not included).

Or, maybe you want to get your Studio J membership for free!

With the Studio J Add On, you get a 12-month Studio J® membership and five Studio J® layouts (must redeem within first 3 months).

Those are some great add ons!! I’ve seen (and made) some wonderful cards and pages with these add on kits! I would love to have you join my team! We are a great crafty bunch, and we would love some more crafty ladies (and/or gents!) join us! You don’t have to be close either, you could be our distant sister (or brother)! 🙂

If you have ANY questions, please just let me know!

Twisted Sketches # 79 & World Card Making Day!

What a title, huh?

Did you know that October 1st is World Card Making day? Operation Write Home is doing a blog hop, and there will be 125 or so blogs with beautiful cards! You definitely should go and take a look at each and every one of them! And, of course, Twisted Sketches has a wonderful sketch to play along with every Saturday, so you should play along with them too!

So, today I have 2 cards for you, a sale, and some blog candy!

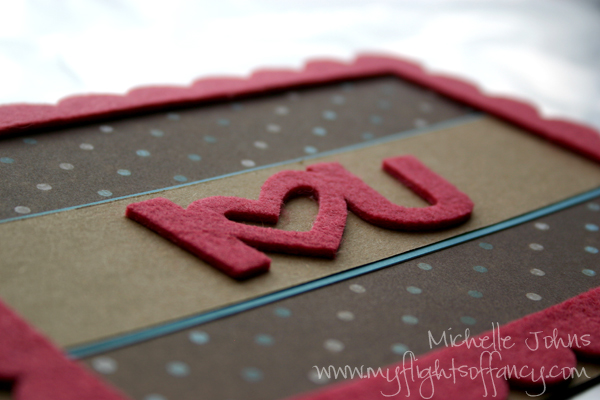
This card was made with our wonderful Wonderland papers, and some felt that has been retired (but is on the While Supplies Last on the website). It was so fun to make!!

Look at that tiny little heart peeking out from the inside of the card!

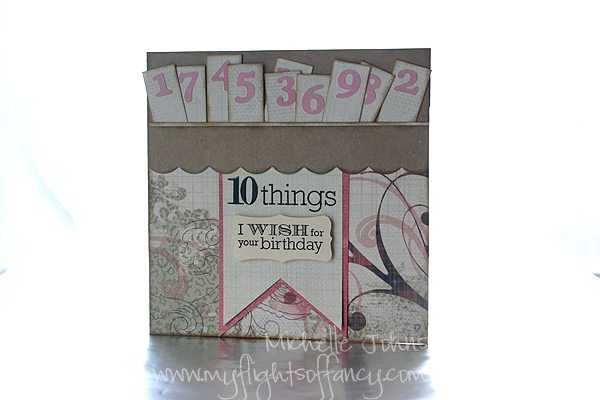
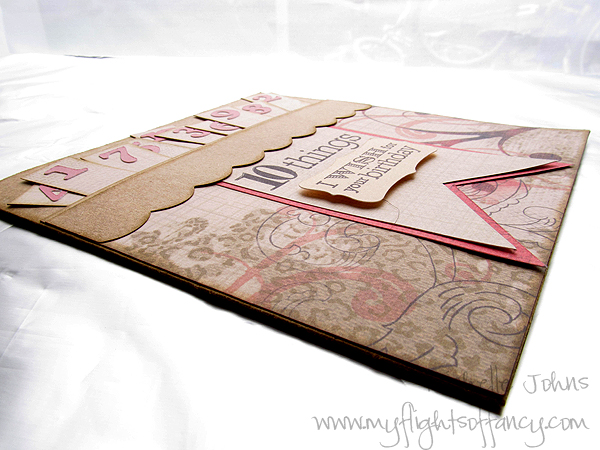
The second card that I have for you was made with the fun Roxie paper pack! The Art Philosophy Cartridge was instrumental in making this card!

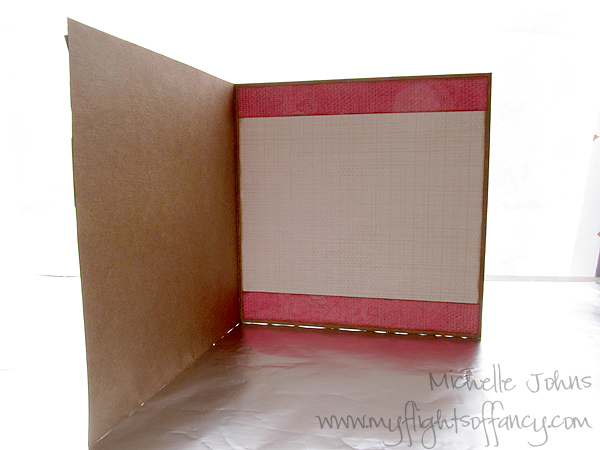
Each of those little number tabs are able to be pulled out and written on!

Now, for the blog candy and sale! You will need to go to HERE to see it, so that this page doesn’t get too long!

Thanks for visiting my blog for World Card Making Day!!

~Michelle

I heart U Card Supply List:
{All Items CTMH}

10 Things Card Supply List:
{All Items CTMH}

Twisted Sketches #78

I love playing with Anam’s sketches over on the Twisted Sketches blog! They are so fun! Make sure to head over there to see what this week’s card sketch is! The twist this week is Verse. I don’t know that mine qualifies under that, but I still had fun with this card!

The front of the card is one of the Mischief papers, a cardstock flower cut with the AP cartridge and a canvas button!

Inside is one of the Dreamin’ papers! I thought the orange fit so well with the Creme Brulee flower!

Isn’t that dimension so fun?

You should come and play along!!

~Michelle

All items used are CTMH

Twisted Sketches #77

it’s that time of week again! Anam has a wonderful sketch over on the Twisted Sketches blog, you will have to go over there and see it! I was having so much fun with it, that I made two cards!

First is the vertical card, with some of the new, yummy designer Rhinestone brads! They are so fun and so easy to use! They add just the right amount of bling to this card, I think! Paired with the Believe paper and Kraft cardstock, it makes it so fun!

Then, sticking with the winter theme, we have some snowflakes! The Wonderland paper is so soft and pretty. With the Glitz Glitter Glue, I didn’t get glitter everywhere either! It made it so easy to add that little bit of bling to this card!

I hope you had as much fun with these cards as I did! Go and check out the Twisted Sketches blog and the other designer’s work!

Michelle

Products I used for these cards:

More for your Money!

It’s a great time for the “More For Your Money” Sale with the brand NEW Autumn/Winter Idea Book!….and it’s also National Stamping Month!


“More for your Money” means you receive a minimum of $80 in free product for placing your order!


This is how the sale works: The offer will be available to the first 10 people who contact me.  Email me queenmychl@gmail.com  or call me at 360.518.7173 right away to join and then start collecting your order(s) of at least $100.  You can check with a couple of your friends for orders and pool them together or place it all on your own. If you want to keep it simple you could just order the Cricut cartridge for $99 and the Stamp of the month called Wicked and you have reached your total. Orders must be placed by Aug. 26th.


EVERYONE who places the minimum $100 order will earn the following rewards!


* $20 in Free product of your choice (Choose from stamp sets, ink, markers, cardstock, scrapbook kits & papers, stickers, acrylix blocks, and more!)


* The August Stamp of the Month “Wicked” for just $5.   ($17.95 value)  It’s a very versatile set!  


* FREE Exclusive Alphabet set called “A Typeset” ($6.95 value)  See attachment


* FREE National Stamping Month Special stamp set called: Pair-a-Phrase.  It’s 2 very versatile D size stamp sets at a BIG value of $35.90!! 


AND…. you have a 4 in 10 chance in getting a 1/2 price item!  


Why stop there?…..If you collect $200 in orders, you’ll get double the prizes, $300, triple the prizes, etc. 


If you don’t have a current idea book…hop on over to my website www.craftymichelle.myctmh.com to view it. Or call me and I will be happy to deliver one to you or put one in the mail.


Remember, you can collect orders from your friends and combine orders to reach the $100 minimum order.  So get started with your wish list right away!

I can’t WAIT to give away all those FREE and half price goodies!! You all know that is my favorite part of my job! 🙂


Looking forward to your RSVP.  Please contact me soon and let me know you want to be in on this opportunity!


Happy Shopping,

Michelle Johns


~$20 in free product and chance at half price item will require all 10 people to participate in this great offer!

Red, white, & Blue!

Hi Everyone!

Jessica, over at My World Handmade is having a fun month on her blog, every day in July she has been having a project, with how to’s, posted on her blog! And every project will involve red, white, and blue! Lots of guest posters (like me!) are helping her! I got to close out the month with my little tutorial, so I hope you enjoy it!

So, for my project, I thought I would share a fun little card box! It’s a box, that folds flat, even with your stuff inside! (well, depending on what you put inside!)

While I would love to claim that I made this up, I didn’t, and you can find other tutorials all over! LOL!! I’ve adjusted mine just a bit so that it will fit into a regular envelope (the ones that fit a 5 1/2 x 4 1/4 card). That way, you can send your little box in the mail, if you wanted!

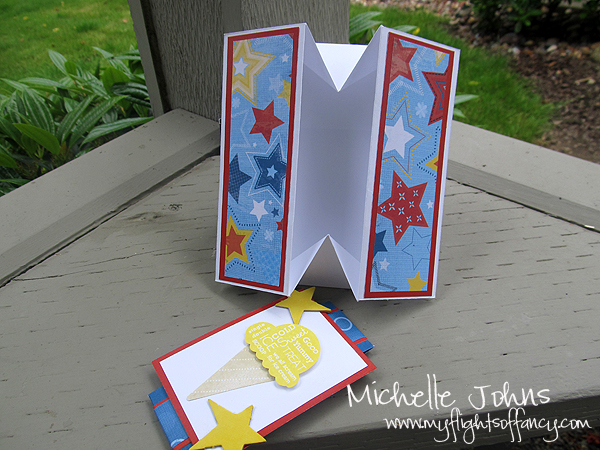
You will see photos from 2 box cards that I made. I forgot to take some pictures, so had to do other photos! The blue box card does not fit into that envelope mentioned before. However, if you trim 1/2 an inch off each flap, and adjust the cardstock and paper, like on the white box, then it will easily fit into the envelope!

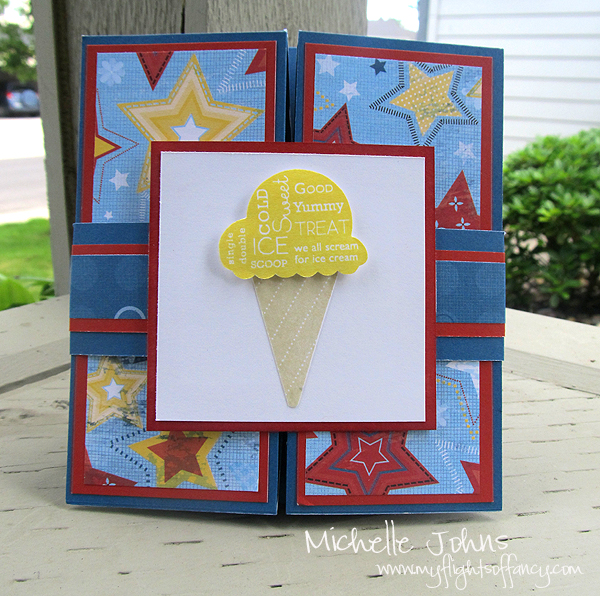
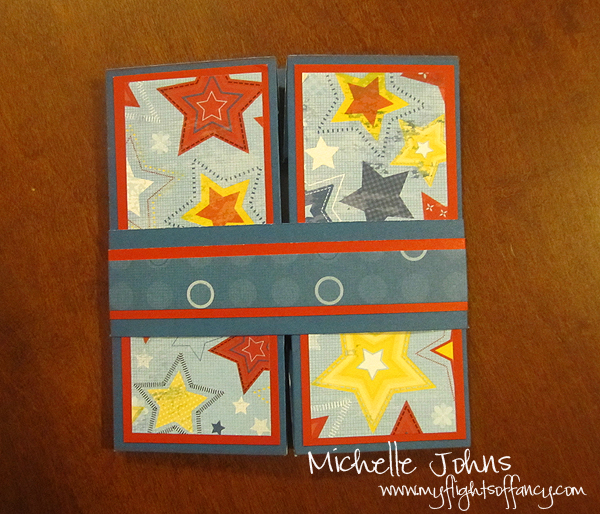
This is what you will end up with, when you are done!

null

I used Close To My Heart’s Fanfare Workshop on the Go, which contains the cardstock, Background & Texture, and stamp set.

So, you will need the following things to make this box:
Cardstocks:
8 1/2 x 11 (main)
2 1/4 x 5 1/4 (contrast)
1 1/2 x 12 (main band)
3/4 x 12 (2nd band)
Sentiment Mat
Sentiment Cardstock

Background & Texture:
2 x 5 (two of these)
1/2 x 12

Stamps & Inks dependent on your papers and stamp image!
null


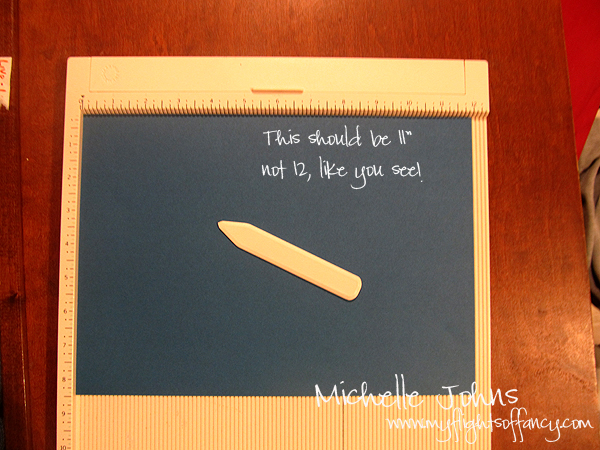
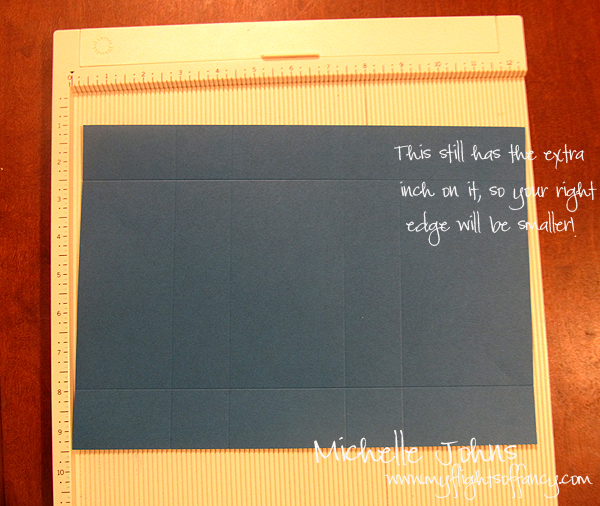
So, first you are going to score your cardstock along the longest side: 2 1/2″, 4″, 7″, 8 1/2″

Next you are going to turn your cardstock, and score it at 1 1/2″, then flip the paper and score it at 1 1/2″ on the other side.

null

{If you want your card to fit into the envelope, now would be the time to trim off 1/2 inch from each end (so, from the 2 1/2 & 8 1/2 spots), or, at least, the easiest spot to do so!}

Now, you are NOT going to fold all of your score lines just yet!

You want to mark your middle point of the biggest box (in the middle). Just a little mark with pencil, or I did mine with my bone folder. You want to mark on both sides of your paper (this is along the long side).

Once you have your middles marked, then you are going to score, BUT ONLY on the long sides. (that 1 1/2″ score mark that you did) And here’s why. You need to make a couple more score lines, but you need to have the middles marked, and be able to fold to see the corners.

Here on my handy dandy MS scoring board, you can see that I have marked one line with a pencil. I did this the entire length of the score board. I do this because it makes it SUPER easy to line up my lines in the right spot. What you are going to do, is make a diagonal line from the inside corner of the biggest box to your middle mark. (all within that 1 1/2″ score mark) First, line up your corner with the line, by getting it as close as you can. Fold your edge in, and make sure that your corner is on the line.
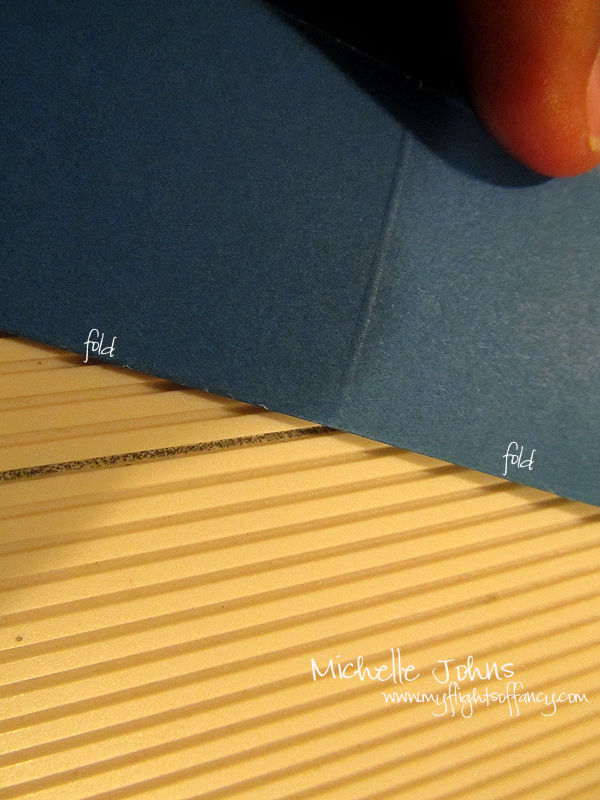

null

Then you are going to unfold the edge, and get the middle lined up on the same line.

Double check to make sure your corner is still on that line, and then score.
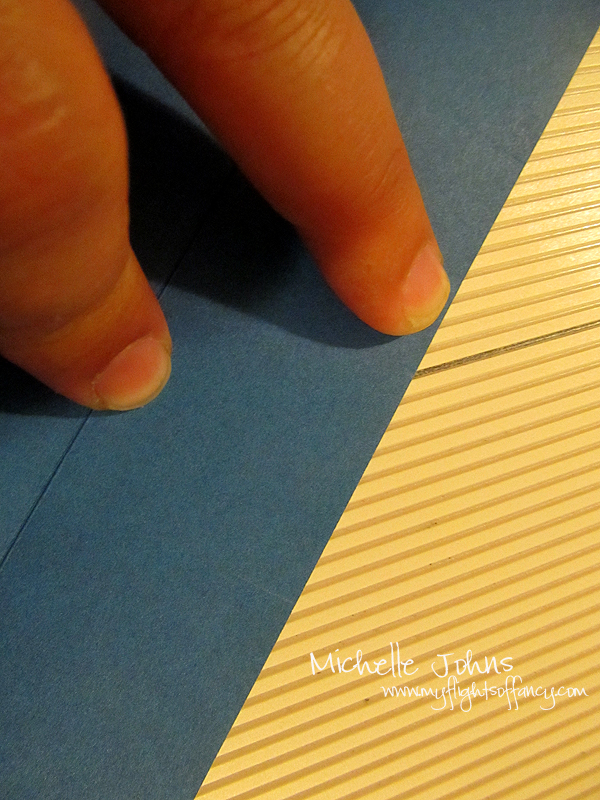

null

Repeat with the other side of the same box, and then the other side of the page.
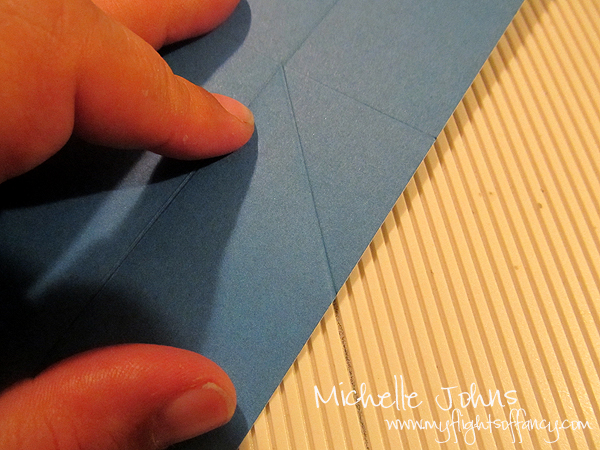
null

So, now that you have that done, fold along all of the score lines.

Next you are going to cut your score lines so they look like this:
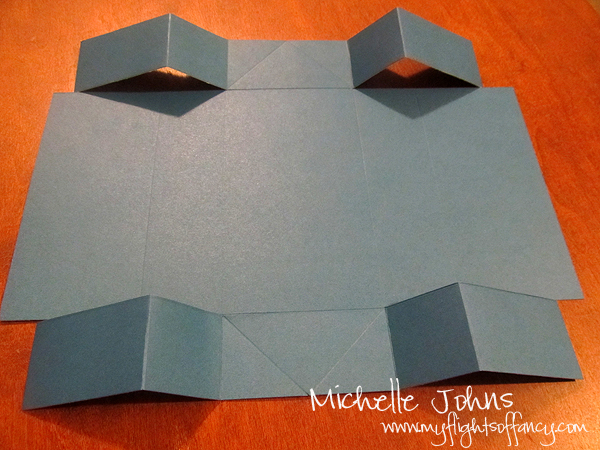

null

Then you will cut off the end corners, so it will now look like this:
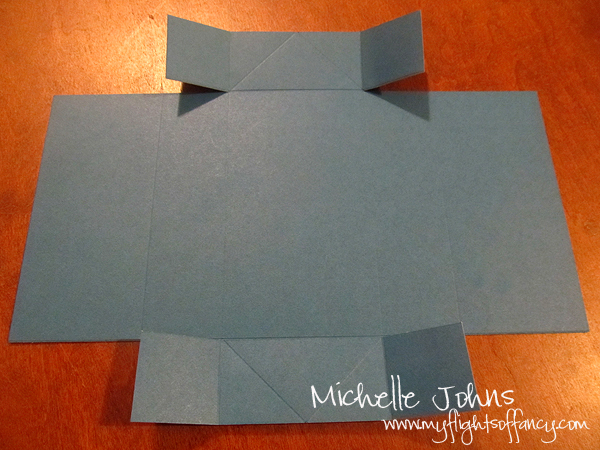
null

Now that they are all scored and cut, your box will look like this:
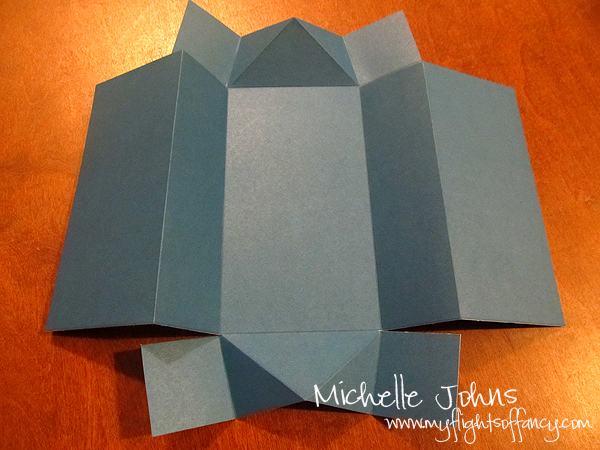
null

If you want to insert a back / greeting on the card, now would be the time to do it. You can see that I just added a white piece of cardstock.
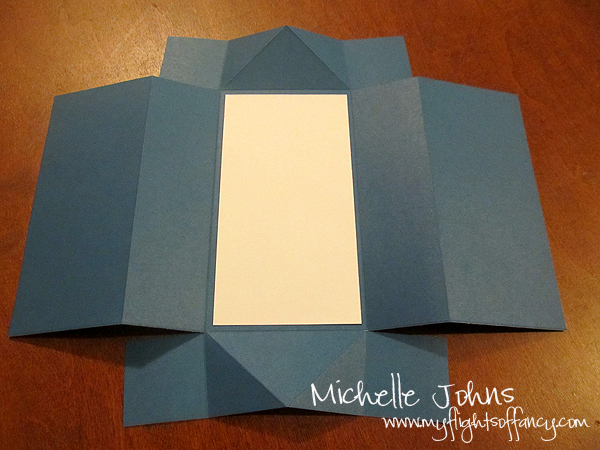
null

Add glue to the top and bottom corners of the cut pieces. (You should be able to see the glue in my photo) How much glue you use, will depend on the stickiness of your glue. ATG or scor pal or red tape would be the best here.
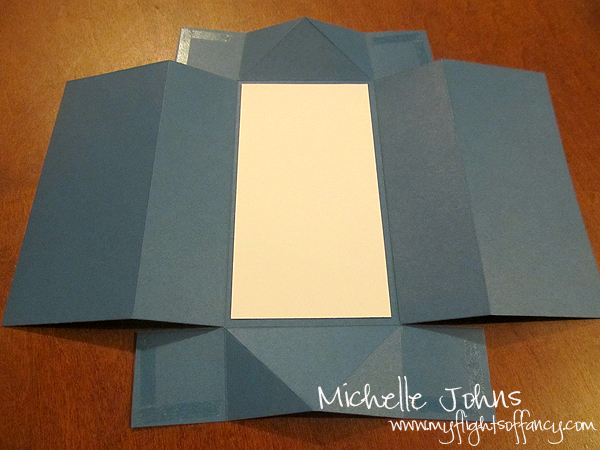
null

It’s really hard to get a good picture holding this together, but I tried! You are going to fold up the middle ‘flap’ and glue the flaps with glue at a right angle.
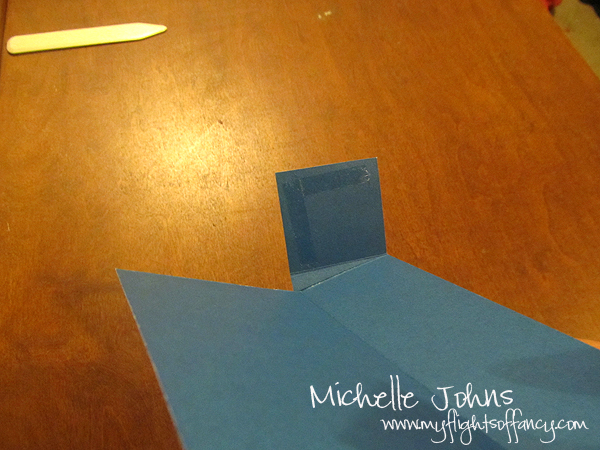
null

Here is a shot with both ends on one side glued.
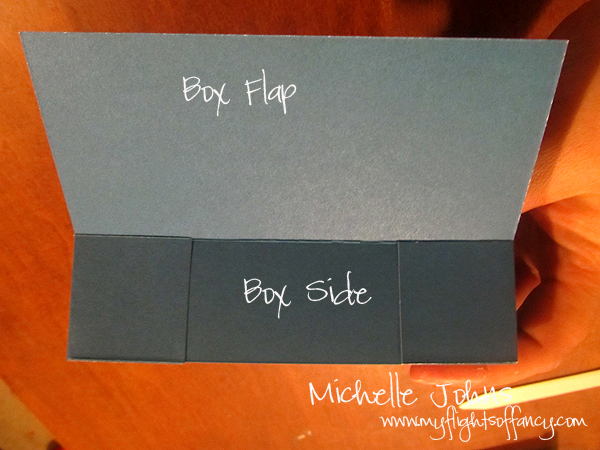
null

Here is what the box will look like, at this stage when you get both ends done, and have it sitting on your desk / table!
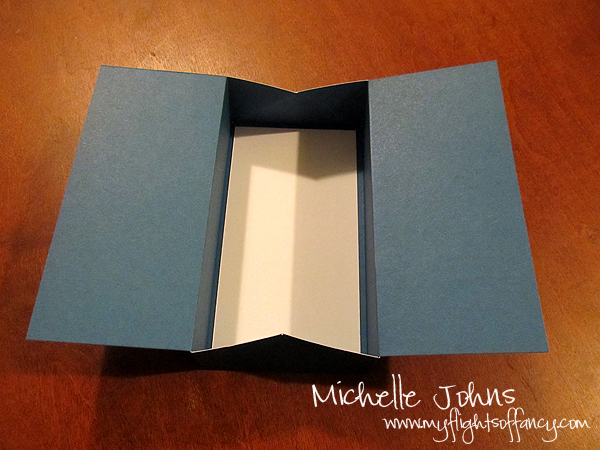
null

And what it looks like sitting upside down on the desk / table
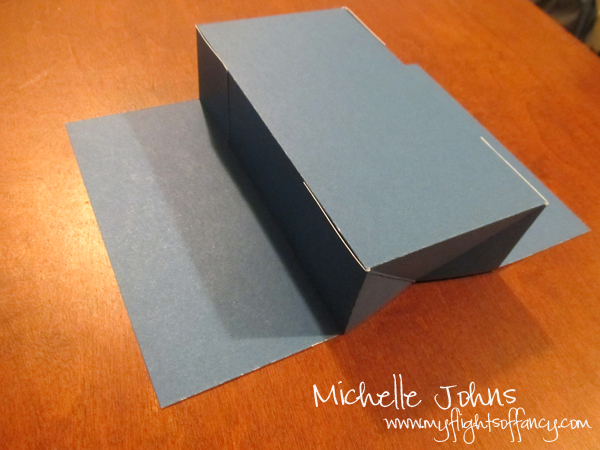
null

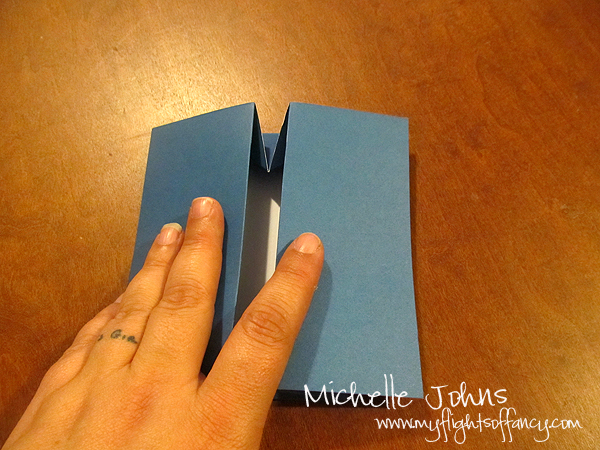
Now for the technical terms . . . . you are going to ‘smoosh’ the flaps in, to teach them that they need to lie flat! (those score marks that we made will help!)
null

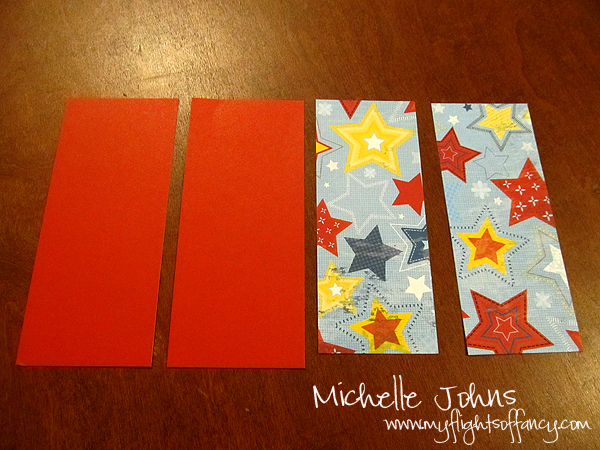
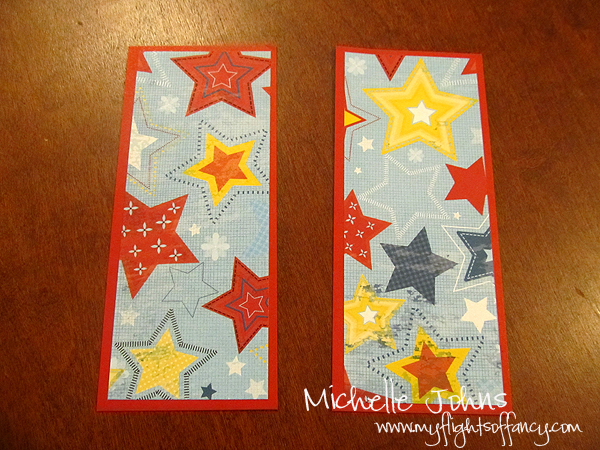
Now your box is all done, and it’s time to decorate!! You can do this any way you see fit, but this is how I did it! I have used cardstock and paper on mine, but you could use just a piece of cardstock and stamp it and put a pretty border on it.
null
null
null

Now it’s time for the band!

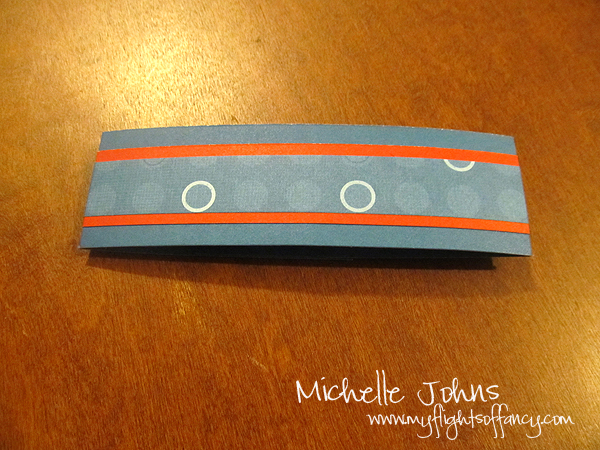
Now, theory would be, you glue all pieces, and then fold them. However!!! Let me tell you from experience, that this won’t work!! Your paper will buckle, and not be pretty! LOL the easiest way to do this, is to glue the middle of the paper, on all levels. (I have 3 levels, you might do only 2) Next, you are going to hold it across the front of the card. Then you are going to bend the cardstock that is closest to the card. You do not want this to fit super snugly, you need to have space. Make sure they overlap, and you can cut off the excess once you get all the folds figured out. Once all the papers are folded, you will want to attach the ends with a strong tape (again, ATG, scor pal, red tape).

null

So, what you are going to do next, I don’t have photos of. (sorry!!) You are going to stamp your sentiment, and then mat it with your cardstock. You will then use Scor pal or red tap to attach this to your band.
null

The secret to making your project look more finished and professional, is to attach your sentiment where the band meets! That way you hide that meeting of the ends of the band and it looks all nice and neat!

Here are the few pics of the cards as they are done! You can see on the white card, I put the sentiment sideways, and on the blue card, it’s up and down. How you do this is completely up to you (and your sentiment!)

null
null
null

You can put all sorts of things inside! I’ve put in little thank you tags, cupcake toppers, and even to/from tags! The possibilities are endless! You could even put a gift card inside, make a little pocket so that it doesn’t slip around.

I hope you had fun viewing my how to make a box card! I am having a give away, so I hope that you enter!

~Michelle

It’s a giveaway!!

Who likes free stuff?? I know I do!!

So, you saw that I am doing a guest spot post over on My World, Made By Hand, right? If not, you need to go take a look!!

Here is what you get!!

A custom made brand new product with brand new papers! Here is a box that I have made with the Memory Game box, it’s brand new! I have used the Elemental paper pack. Inside you get 24 coasters! This is great for a count down, for boredom busters, scrapbook in a box, or even a memory game! You get to choose which paper pack and what the general theme will be. I will cover one side of the boards with paper, and you can put whatever you want on the other side.

I’m sure that you are wondering how to win this wonderful set of schtuffs, huh? Well, there are lots of ways to enter!!

1. comment on this post
2. comment on this post with which project over at My World Made by Hand was your favorite
3. comment here and let me know which card is your favorite!
4. 1 entry for each person that you refer to my facebook page, they need to “like” my page, and comments there with who sent them! (make sure they say who sent them!) (that would include yourself if you aren’t already a ‘liker’) If you already like my facebook page, then comment with that info!
5. Sign up for my newsletter, and leave a comment letting me know that you have
6. 10 entries if you place an order from the party listed to the right
7. 10 entries if you schedule a home party/workshop date with me!

Contest entry will end on August 5th at 9pm Pacific time. I will announce the winner on August 6th!

Today is the last day for the July special with Close to my Heart! Purchase $50 worth of products, and have the ability to choose 1 of 5 products for only $1! (normally $8.95) What a great deal!! Order through me or on my website! Make sure to check my earlier posts about things that are retiring! You don’t want to miss out on those.

And remember, the new idea book is available TOMORROW!! There are some really wonderful things in there! You should come see what’s available!!

~Michelle

Guest Spot

Hey everyone!

I have a guest spot post over on My World Made by Hand, so you should go over and take a look at what I posted, and all of the other great projects that have happened this whole month!

When you do that, come back and see my giveaway that is happening!!

~Michelle

Retiring items

So, as you may have heard, the new Idea Book goes live on August 1st! (and I can’t wait to show you the new stuff!!) That means that there are some items that won’t be available anymore! Here is a list of things that will be going away!


My Relections Kits, Papers & My Stickease
All Level One Scrapbook Kits
Bliss Level 2 Paper Packet and My Stickease
Miracle Level 2 Paper Packet and My Stickease
Sweetheart Level 2 Paper Packet and My Stickease
Wings Level 2 Paper Packet and My Stickease
Magnifique Level 2 Paper Packet and My Stickease
Olivia Level 2 Paper Packet and My Stickease
Hooligans Level 2 Paper Packet and My Stickease
Mistletoe Level 2 Paper Packet and My Stickease

Acrylic Blocks
1” x 1 ½” block (Y1001)
1” x 6 ½” block (Y1005)
2” x 11” block (Y1007)
2 ½” x 2 ½” block (Y1004)
4 ½” x 6 ½” block (Y1011)
My Acrylix block starter kit (Y1500)

Embellishments & Tools
Designer ribbon – Cranberry (Z1209)
Designer ribbon – Buttercup (Z1154)
Designer ribbon – Sweet Leaf (Z1125)
Sophia Level 2 Journaling Spots (Z1357)
Mini Medley Accents – Pear (Z1339)
Mini Medley Accents – Lagoon (Z1340)
Mini Medley Accents – Outdoor Denim (Z1277)
Top Coats – Framed In (Z1211)
Rub Ons – Across the Board (Z1231)
Rub Ons – Primavera (Z1265)
Kraft Color Ready Borders (Z1377)
Red Eye Pen (3501)
Embossing Powders – Clear (Z671)
Embossing Powders – Heavenly Blue (Z647)
Embossing Powders – Pansy Purple (Z664)
Embossing Powders – Silver Pearl (Z678)
Block Buddy Set Z1289 121 Pivot Point Stapler (Z1009)
Texture Tools – Foam Tools (set of 4 white foam)(Z1090)
Fun Flock (Z263)
My Accents Block Organizer (Z185)

Cardstock
24 pks of Cardstock will only be offered in these colors after July 31st: Kraft,
Black, White Daisy, Colonial White, Vanilla Cream, Chocolate, Cocoa, Desert
Sand, Bamboo, Sweet Leaf, Pacifica, Smoothie, Creme Brulee, Olive,
Cranberry, and Outdoor Denim
Textured Cardstock – White Daisy
We are not retiring any colors and you will be able to purchase the other colors in combo packs.

Inks and Markers
After July 31st, you will be able to purchase our stamp pads and markers individually. We will no longer offer them in sets of color families. Order before July 31st so that you can receive the Color Family Set discounted price.

Dimensional Elements
Dimensional Elements – Villa (Z1390)
Dimensional Elements – Miracle (Z1354)
Dimensional Elements – Booksmart (Z1223)
Dimensional Elements – Borders (Z1156)
Dimensional Elements – Framed Fun (Z1140)
Dimensional Elements – Plain Chipboard (Z1164)
Dimensional Elements – Stars (Z1312)
All Dimensional Elements Monograms – A – Z

Other Items
All Envelope flats – Pg 114
3” x 3” Mini Album (Z1166) – Pg 120
My Creations 3 ring binder (Z1141) – Pg 120

As to Stamps. All stamps that are in the current book, will be able to be ordered into the new year. They are good for the current book, and one past. So, if you have the Fall/Winter book from 2010, you might want to do a quick check to make sure that there aren’t any stamps in there that you want! Because, if so, then you will need to order them by July 31st!!

Twisted Graduation

Twisted sketches is awesome! (even if I am late with it this week! Sorry!!) You will have to go to the blog to see the sketch. I altered it just a smidge, but not much. I used it to make a graduation present for my step brother. He graduated high school in June, and will be going away to college (luckily for his mom, not too far away!) I thought he might want to take some pictures with him!

I love the You & Me kit that was a promo! The cardstock B&T is perfect!! (and Chocolate brown is one of my most fav colors! And the green that is in there is one of my others!) . . Oh, btw, green was the twist this week too! So I got just a smidge of it in there!

Since it is a photo album, I of course needed to use CTMH flip flaps! I put 5 on/in this album.

CTMH has a product called “Irrestibles” They are fantastic little chipboard pieces. Here, you can see on the rectangle bracket and the pieces at the end of the ribbon. They were both white to begin with. They are already stamped and embossed with a clear design, so that when you add ink to them, they pop! There are a number of different designs. These ones specifically came with the You & Me kit.

I only stamped one thing on this little album, and you can’t even really see it much! LOL I stamped a little string to hang the banner on, in the top corner! 🙂 Of course, there is ink on all of the chipboard pieces.

I hope you have enjoyed this!

~Michelle