Author Archives: Michelle

Card in a Box

Hello crafters!

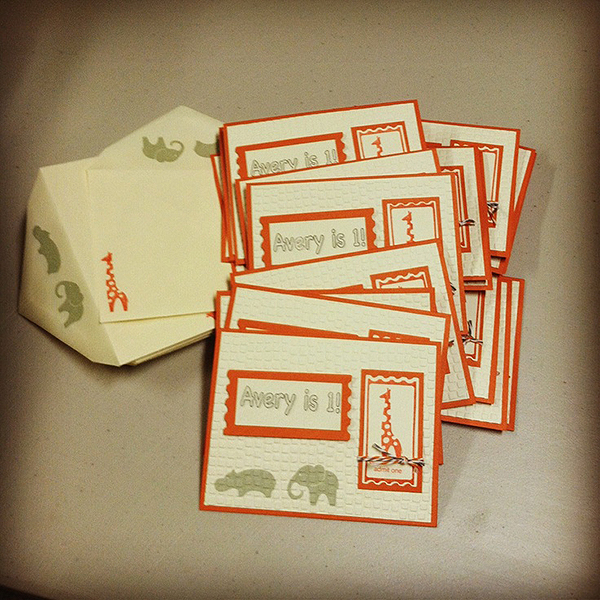
Today I have another tutorial for you! I have liked the Card in a Box since I first saw it a few months ago. There are a number of tutorials out there. Most of them will give you sizes that you need to create a custom envelope for. Me being me, I wanted something that fit into a regular envelope!

This fun card will fit perfectly into a regular sized envelope! Perfect, right?

This fun little card has a spot on the back for you to write your greeting, so you aren’t missing out on anything! Grab some basic supplies, and make a card in a box today!


{If you are viewing via email ,you may need to click through to see the video}

By the way, this tutorial shows you how you can get 3 cards out of one sheet of cardstock! Two of the cards are Card in a Box, and one will be a small 3×6 card. You will have very minimal scraps left over from your base cardstock!

I hope you enjoy the tutorial!

~ Michelle

All products are CTMH (unless noted)
Timberline Paper Pack
Cardstock: Lagoon, White Daisy
Ink: Smoothie, Archival Black
Stamps: All the Details, Word Balloons {Artiste Collection Stamp Set}
Glue: Tombow, Glue Dots, Adhesive strips
Tools: Artiste Cricut Cartridge, Paper Trimmer, Versa Mat, Scissors, Clear Blocks, Bone Folder
Non CTMH: Martha Stewart Scoring board and embossing tools

Timberline Layout

This week we will be looking at the Timberline paper pack. This one is so versatile, with a wood grained paper, it will go with any and everything!

This layout would be PERFECT to use some leftover scraps of any paper pack. I used the other papers in the Timberline paper pack, since that is our focus this week! There are LOTS of places for photos!

I used the Artbooking Cricut Cartridge to cut out a couple of elements for this layout.

Here you can see one of the elements that I cut with the Artbooking cartridge, you can also see a bit more in detail the outside lines of the square. These were a list that was on the zip strip of the wood grain paper! It’s a long list of different things that you would need to go camping! There are only 3 lines, so I used another line from another zip strip.

Although, I realize, that I left off some of my embellishments!! I was going to add some of the gold triangle durables to the corners! So, imagine that they are there!

It was fun to do this layout! I was inspired by this layout.

I hope you have some crafty time!!

All items used are CTMH:
Timberline Paper Pack
Cardstock: Bamboo, Twilight, White Daisy
Embellishments: {not shown: Triangle Durables}
Glue: Tombow, Bonding Memories Glue Pen, Foam Tape
Tools: Artbooking Cricut Cartridge, Paper Trimmer, Craft knife {retired}

Lollydoodle Scrapbooking Workshop on the Go!

It’s the end of the week, which means I get to show you the WOTG for this paper pack! As with all WOTG, you will have enough to make 2 sets of double page layouts, with extra paper left over!

To create these pages, you will need some basic supplies, plus the Cricut Artiste Collection.

You will have these beautiful pages ready to go in no time!!

Each WOTG comes with a full paper packet, plus 3 additional sheets of cardstock {Juniper & White Daisy with Lollydoodle}, a full D sized stamp set {exclusive to the WOTG}, full color instructions with cutting and stamping guides, and 2 sets of embellishments.

With all of this, you can easily get 2-4 more double page layouts with the papers, just by adding the bases for the pages.

Have you seen the blog hop from earlier this weekend? If you become a follower and post a comment on that post, you are entered to win a set of 4 cards! Make sure to go and check it out!

I hope you have had a crafty weekend! I look forward to sharing more fun stuff with you next week!

~ Michelle

Picture My Life

One of the brand new products in the Spring/Summer Idea book, is a line called Picture My Life. It is made to make scrapbooking easier, faster, simpler! It’s also known as “pocket scrapbooking”, because there are pockets everywhere!

Each of the 8 different sets comes with 10 page protectors, 1 “Cover” page, 78 cards that are sized 3 x 4, and 44 cards that are sized 4 6. You get a LOT of cards in this kit!

The cover page is printed front and back, and has spots for photos. I didn’t add any photos yet to the cover page, but I am certain I will!

Now, if you haven’t tried to take photos of scrapbook pages, while in their pages, then you don’t know just how hard it is!

So, I have a straight shot photo (with lots of glare), and an angled photo, with the glare in a different spot! LOL

I’ve used the Surf’s Up kit for my pages so far, and I am using photos from my first annual retreat at the beach!

I think I might use this to do each retreat!

I had fun at the retreat, and fun putting these pictures into the pages! I need to get some more printed! I have cards picked out already for the next few pages, now I just have to decide! LOL

Let me know if you want to check out the cards and how the Picture My Life works, in person! I’ll gladly meet up with you and let you play with it!

Have a crafty weekend!

~ Michelle

Lets scrap our stash!

This weekend, there is a Scrap your Stash blog hop with the Practical Scrappers design team! It’s always fun to use some old things, those things that you don’t want to get rid of, because you just KNOW they will come in handy one day!

You should have arrived here from Bobbi’s blog. If you happen to get lost along the way, you can find the full list over at the Practical Scrappers Blog!

Today I decided to partake in a few more challenge blogs as well, and went with the inspiration from Muse which also went well with Clear it Out’s challenge of using flowers (and they are all about using your stash too! What a great fit!!).

I used the Love Blooms stamp set {retired}, with some new stuff {Lollydoodle} and some ‘general’ stuff {scrap white cardstock, & inks}. I REALLY liked how it turned out!

So, as I mentioned, this is a blog hop, and many of the blogs that you are hopping to, including mine, will have a prize for you! So, make sure to check them all out! PLUS, there is a great prize from Kiwi Lane Designs! (They are also one of the prize sponsors for my retreat in March, you should come join me, I still have some spots available!) So, if you didn’t start at the Practical Scrappers blog, make sure you at least end up there, so you can get yourself entered to win!

Next on your hop list is Kerri. She is dealing with that huge ice storm, so she may not be able to get her post up! If that is the case, please head over to Cathy’s blog.

Now, onto my giveaway! If you become a new follower to my blog, and comment on this post, you will be entered into a drawing to win a set of 4 of these cards. I will mail them directly to you! {please note, if you already are a follower to this blog, and you get it sent to your email, you will need to re-subscribe, as feedburner (who I have been using in the past) is going away.}

These are the challenges that this card fits with this week:

Thanks for hopping along with us! Have a crafty day!!

~ Michelle

Hey, Foxy!

Thursdays are my focus day for the Stamp of the Month, which is Wild about Love, this month! It’s been so fun to use it with the different papers! Since it’s Lollydoodle paper week, you will get another one with some bright colors!

I decided I was going to play along with Seize the Birthday challenge this week, and started making this super fun card! However, in making it, I got carried away, and forgot what I was doing!

I REALLY love how the inside turned out!! Got ready to do photos, and realized that I was supposed to be doing a birthday card! Soooooo, I decided to fix it! I knew I didn’t want to do a whole new card, and I really liked how everything stamped, and I didn’t want to just stamp over it . . . sooooo . . . I improvised! LOL

I used a retired birthday sentiment card, and made a banner for the inside! Still SUPER cute, you wouldn’t know I ‘forgot’, except for the fact that I told on myself . . . I have a bad habit of that! LOL!!

This is my super fun, super fast, super easy card for the day! If you would like to get your very own set of fox stamps, it’s just $17.95 by itself, or you can get it for an amazing low price of just $5, with any $50 order! Contact me today to get yours!!

This fun card fits these challenges for the week:


Have a crafty day!
~Michelle

Everything used is CTMH:
Paper Pack: Lollydoodle
Cardstock: White Daisy
Stamps: Wild about Love
Inks: Cashmere, Saddle, Chocolate, Cotton Candy
Glue: Tombow, 3-D Foam Tape
Tools: Paper Trimmer, Micro-Tip Scissors,  Clear Blocks

Zoology 101

Today’s focus is on the Zoology stamp set from Close to my Heart. It’s a great little set! I had so much fun making this little card with it and the Lollydoodle papers!!

I was completely inspired by Kimberly’s card below. She used a stamp set that is now retired, for her banners, so I just recreated them with the Lollydoodle papers!

It’s a bit different than most of the cards that you will see, in that it opens like this:

And then there is a party inside!

I used masks to be able to stamp the group of animals without overlapping them.

Isn’t this a fun card?? It would be great for so very many things!! Because this set is a Cricut Compatible set, it means that it will always be available! I tell ya, it’s a steal at just $9.95!

Take a look at some cards that some other fabulous ladies have made with this set!


by Sheila Bennett


by Joelle H.


by Sheila Bennett


by Kimberly Thomas


by Aaron Booth

I hope you have enjoyed all of the cards made with the Zoology stamp set today!

I hope you are able to enjoy some crafty time today!

~Michelle

Everything used is CTMH:
Paper Pack: Lollydoodle
Cardstock: White Daisy, Pear
Stamps: Zoology
Inks: Honey, Whisper, Slate, Cotton Candy
Glue: Tombow
Tools: Paper Trimmer, Micro-Tip Scissors,Clear Blocks

Lollydoodle Valentine

This little fox is just too cute to not use for a valentine! So when a friend contacted me to make a valentine for her boyfriend, I knew that I wanted to use this guy!

I made the first card for her

An then figured I would make one more sparkly! So I came up with this one . . .

Believe it or not, they are based off the sketch that is over at Practical Scrappers today! You should go and take a look!

I made a video, and then did a voice over for it, because when I recorded it, it hurt to talk. So, you can hear me all sick sounding . . . sorry about that!!

Now, it was going to be the dryer sheet tutorial, but it was much too muted for my liking (for this particular card). But if you wanted to do the dryer sheet, it’s just one other step. After you add the elmers glue, put a used dryer sheet over top of it, and wrap it around to the back (or trim to the edges). Then add the glitter. Easy Peasy!

Here are a couple more photos of the strip on the cards.

Everything used is CTMH:
Paper Pack: Lollydoodle
Cardstock: White Daisy
Stamps: Wild about Love
Inks: Cashmere
Embellishments: Prisma Glitter {retired}
Glue: Tombow, 3-D Foam Tape
Tools: Paper Trimmer, Micro-Tip Scissors, Artbooking Cricut Cartridge Bundle, Clear Blocks

Lollydoodle Layout

This week, our focus is going to be on the Lollydoodle paper pack from Close to my Heart. This is such a bright and fun paper packet!

Instead of going with a white base for this page, I went with one of the B&T papers from the paper pack. You can see each of the papers in this fun layout!!

These papers are definitely very springy, and fun to use after this snowstorm that we have been having!

I made a fun bunting to hang across the top of this layout. It would be great as is, or the title could even be put on top of the bunting/banner pieces.

I wanted to add a bit more pizazz to the bottom of the page, so I used some bitty sparkles and Aqua Dots to put in some of the circles on the paper.

I used the notebook paper stamp from the Artbooking Cricut Bundle, stamped second generation with Cashmere ink. It just gives some very light lines to be able to put the journaling onto the page.

I was inspired by this page that I found on Pinterest.

Everything used is CTMH:
Paper Pack: Lollydoodle
Cardstock: White Daisy
Inks: Cashmere
Embellishments: Bakers Twine, Bitty Sparkles, Aqua Dots
Glue: Tombow, 3-D Foam Tape
Tools: Paper Trimmer, Micro-Tip Scissors, Artbooking Cricut Cartridge Bundle, Clear Blocks

Balloon Ride Scrapbook WOTG

Are you familiar with Close to my Heart’s Workshop on the Go (WOTG)? These great kits give you all of the product that you need to create two beautiful layouts. Let me show you the Balloon Ride WOTG.

Cardstock, B&T papers, embellishments, a coordinating stamp set, and even specific instructions on how to create the layout, with measurements too! You just need to add glue and ink, and your paper trimmer!

Aren’t they beautiful pages?

Here you can see a snippet of what you will get, including the stamp set.

The great news is, you will have paper left over, so you can make more pages {or cards, or tags, or any number of things!}!

Workshop on the Go Kits are perfect to take to crops or retreats, like the one I am hosting in March! I still have room, I would LOVE to have you come join me! Click HERE for more info!

Snomagedden is still in effect in the Pacific Northwest. Last night, I measured the last time I was out. (I had to pick up my oldest from work, poor ‘Betsy’ {her car} won’t drive in the snow)

So, at about 9:30 last night, we had just under 9 inches. That means that we only got 1.5 inches instead of 2-4. However, the freezing rain was coming in too. You can see in this picture that there is a covering of ice. The freezing rain kept up a bit overnight, and we have a nice covering of everything today! Luckily we kept power overnight, so that was really nice!!

Stay safe, and have some cocoa and crafting!

~Michelle